首先:什么是UITableView?看图
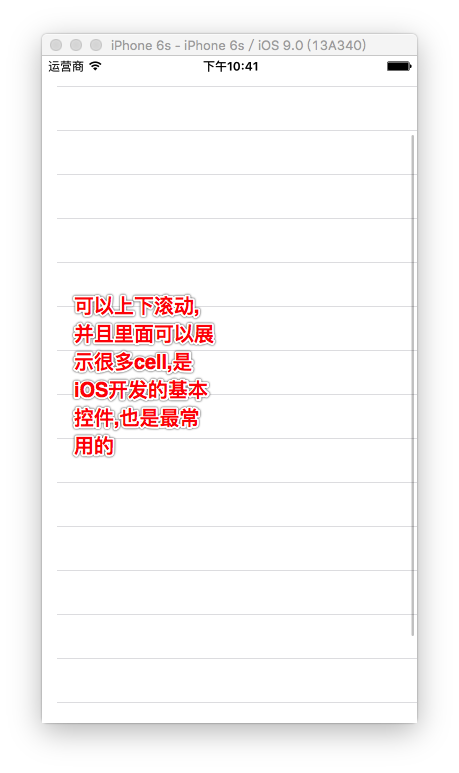
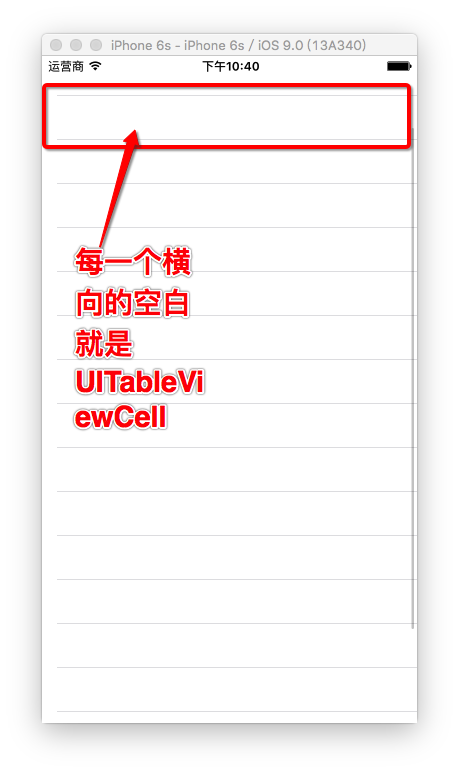
其次:什么是cell?
然后:为什么要自定cell,UITableView不是自带的有cell么?
因为在日常开发中,系统自带的cell满足不了客户和开发人员的需求(并且每个cell中的内容\大小\样式相同),我们就需要自定义cell来实现更加优化的功能.比如下面这种

最后:怎么自定义cell?
1.创建一个新的项目,在storyboard中拖入两个imageView,两个label
2.在ViewController里面创建UITableView
 1 //
 2 //  ViewController.m
 3 //  Xib自定义UITableViewCell
 4 //
 5 //  Created by admin on 16/5/16.
 6 //  Copyright © 2016年 KXZDJ. All rights reserved.
 7 //
 8
 9 #import "ViewController.h"
10
11 @interface ViewController ()<UITableViewDelegate,UITableViewDataSource>
12 @property (nonatomic, strong) UITableView *tableView;
13 @end
14
15 @implementation ViewController
16
17 - (void)viewDidLoad {
18     [super viewDidLoad];
19     // Do any additional setup after loading the view, typically from a nib.
20     [self config];
21 }
22
23 - (void)didReceiveMemoryWarning {
24     [super didReceiveMemoryWarning];
25     // Dispose of any resources that can be recreated.
26 }
27
28
29 -(void)config {
30     //初始化tableView,并给tableView设置frame以及样式
31     self.tableView = [[UITableView alloc] initWithFrame:[UIScreen mainScreen].bounds style:UITableViewStylePlain];
32     //遵守代理和数据源(因为要用到代理和数据源方法)
33     self.tableView.delegate = self;
34     self.tableView.dataSource = self;
35     //添加到ViewController的视图中
36     [self.view addSubview:self.tableView];
37 }
38
39 /**
40  *  返回多少个组(默认是1组,如果只有一组可以不实现这个方法)
41  *
42  *  @param tableView 当前tableView
43  *
44  *  @return 组的个数
45  */
46 -(NSInteger)numberOfSectionsInTableView:(UITableView *)tableView {
47     return 1;
48 }
49 /**
50  *  每一组返回多少行
51  *
52  *  @param tableView 当前tableView
53  *  @param section   当前组
54  *
55  *  @return 行的个数
56  */
57 -(NSInteger)tableView:(UITableView *)tableView numberOfRowsInSection:(NSInteger)section {
58     return 20;
59 }
60
61 -(UITableViewCell *)tableView:(UITableView *)tableView cellForRowAtIndexPath:(NSIndexPath *)indexPath {
62     //指定cell的重用标识符
63     static NSString *reuseIdentifier = @"CELL";
64     //去缓存池找名叫reuseIdentifier的cell
65     UITableViewCell *cell = [tableView dequeueReusableCellWithIdentifier:reuseIdentifier];
66     //如果缓存池中没有,那么创建一个新的cell
67     if (!cell) {
68         cell = [[UITableViewCell alloc] initWithStyle:UITableViewCellStyleDefault reuseIdentifier:reuseIdentifier];
69     }
70     //返回当前cell
71     return cell;
72 }
系统自带的UITableView
运行效果

4.Xib自定义cell
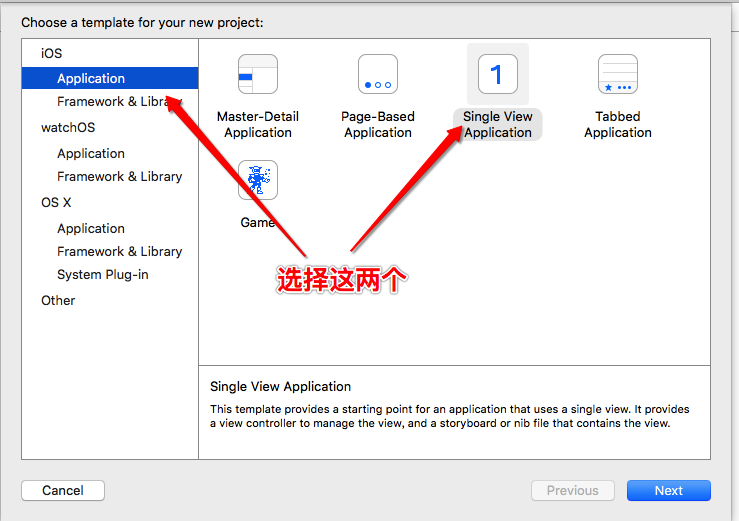
首先我们要创建一个xib文件,有两种创建方式:
直接上图
第一种:
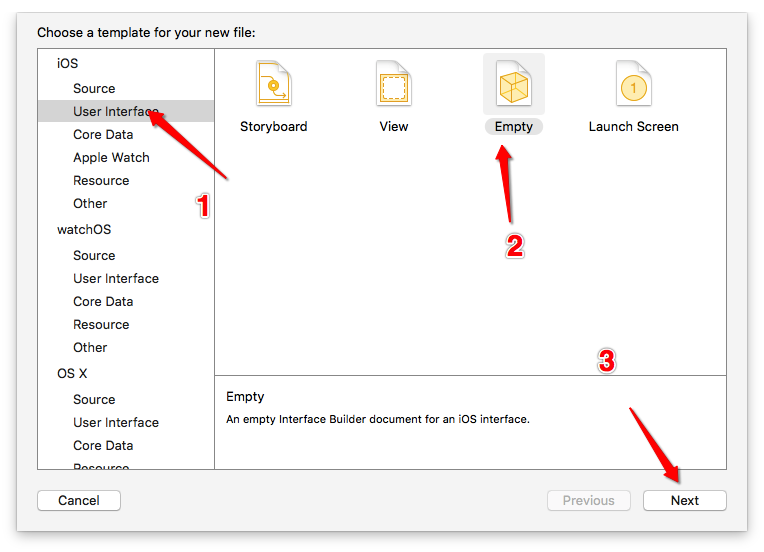
第二种:
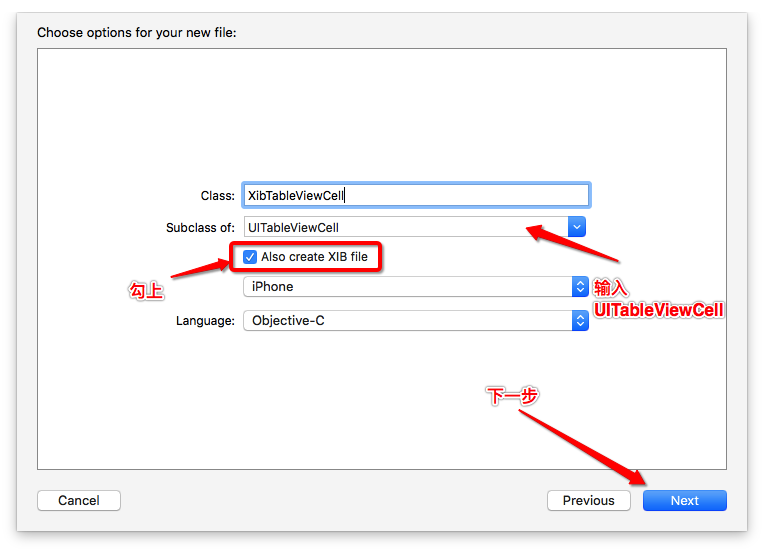

第二种在创建类的时候也同时创建了xib,比较方便,要是用第一种方式创建,还得关联类
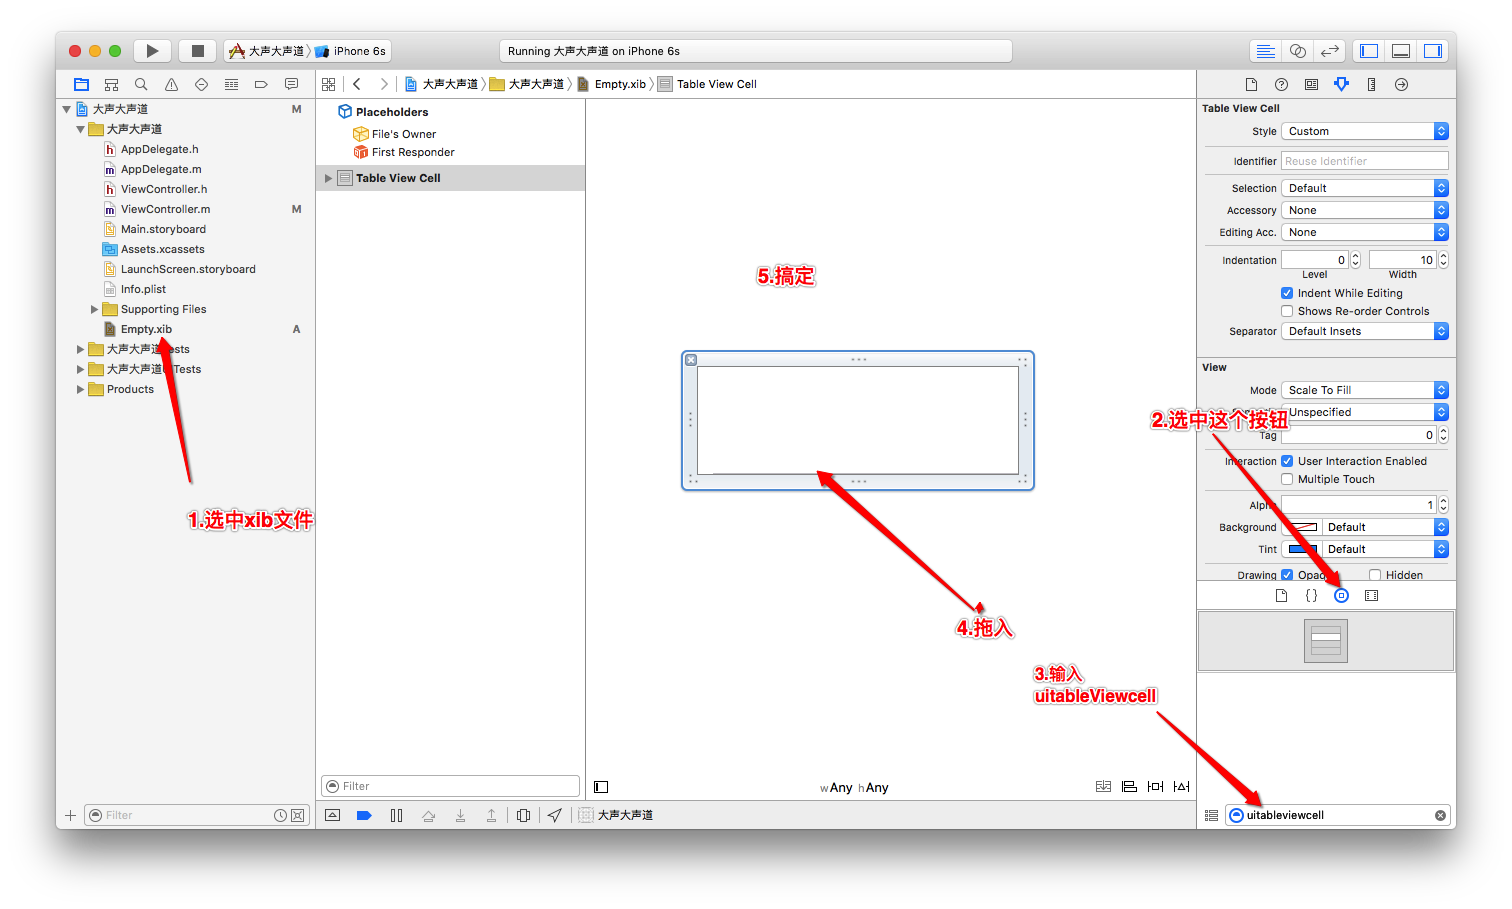
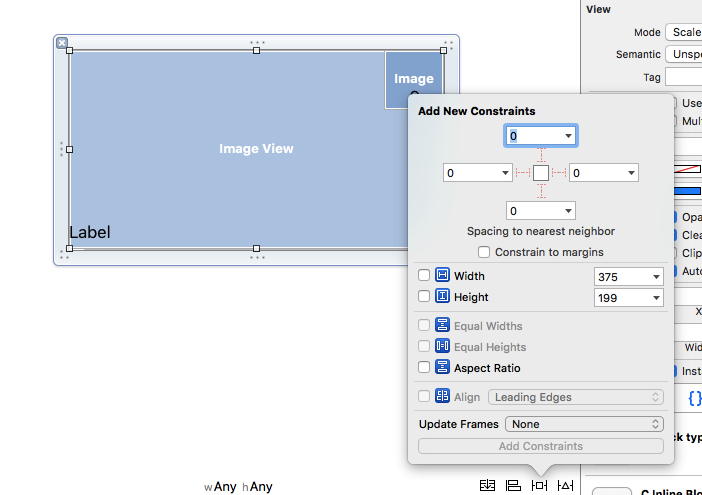
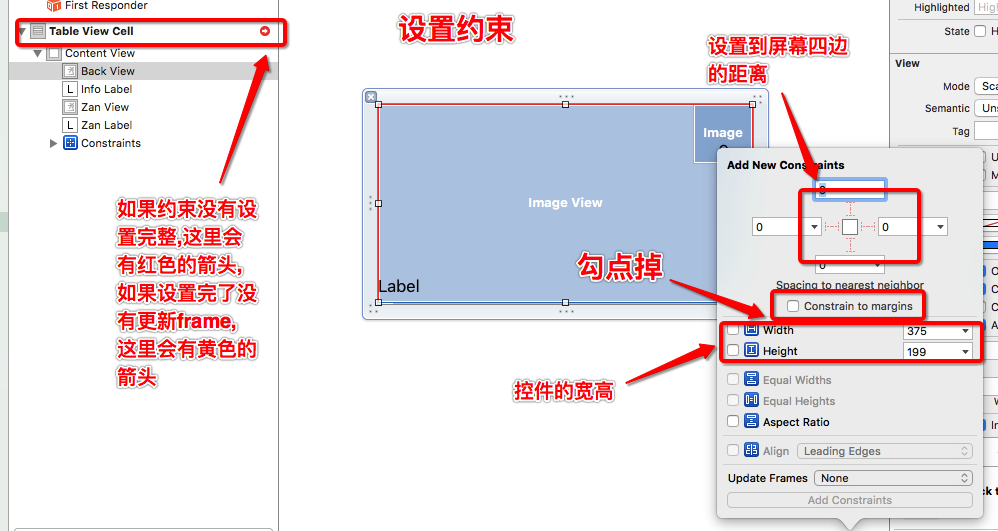
下面就要拖控件到Xib的cell中并给控件设置布局(约束)了
下面进入代码阶段
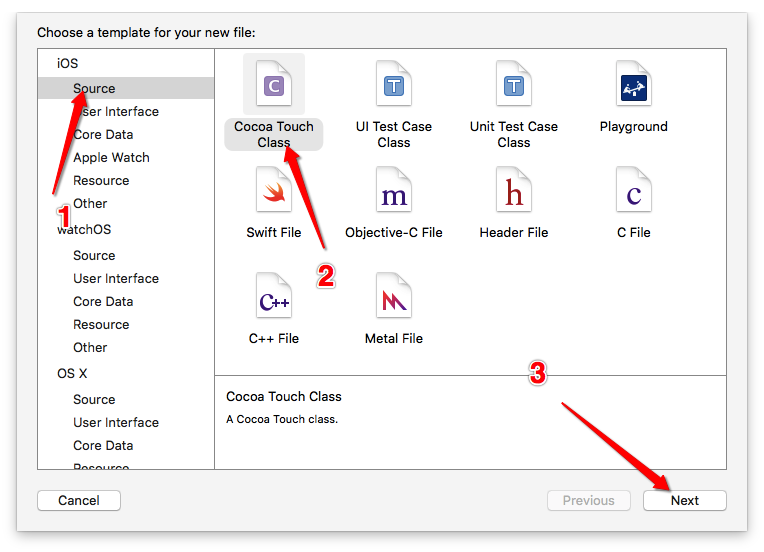
5.获取Xib自定义的cell
代码:(XibTableViewCell.h)
 1 //
 2 //  XibTableViewCell.h
 3 //  Xib自定义UITableViewCell
 4 //
 5 //  Created by admin on 16/5/16.
 6 //  Copyright © 2016年 KXZDJ. All rights reserved.
 7 //
 8
 9 #import <UIKit/UIKit.h>
10
11 @interface XibTableViewCell : UITableViewCell
12 //加载xib的方法(自己写的,不是系统自带)
13 +(instancetype)xibTableViewCell;
14
15 @end
(XibTableViewCell.m)
 1 //
 2 //  XibTableViewCell.m
 3 //  Xib自定义UITableViewCell
 4 //
 5 //  Created by admin on 16/5/16.
 6 //  Copyright © 2016年 KXZDJ. All rights reserved.
 7 //
 8
 9 #import "XibTableViewCell.h"
10
11 @implementation XibTableViewCell
12 //实现类方法
13 +(instancetype)xibTableViewCell {
14     //在类方法中加载xib文件,注意:loadNibNamed:owner:options:这个方法返回的是NSArray,所以在后面加上firstObject或者lastObject或者[0]都可以;因为我们的Xib文件中,只有一个cell
15     return [[[NSBundle mainBundle] loadNibNamed:@"XibTableViewCell" owner:nil options:nil] lastObject];
16 }
17
18 - (void)awakeFromNib {
19     // Initialization code
20 }
21
22 - (void)setSelected:(BOOL)selected animated:(BOOL)animated {
23     [super setSelected:selected animated:animated];
24
25     // Configure the view for the selected state
26 }
27
28 @end
6.把xib文件加载到系统的UITableView中替换系统自带的cell
这一步必须在
-(UITableViewCell *)tableView:(UITableView *)tableView cellForRowAtIndexPath:(NSIndexPath *)indexPath方法中进行,或者是封装在自己定义的类中,不过就算封装了,也要在这个方法中调用.
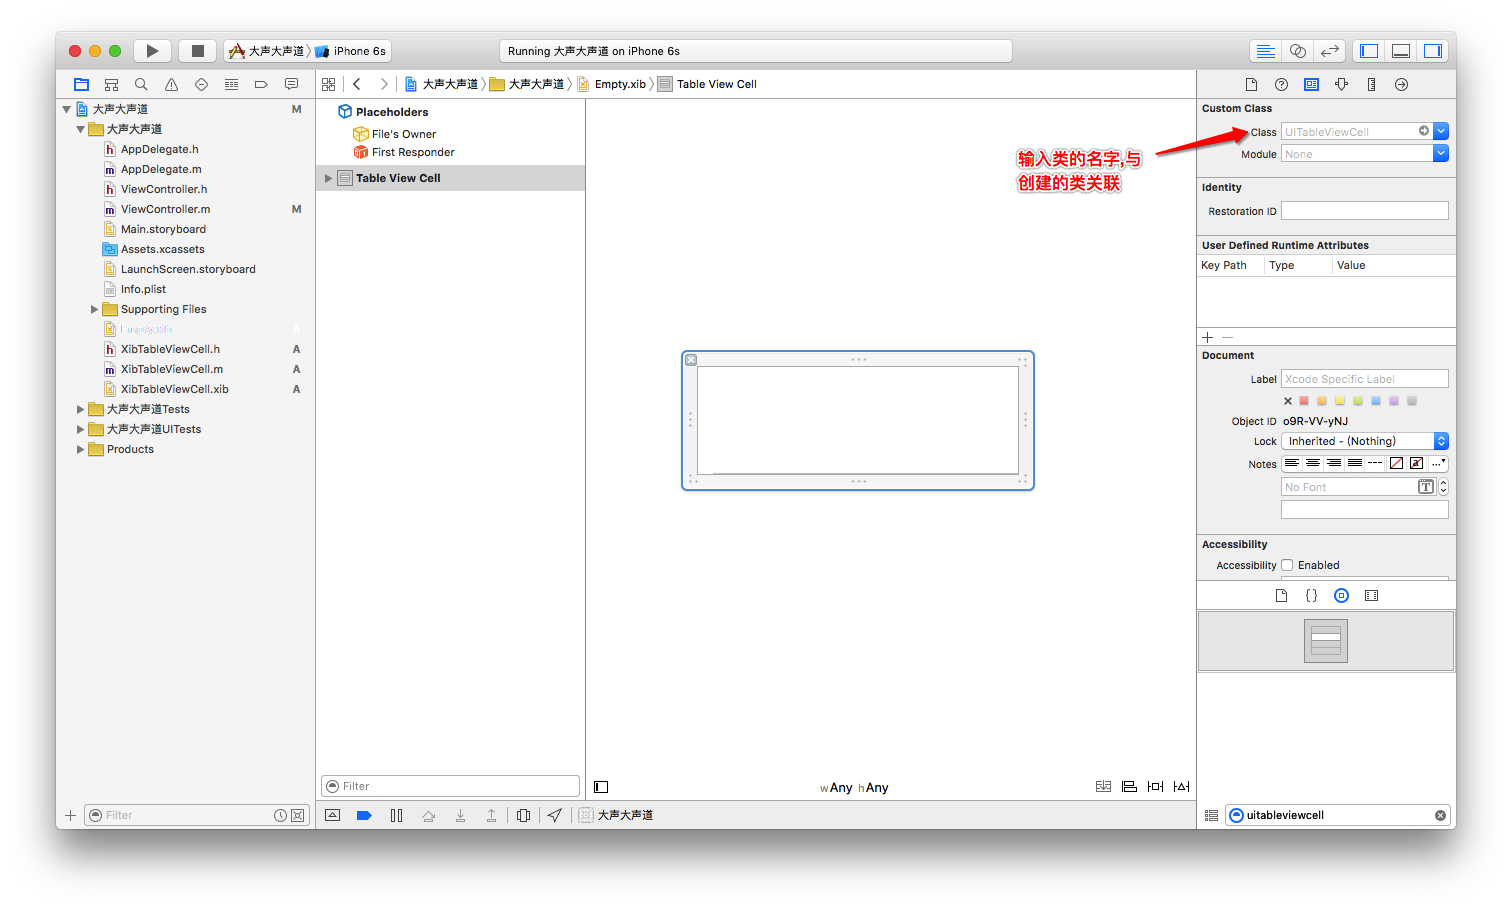
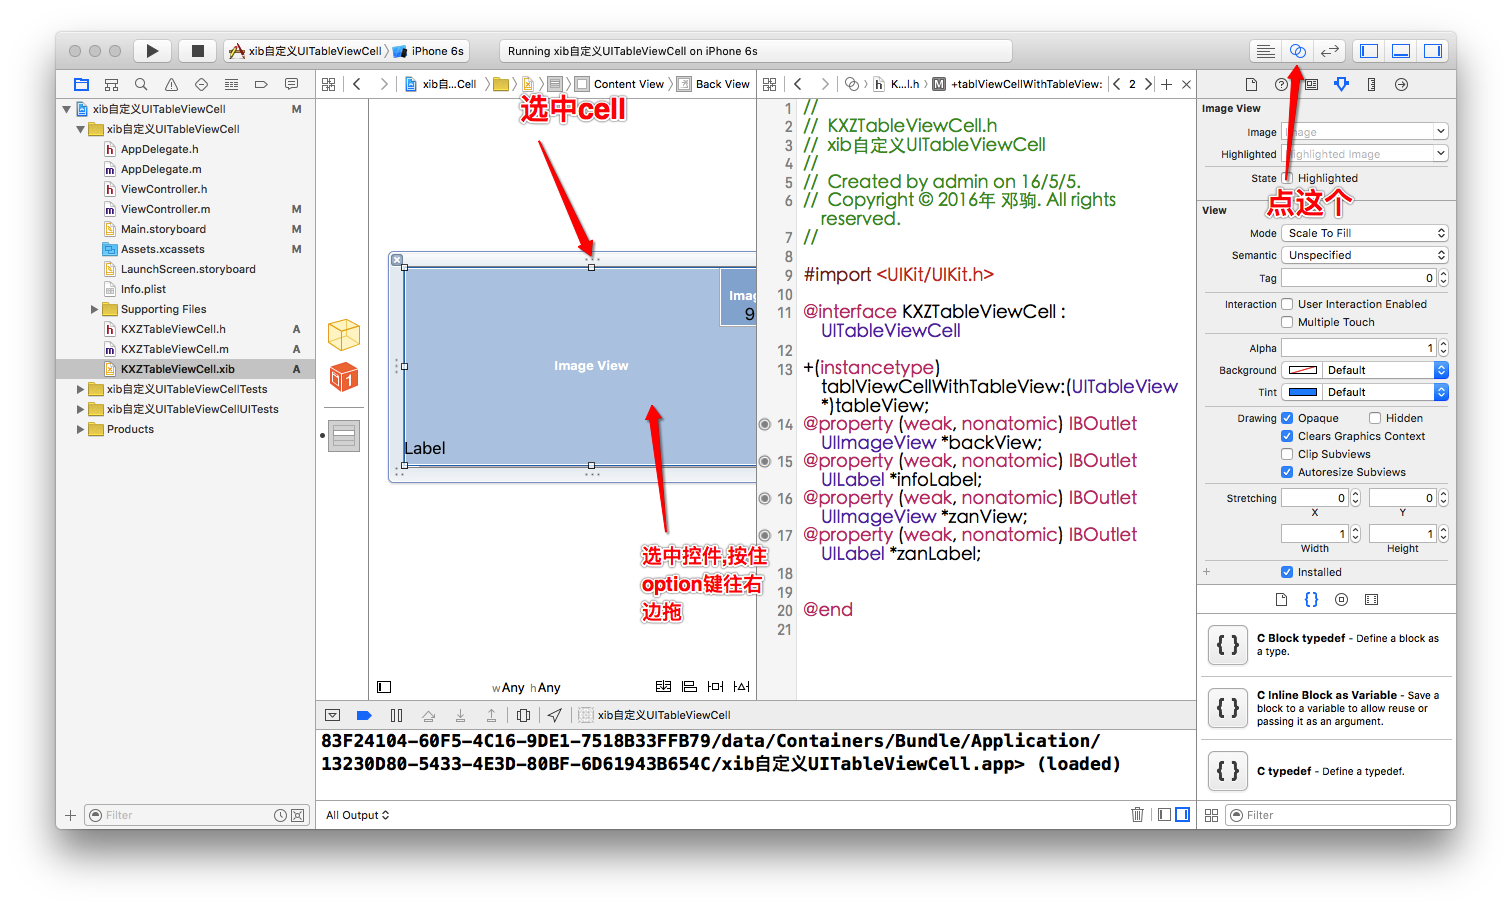
6.1给控件拖线关联到类中,方便调用控件
6.2代码:
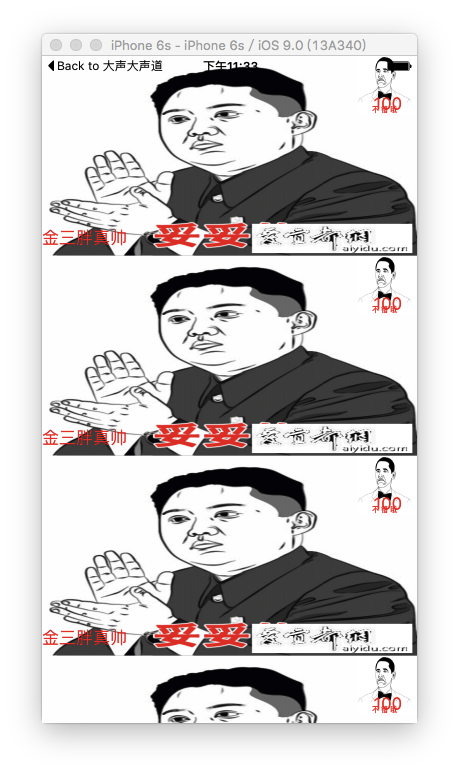
 1 //
 2 //  ViewController.m
 3 //  Xib自定义UITableViewCell
 4 //
 5 //  Created by admin on 16/5/16.
 6 //  Copyright © 2016年 KXZDJ. All rights reserved.
 7 //
 8
 9 #import "ViewController.h"
10 //导入头文件
11 #import "XibTableViewCell.h"
12
13 @interface ViewController ()<UITableViewDelegate,UITableViewDataSource>
14 @property (nonatomic, strong) UITableView *tableView;
15 @end
16
17 @implementation ViewController
18
19 - (void)viewDidLoad {
20     [super viewDidLoad];
21     // Do any additional setup after loading the view, typically from a nib.
22     [self config];
23 }
24
25 - (void)didReceiveMemoryWarning {
26     [super didReceiveMemoryWarning];
27     // Dispose of any resources that can be recreated.
28 }
29
30
31 -(void)config {
32     //初始化tableView,并给tableView设置frame以及样式
33     self.tableView = [[UITableView alloc] initWithFrame:[UIScreen mainScreen].bounds style:UITableViewStylePlain];
34     //遵守代理和数据源(因为要用到代理和数据源方法)
35     self.tableView.delegate = self;
36     self.tableView.dataSource = self;
37     //添加到ViewController的视图中
38     [self.view addSubview:self.tableView];
39 }
40
41 /**
42  *  返回多少个组(默认是1组,如果只有一组可以不实现这个方法)
43  *
44  *  @param tableView 当前tableView
45  *
46  *  @return 组的个数
47  */
48 -(NSInteger)numberOfSectionsInTableView:(UITableView *)tableView {
49     return 1;
50 }
51 /**
52  *  每一组返回多少行
53  *
54  *  @param tableView 当前tableView
55  *  @param section   当前组
56  *
57  *  @return 行的个数
58  */
59 -(NSInteger)tableView:(UITableView *)tableView numberOfRowsInSection:(NSInteger)section {
60     return 20;
61 }
62
63 -(UITableViewCell *)tableView:(UITableView *)tableView cellForRowAtIndexPath:(NSIndexPath *)indexPath {
64     //指定cell的重用标识符
65     static NSString *reuseIdentifier = @"CELL";
66     //去缓存池找名叫reuseIdentifier的cell
67     //这里换成自己定义的cell
68     XibTableViewCell *cell = [tableView dequeueReusableCellWithIdentifier:reuseIdentifier];
69     //如果缓存池中没有,那么创建一个新的cell
70     if (!cell) {
71         //这里换成自己定义的cell,并调用类方法加载xib文件
72         cell = [XibTableViewCell xibTableViewCell];
73     }
74     //给cell赋值
75     cell.backView.image = [UIImage imageNamed:@"223733vuf3mhajhd04hdh5"];
76     cell.infoLabel.text = @"金三胖真帅";
77     cell.infoLabel.textColor = [UIColor redColor];
78     cell.zanView.image = [UIImage imageNamed:@"103112778vn00czp59p6w7"];
79     cell.zanLabel.text = @"100";
80     cell.zanLabel.textColor = [UIColor redColor];
81     //返回当前cell
82     return cell;
83 }
84 /**
85  *  返回cell的行高
86  *
87  *  @param tableView 当前tableView
88  *  @param indexPath
89  *
90  *  @return cell的行高
91  */
92 -(CGFloat)tableView:(UITableView *)tableView heightForRowAtIndexPath:(NSIndexPath *)indexPath {
93     return 200;
94 }
95
96 @end
运行效果