上篇主要介绍了UIView的几个主要属性,分别为frame,bounds,center,transform,本篇通过一个简单的实例来验证这几个属性的功能.
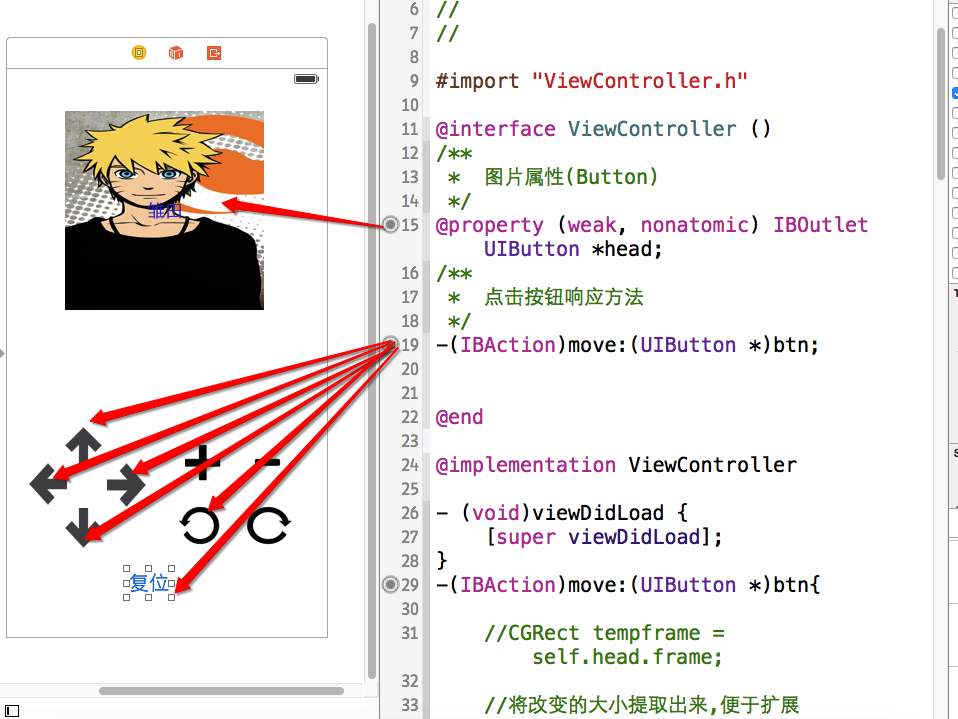
软件界面如下:

主要功能:通过界面上的上下左右按钮来移动上面的图片,通过+-来放到缩小图片,下面两个旋转按钮实现了旋转的功能(transform的应用);复位按钮实现了还原的功能(transform的功能)
界面上显示图片的是一个Button,通过点击图片,会更换图片.
首先附上源代码:
 1 //
 2 //  ViewController.m
 3 //  03-常见属性
 4 //
 5 //  Created by hukezhu on 15/5/9.
 6 //
 7 //
 8
 9 #import "ViewController.h"
10
11 @interface ViewController ()
12 /**
13  *  图片属性(Button)
14  */
15 @property (weak, nonatomic) IBOutlet UIButton *head;
16 /**
17  *  点击按钮响应方法
18  */
19 -(IBAction)move:(UIButton *)btn;
20
21
22 @end
23
24 @implementation ViewController
25
26 - (void)viewDidLoad {
27     [super viewDidLoad];
28 }
29 -(IBAction)move:(UIButton *)btn{
30
31     //CGRect tempframe = self.head.frame;
32
33     //将改变的大小提取出来,便于扩展
34     CGFloat margin = 80;
35     //动画的开始
36     [UIView beginAnimations:nil context:nil];
37     //设置动画持续时间
38     [UIView setAnimationDuration:2.0];
39         //根据tag值来获取是哪个按钮点击了
40         switch (btn.tag) {
41             case 1:
42                 //tempframe.origin.y -= margin;
43                 //向上移动
44                 self.head.transform = CGAffineTransformTranslate(self.head.transform, 0, -margin);
45                 break;
46
47             case 2:
48                 //tempframe.origin.y += margin;
49                 //向下移动
50                 self.head.transform = CGAffineTransformTranslate(self.head.transform, 0, margin);
51                 break;
52             case 3:
53                 //tempframe.origin.x -= margin;
54                 //向左移动
55                 self.head.transform = CGAffineTransformTranslate(self.head.transform, -margin, 0);
56                 break;
57             case 4:
58                 //tempframe.origin.x += margin;
59                 //向右移动
60                 self.head.transform = CGAffineTransformTranslate(self.head.transform, margin, 0);
61                 break;
62             case 5:
63                // tempframe.size.height += margin;
64                // tempframe.size.width += margin;
65                 //放大
66                 self.head.transform = CGAffineTransformScale(self.head.transform, 1.5, 1.5);
67                 break;
68             case 6:
69                 //tempframe.size.height -= margin;
70                 //tempframe.size.width -= margin;
71                 //缩小
72                 self.head.transform = CGAffineTransformScale(self.head.transform, 0.8, 0.8);
73                 break;
74             case 7:
75                 //向左旋转(逆时针旋转)
76                 self.head.transform = CGAffineTransformRotate(self.head.transform, -M_PI_4);
77                 break;
78             case 8:
79                 //向右旋转(顺时针旋转)
80                 self.head.transform = CGAffineTransformRotate(self.head.transform, M_PI_4);
81                 break;
82             case 9:
83                 //复位功能
84                 self.head.transform =CGAffineTransformIdentity;
85                 break;
86         }
87     //self.head.frame = tempframe;
88
89     //提交动画(动画结束)
90     [UIView commitAnimations];
91 }
92
93 @end
上面这段代码是使用了transform属性实现了最初预想的功能.
上面放置的源码已经实现了预想的功能,下面分析一下其中的细节部分.
实现上下左右移动,就是利用空间的位置,通过修改x/y值来进行移动,这里仍用上面这个小程序的代码来进行演示:
self.head.frame.origin.y -=10;//这句话会报错(错误:Expression is not assignable),因为这个属性不允许直接修改.
所以这里有一个结论:不能直接访问对象的结构体属性的成员变量
但是可以访问对象的结构体属性,将这个结构体属性取出来,再进行修改
1 1>取出对象的结构体属性值frame,然后复值给临时变量
2  CGRect tempFrame = self.head.frame;
3 2>修改临时变量的值
4  tempFrame.origin.y -= 10;
5 3>用临时变量覆盖原来的frame
6  self.head.frame = tempFrame;
所以通过frame属性实现上述功能的代码如下:
-(IBAction)up{

    //self.head.frame.origin.y -=10;
    CGRect tempFrame = self.head.frame;
    tempFrame.origin.y -= 10;
    self.head.frame = tempFrame;
}
-(IBAction)down{

    CGRect tempFrame = self.head.frame;
    tempFrame.origin.y += 10;
    self.head.frame = tempFrame;
}
-(IBAction)left{

    CGRect tempFrame = self.head.frame;
    tempFrame.origin.x -= 10;
    self.head.frame = tempFrame;
}
-(IBAction)right{

    CGRect tempFrame = self.head.frame;
    tempFrame.origin.x += 10;
    self.head.frame = tempFrame;
}
观察上面代码,有太多的重复的代码,所以可以将这些重复的代码提取出来,封装成另外一个方法:
 1 -(IBAction)move:(UIButton *)btn{
 2
 3     //开始动画
 4     [UIView beginAnimations:nil context:nil];
 5
 6     //动画持续2秒
 7     [UIView setAnimationDuration:2.0];
 8
 9
10     //取出原来的属性
11     CGRect tempFrame = self.head.frame;
12
13     CGFloat delta = 100;
14     switch (btn.tag) {
15         case 1:
16             tempFrame.origin.y -= delta;
17             break;
18         case 2:
19             tempFrame.origin.y += delta;
20             break;
21         case 3:
22             tempFrame.origin.x -= delta;
23             break;
24         case 4:
25             tempFrame.origin.x += delta;
26             break;
27     }
28     self.head.frame = tempFrame;
29
30
31     //提交动画
32     [UIView commitAnimations];
33 }
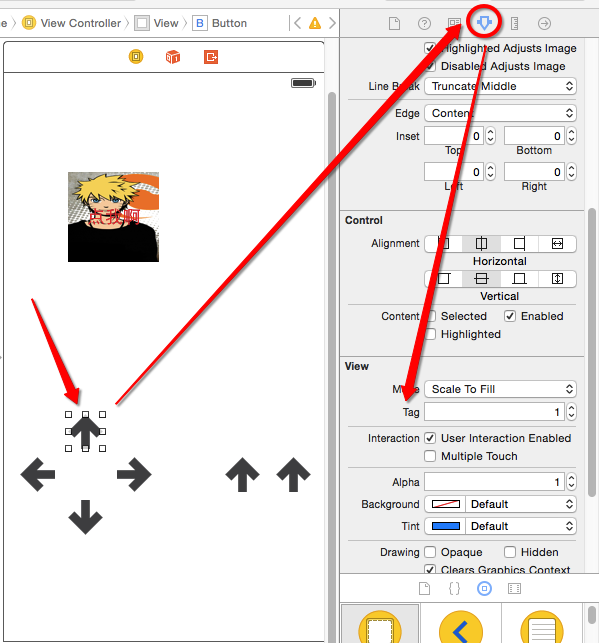
这段代码使用了tag属性,每个控件都有一个tag值,默认为0(当然这个tag值是允许重复的,不是唯一的)在开发过程中,每个视图一般都有多个子视图,我们给每个子视图设置不同的tag值,可以通过这个tag值来获取到这个视图,方法为:Viewwithtag:
控件中点的位置(以父控件的左上角为坐标原点),通过修改center 的值也可以实现上下左右移动
 1 - (void)move:(UIButton *)btn{
 2
 3 //         0.开启动画
 4     [UIView beginAnimations:nil context:nil];
 5 //         0.1设置动画的时间
 6     [UIView setAnimationDuration:1.5];
 7     //     1.取出对象的结构体属性center,赋值给临时的变量
 8     CGFloat delat = 100;
 9     CGPoint tempCenter = self.head.center;
10     switch (btn.tag) {
11         case 10:
12             tempCenter.y -= delat;
13             break;
14         case 20:
15             tempCenter.y += delat;
16             break;
17         case 30:
18             tempCenter.x -= delat;
19             break;
20         case 40:
21             tempCenter.x += delat;
22             break;
23
24     }
25     //    3.用临时变量的值覆盖原来的值
26     self.head.center = tempCenter;
27 //        4.提交动画
28     [UIView commitAnimations];
29
30 }
这个属性在本篇一开始就已经说过了,最上面的代码实现就是使用transform实现的
放大和缩小也就是修改控件的尺寸,上篇也介绍过了,修改尺寸,可以使用frame\bounds\transform,其中transform属性已经在本篇一开始就使用了,下面说一下frame和bounds属性
 1 -(IBAction)big{
 2
 3     [UIView beginAnimations:nil context:nil];
 4     [UIView setAnimationDuration:2.0];
 5     CGRect tempFrame = self.head.frame;
 6     tempFrame.size.height += 10;
 7     tempFrame.size.width += 10;
 8     self.head.frame = tempFrame;
 9     [UIView commitAnimations];
10 }
11
12 -(IBAction)small{
13
14     CGRect tempFrame = self.head.frame;
15     tempFrame.size.height -= 10;
16     tempFrame.size.width -= 10;
17     self.head.frame = tempFrame;
18
19 }
 1 - (void)big{
 2     //         0.开启动画
 3     [UIView beginAnimations:nil context:nil];
 4     //         0.1设置动画的时间
 5     [UIView setAnimationDuration:1.5];
 6     //     1.取出对象的结构体属性bounds,赋值给临时的变量
 7     CGRect tempBounds = self.head.bounds;
 8     //     2.修改临时变量的值
 9     //    tempFrame.origin.y = tempFrame.origin.y - 10;
10     tempBounds.size.width += 10;
11     tempBounds.size.height += 10;
12     //    3.用临时变量的值覆盖原来的值
13     self.head.bounds = tempBounds;
14 //        4.提交动画
15     [UIView commitAnimations];
16
17
18
19 }
20 - (void)small{
21 //         0.开启动画
22     [UIView beginAnimations:nil context:nil];
23 //         0.1设置动画的时间
24     [UIView setAnimationDuration:1.5];
25     //     1.取出对象的结构体属性bounds,赋值给临时的变量
26     CGRect tempBounds = self.head.bounds;
27     //     2.修改临时变量的值
28     //    tempFrame.origin.y = tempFrame.origin.y - 10;
29     tempBounds.size.width -= 10;
30     tempBounds.size.height -= 10;
31     //    3.用临时变量的值覆盖原来的值
32     self.head.frame = tempBounds;
33     [UIView commitAnimations];
34
35
36 }
这个目前只能使用transform属性来实现,见本篇最开始的代码.
transform属性注意点
1 *transform 是一种状态,并且只有一种状态
2 * 向上移动
3 (1)CGAffineTransformMakeTranslation(<#CGFloat tx#>, <#CGFloat ty#>):只能变化一次,因为这种方式的变化始终是以最原始的状态值进行变化的,所以只能变化一次
4
5 (2)CGAffineTransformTranslate(CGAffineTransform t, <#CGFloat tx#>, <#CGFloat ty#>):能够多次变化,每次变化都是以上一次的状态(CGAffineTransform t)进行的变化,所以可以多次变化
所以我们一般使用的是CGAffineTransformTranslate这个方法,如果使用CGAffineTransformMakeTranslation这个方法,则只能变化一次
附:storyboar拖线;