UITableView的样式有两种,一种是Grouped(左图),另一种是Plain(右图),如下图,它的属性是style,类型为UITableViewStyle,枚举值分别是UITableViewStyleGrouped和UITableViewStylePlain;

用这个控件的ViewController可以使用UITableViewController,使用了这个ViewController可以不需要另外创建UITableView,里面也包含了UITableViewDataSource和UITableViewDelegate这两个实现,这两个类稍后讨论,但是也有不方便的地方,默认情况下使用UITableViewController创建的tableView是充满全屏的,如果需要用到tableView是不充满全屏的话,我们应该使用UIViewController。
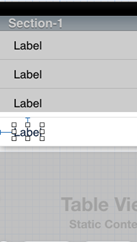
UITableView的数据可以通过静态绑定和动态绑定,控件默认是动态绑定的,在StoryBoard里面设置Content属性,它有两个值Static Cell和Dynamic,顾名思义了。如果设置了Static Cell,点击Section的标题则可以控制UITableView的行数,添加了行数则可以。若要往行里添加内容可以直接把控件拖入单元格里面。
如果要动态的往UITableView添加内容,则需要实现UITableViewDataSource和UITableViewDelegate的几个方法。其实这两个方法的共同作用有点类似于Andriod中的各种Adapter,Android中的Adapter是指定了列表中各个元素的布局,列表的数据源,而这两个协议要实现的方法是传递数据源的情况还有各个数据单元格的定义情况。
//返回分组的数量

-(NSInteger)numberOfSectionsInTableView:(UITableView *)tableView

{
}
//每个分组里面行数
-(NSInteger) tableView:(UITableView *)tableView numberOfRowsInSection:(NSInteger)section

{
}
//定义单元格的内容,并返回。
-(UITableViewCell*)tableView:(UITableView *)tableView cellForRowAtIndexPath:(NSIndexPath *)indexPath
{
}
如果使用了UITableViewController,则可以直接去实现这几个方法,假如用的是UIViewController,则在类声明的地方显式实现UITableViewDataSource和UITableViewDelegate。
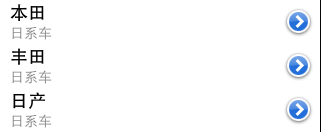
UITableView的每个单元格对象都是UITableViewCell类型的。在上面最后的一个方法里面构造并返回,单元格的布局类型有几种,它是UITableViewCellStyle类型的枚举,一般在初始化函数中设置它的类型。
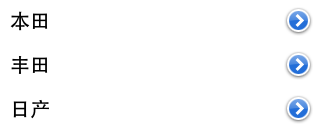
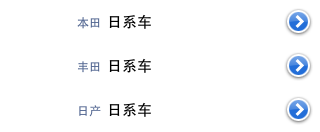
每个单元格的布局都是分左中右三块,最左边是图标,最右边是附件视图,附件一般是箭头,它通过UITableViewCellAccessoryType类型的属性accessoryType,它的值有以下几个


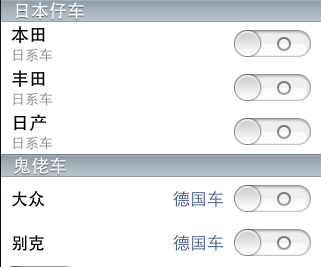
官方文档上是上面五个值,但是我的环境是iOS6的,只有截图的那几个值(None除外)。附件区域也可以自己添加控件,如下面这样的形式可以在每一行中添加了一个开关控件
cell.accessoryView= [[UISwitch alloc]init];
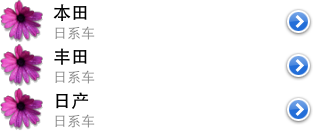
UITableViewCell提供了imageView来设置每一个单元格的图标它是一个UIImageView类型的属性,可以直接通过设置它的image属性来给每一行添加一个图标如
cell.imageView.image=[UIImage imageNamed:@"African Daisy.gif"];
假如这些控件还是太少的话,还可以通过Cell的contentCell的addSubview方法来添加控件到单元格里面,如下所示。
[cell.contentView addSubview:label];
但是要控制好添加到Cell里面控件的数量,因为如果控件数量多于3、4个的话,会比较影响效率,在列表滚动的时候会出现卡顿了。
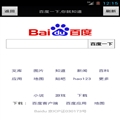
在UITableView的表头表尾,分组头分组尾都可以添加视图,如果添加表头表尾的视图的话可以通过设置UITableVIew的tableHeaderView和tableFoorterView两个属性,如下所示
self.tableView.tableHeaderView=[[UIImageView alloc]initWithImage:[UIImage imageNamed:@"bd_logo1.png"] highlightedImage:nil];

self.tableView.tableFooterView=[[UISwitch alloc]init];
那添加分组头和分组尾时就可以通过实现下面两个方法
-(NSString *) tableView:(UITableView *)tableView titleForFooterInSection:(NSInteger)section
{
}

-(NSString *) tableView:(UITableView *)tableView titleForHeaderInSection:(NSInteger)section
{
}
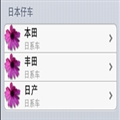
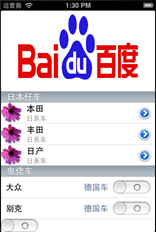
之前说了那么多,现在给个简单的例子来说明动态绑定的步骤
这里用到的数据源是自己填充上去的,
@property(nonatomic,strong) NSArray *carGroups;

-(NSArray*)carGroups

{

if(_carGroups==nil)

{

// 1.创建模型

HGTableviewModel *cg1 =[[HGTableviewModel alloc]init];

cg1.group=@"日本仔车";

cg1.desc=@"日系车";

cg1.cars=@[@"本田",@"丰田",@"日产"];


HGTableviewModel *cg2 = [[HGTableviewModel alloc] init];

cg2.group=@"鬼佬车";

cg2.desc=@"德国车";

cg2.cars=@[@"大众",@"别克",];


// 2.将模型添加到数组中

_carGroups = @[cg1, cg2];

}

return _carGroups;

}
在viewDidLoad方法中给tableView指定数据源
self.tableView.dataSource=self;
在这个方法里面可以对tableView做其他设置,这里不一一例举了,最后就实现之前获取分组数量,每个分组的列数,构造单元格的三个方法
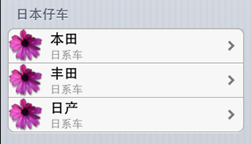
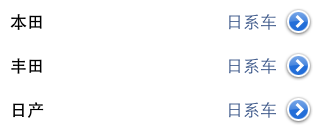
-(NSInteger)numberOfSectionsInTableView:(UITableView *)tableView

{

return self.carGroups.count;

}

-(NSInteger) tableView:(UITableView *)tableView numberOfRowsInSection:(NSInteger)section

{

HGTableviewModel *item= self.carGroups[section];

return item.cars.count;

}

-(UITableViewCell*)tableView:(UITableView *)tableView cellForRowAtIndexPath:(NSIndexPath *)indexPath

{

UITableViewCell *cell=nil;

if(indexPath.section==0)

cell=[[UITableViewCell alloc] initWithStyle:UITableViewCellStyleSubtitle reuseIdentifier:nil];

else

cell=[[UITableViewCell alloc] initWithStyle:UITableViewCellStyleValue1 reuseIdentifier:nil];


HGTableviewModel *item=self.carGroups[indexPath.section];

cell.textLabel.text= item.cars[indexPath.row];

cell.accessoryType= UITableViewCellAccessoryDetailDisclosureButton;

cell.detailTextLabel.text=item.desc;

if(indexPath.section==0)

cell.imageView.image=[UIImage imageNamed:@"African Daisy.gif"];

else

cell.accessoryView= [[UISwitch alloc]init];//[UIButton buttonWithType:UIButtonTypeContactAdd];

return cell;

}
如果要给选中单元格这个事件绑定方法,只需要实现下面这个方法则可,如下面代码所示,选中了某行后弹出一个框说明当前选中了是哪个品牌
-(void)tableView:(UITableView *)tableView didSelectRowAtIndexPath:(NSIndexPath *)indexPath

{

NSString *msg=[[NSString alloc]initWithFormat:@"你选中了 %@", ((HGTableviewModel*)self.carGroups[indexPath.section]).cars[indexPath.row]];

UIAlertView *alert=[[UIAlertView alloc]initWithTitle:@"选中行" message:msg delegate:self cancelButtonTitle:nil otherButtonTitles:@"确定", nil];


[alert show];

}
UIDatePickerView是一个日期时间选取的空间,它是以一个滚轮的形式呈现出来,可以通过设置它的当前显示时间,最大最小时间范围,这些值都是NSDate类型的,
NSDateFormatter *formatter=[[NSDateFormatter alloc]init];

[formatter setDateFormat:@"yyyy-MM-dd HH:mm:ss"];

self.dtpDateTime.minimumDate= [formatter dateFromString:@"2011-01-01 00:00:00"];

self.dtpDateTime.maximumDate=[formatter dateFromString:@"2015-01-01 00:00:00"];

self.dtpDateTime.date=[formatter dateFromString:@"2015-03-01 00:00:00"];
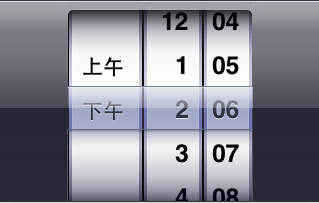
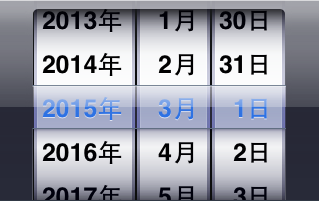
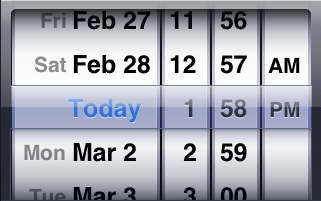
它有一个datePickerMode属性来设置DatePicker的显示类型,它是一个UIDatePickerMode类型的枚举,分别有下面这些值
效果图按顺序如下图所示

UIDatePicker有个ValueChange事件,是在控件的Value发生改变之后触发的,需要绑定事件,通过StoryBoard或者使用addTargetWithActionForControlEvents方法,下面则是改变了值之后输出当前的日期
- (IBAction)dtpValueChanged:(id)sender {

NSLog(@"当前日期是 %@",self.dtpDateTime.date);

}
UIPickerView是把数据列表以滚轮的形式呈现给用户,与UITableVIew类似,它的数据绑定需要实现UIPickerViewDataSource和UIPickerViewDelegate两个协议,但是这个UIPickerView却不支持静态绑定数据。绑定数据主要是实现两个协议的下面这些方法
//返回显示的列数
-(NSInteger)numberOfComponentsInPickerView:(UIPickerView *)pickerView
{
}

//返回当前列显示的行数
-(NSInteger)pickerView:(UIPickerView *)pickerView numberOfRowsInComponent:(NSInteger)component
{
}
//下面的方法是PickerDelegate协议的方法,可以二选一,主要是返回每一项显示的内容
- (NSString *)pickerView:(UIPickerView *)pickerView titleForRow:(NSInteger)row forComponent:(NSInteger)component
{
}

- (UIView *)pickerView:(UIPickerView *)pickerView viewForRow:(NSInteger)row forComponent:(NSInteger)component reusingView:(UIView *)view
{
}
加入滚轮中只是一些单纯的文本信息则可以使用返回String的那个方法,如果是每一项都是一些文本以外的内容,则需要使用返回UIView的那个方法,既然是返回View则说明可以返回任何的控件,包括自定义的也可以。
假如要在UIPickerView被选中后触发事件执行方法,则实现下面的方法则可
-(void)pickerView:(UIPickerView *)pickerView didSelectRow:(NSInteger)row inComponent:(NSInteger)component

{

NSLog([[NSString alloc]initWithFormat:@"SELECT Item %@ " ,[pickerDs objectAtIndex:row] ] );

}
下面则给出一个例子完整说明给一个UIPicker绑定数据的过程,里面的数据抄袭了某位网友的博文,莫怪。
首先是要实现两个协议
@interface HGDatePickerViewController : UIViewController<UIPickerViewDataSource,UIPickerViewDelegate >

@end
通过StoryBoard建立了关联的变量picker和定义数据源一个NSArray的变量,然后在viewDidLoad里面添加下面这些代码,其中设置deletage的最为关键
pickerDs=[[NSArray alloc]initWithObjects:@"许嵩",@"周杰伦",@"梁静茹",@"许飞",@"凤凰传奇",@"阿杜",@"方大同",@"林俊杰",@"胡夏",@"邱永传", nil];

self.picker.delegate=self;
然后实现之前提到的方法,在这里把两个UIPickerViewDelegate的方法列举出来了,返回View的那种是返回一个UILabel,它们的效果图分别列举
-(NSInteger)numberOfComponentsInPickerView:(UIPickerView *)pickerView
{
return 1;
}

-(NSInteger)pickerView:(UIPickerView *)pickerView numberOfRowsInComponent:(NSInteger)component
{
return [pickerDs count];
}

- (NSString *)pickerView:(UIPickerView *)pickerView titleForRow:(NSInteger)row forComponent:(NSInteger)component
{
return [pickerDs objectAtIndex:row];
}

- (UIView *)pickerView:(UIPickerView *)pickerView viewForRow:(NSInteger)row forComponent:(NSInteger)component reusingView:(UIView *)view
{
UILabel *myView = nil;

myView = [[UILabel alloc] initWithFrame:CGRectMake(0.0, 0.0, 180, 30)];
myView.text = [pickerDs objectAtIndex:row];
myView.textAlignment = UITextAlignmentCenter;
myView.font = [UIFont systemFontOfSize:14];
myView.backgroundColor = [UIColor clearColor];
return myView;

}
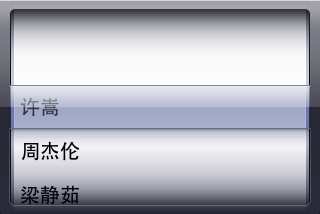
- (NSString *)pickerView:(UIPickerView *)pickerView titleForRow:(NSInteger)row forComponent:(NSInteger)component实现的效果
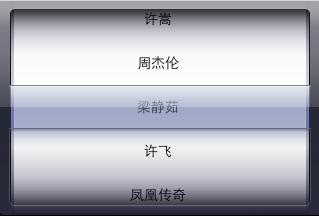
- (UIView *)pickerView:(UIPickerView *)pickerView viewForRow:(NSInteger)row forComponent:(NSInteger)component reusingView:(UIView *)view实现的效果
其实UIPicker可以实现像以前在BS或CS开发中的下拉菜单多级联动效果的,这里都不详细列举了,主要是通过-(void)pickerView:(UIPickerView *)pickerView didSelectRow:(NSInteger)row inComponent:(NSInteger)component方法根据当前级别的数据来调用[self.picker reloadComponent:xxx];方法来出发下一级别的值重新载入。
UIActionSheet这个控件是在之前看UIDatePicker时别人用了而发现的,感觉也比较有用所以也记录下来,本人没有iOS的设备,故有哪些控件都不太了解,之前在一个界面原型图中见过这个控件,但不知道它是ActionSheet。这个ActionSheet个人感觉和AlertView很像。也能给界面弹出按钮选择框,同时具备遮罩的效果。
使用这个UIActionSheet需要实现UIActionSheetDelegate协议,构造和初始化ActionSheet的代码如下
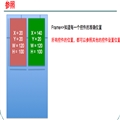
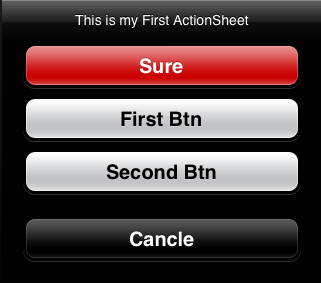
UIActionSheet *as=[[UIActionSheet alloc]initWithTitle:@"This is my First ActionSheet" delegate:self

cancelButtonTitle:@"Cancle" destructiveButtonTitle:@"Sure" otherButtonTitles:@"First Btn",@"Second Btn", nil];
在上述参数中有两个比较特殊的按钮,cancelButton和destructiveButton,在ActionSheet中按钮也是有一定序列的,如AlertView那样,所有按钮都是有一定顺序的,按默认的情况下,destructiveButton是排在第一,是一个红色的按钮,接着是到ortherButton,它们的顺序由添加进去的顺序而定,最后的是cancelButton,是一个黑色的按钮。在上面的初始化函数中如果那个按钮不需要的话则可以传入nil则可。上面的ActionSheet显示的效果如下图
添加OtherButton也可以调用下面方法来添加
[as addButtonWithTitle:@"addButton"];
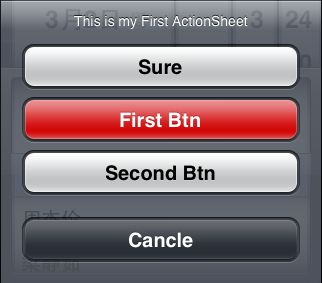
destructiveButton也可以更替由其他按钮来充当,通过下面这个属性的设置则可
as.destructiveButtonIndex=1;
效果如下图
显示ActionSheet则调用下面的方法
[as showInView:self.view];
在开发过程中,发现有时候UIActionSheet的最后一项点击失效,点最后一项的上半区域时有效,这是在特定情况下才会发生,这个场景就是试用了UITabBar的时候才有。解决办法:
在showView时这样使用,[actionSheet showInView:[UIApplication sharedApplication].keyWindow];或者[sheet showInView:[AppDelegate sharedDelegate].tabBarController.view];这样就不会发生遮挡现象了。
ActionSheet的actionSheetStyle属性是设置ActionSheet的样式,它是一个UIActionSheetStyle类型的枚举,它是值有下面三种
与UIAlertView类似,UIActionSheet也是有一组方法在ActionSheet里面出现,点击,消失各个时候触发调用的
-(void)actionSheet:(UIActionSheet *)actionSheet clickedButtonAtIndex:(NSInteger)buttonIndex

{

}


-(void)willPresentActionSheet:(UIActionSheet *)actionSheet

{

}

-(void)didPresentActionSheet:(UIActionSheet *)actionSheet

{

}

-(void)actionSheetCancel:(UIActionSheet *)actionSheet{


}

-(void)actionSheet:(UIActionSheet *)actionSheet didDismissWithButtonIndex:(NSInteger)buttonIndex{

}

-(void)actionSheet:(UIActionSheet *)actionSheet willDismissWithButtonIndex:(NSInteger)buttonIndex{

}
到这里遇到了在UIAlert中一样知什么时候会触发的actionSheetCancel方法,这些方法的触发顺序如下(actionSheetCancel是按照UIAlertView中的顺序推断出来的)
willPresentActionSheet——>didPresentActionSheet
点击了按钮之后
actionSheetclickedButtonAtIndex——>willDismissWithButtonIndex——>didDismissWithButtonIndex