最近做项目又开始用到了uitableview,温习之余,在这里把uitableview的用法分享一下,有不对的地方欢迎大家提出来。
废话不多说,先创建一个工程,由于Xcode6,去除了创建工程时的空项目的选项,我们继续选择single view application 在这里我们用不到main storyboard 先删掉,创建一个类,继承自
class="p1">UINavigationController ,这里文件名字叫做HealthViewcont
然后在appdelegate里的
- (BOOL)application:(UIApplication *)application didFinishLaunchingWithOptions:(NSDictionary *)launchOptions {
// Override point for customization after application launch.
return YES;
}
添加如下代码:
   self.window = [[UIWindow alloc]initWithFrame:[UIScreen mainScreen].bounds];

    [self.window makeKeyAndVisible];

    self.window.rootViewController = [[HealthViewcont alloc]init];
准备工作就完成了
-:UITableView的初始化
1.在.h文件里实现 UITableViewDataSource,UITableViewDelegate两个代理协议,如果你这里继承的时UITableView 可以不用写
然后定义两个对象
@property(nonatomic)UITableView* tableview;
@property(nonatomic)NSMutableArray* dataArryList;
在.m文件里实现
@synthesize tableview;
@synthesize dataArryList;
2.在viewdidload里添加如下代码
- (void)viewDidLoad {
    [super viewDidLoad];
   //初始化一个tableview
    tableview = [[UITableView alloc]initWithFrame:CGRectMake(0, 64, [UIScreen mainScreen].bounds.size.width, [UIScreen mainScreen].bounds.size.height-64)];
    [self.view addSubview:tableview];
    [self.navigationBar setBackgroundColor:[UIColor redColor]];
    //实现代理
    tableview.delegate = self;
    tableview.dataSource = self;
    //初始化数据
    dataArryList = [[NSMutableArray alloc]initWithArray:[NSArray arrayWithObjects:@"334", @"445",@"667",@"779",@"123",nil]];
    // Do any additional setup after loading the view, typically from a nib.

  }
到这里初始化就完成了
二:UITableView数据源的初始化
UITableView有三个必须要实现的代理方法
#pragma mark - Table View
//设置section的个数
- (NSInteger)numberOfSectionsInTableView:(UITableView *)tableView {
    return 1;
}
//设置每个section 的行数
- (NSInteger)tableView:(UITableView *)tableView numberOfRowsInSection:(NSInteger)section {
    return [dataArryList count];
}
//对每个TableViewCell进行操作  UITableView中显示的每一个单元都是一个UITableViewCell对象,其初始化函数initWithStyle:reuseIdentifier:在tableView快速滑动的滑动的过程中,频繁的alloc对象是比较费时的///,于是引入了cell的重用机制
- (UITableViewCell *)tableView:(UITableView *)tableView cellForRowAtIndexPath:(NSIndexPath *)indexPath {
    static NSString* cellIdentifier = @"cell";

    UITableViewCell* cell = [tableView dequeueReusableCellWithIdentifier:cellIdentifier];
    if (cell== nil) {
        cell= [[UITableViewCell alloc] initWithStyle:UITableViewCellStyleDefault reuseIdentifier:cellIdentifier] ;
    }
    cell.textLabel.text=[dataArryList objectAtIndex:indexPath.row];
    return cell;
}
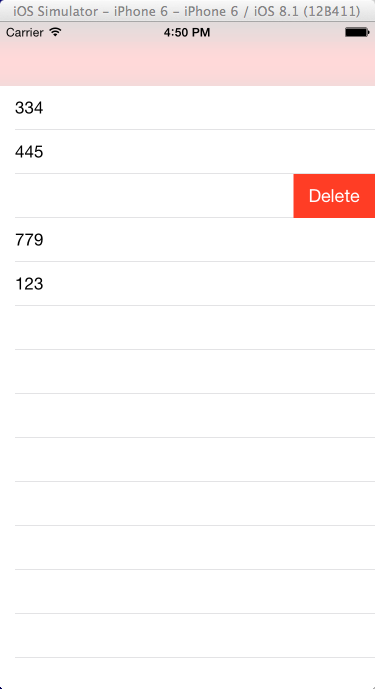
三:插入和删除
- (void)tableView:(UITableView *)tableView commitEditingStyle:(UITableViewCellEditingStyle)editingStyle forRowAtIndexPath:(NSIndexPath *)indexPath {
    if (editingStyle == UITableViewCellEditingStyleDelete) {
        [self.dataArryList removeObjectAtIndex:indexPath.row];
        [tableView deleteRowsAtIndexPaths:@[indexPath] withRowAnimation:UITableViewRowAnimationFade];
    } else if (editingStyle == UITableViewCellEditingStyleInsert) {
        [self.dataArryList insertObject:@"456" atIndex:indexPath.row];
        [tableView insertRowsAtIndexPaths:[NSArray arrayWithObject:indexPath] withRowAnimation:UITableViewRowAnimationRight];
        // Create a new instance of the appropriate class, insert it into the array, and add a new row to the table view.
    }
}
四:其他的一些常用操作
//设置UITableView行缩进
-(NSInteger)tableView:(UITableView*)tableView indentationLevelForRowAtIndexPath:(NSIndexPath *)indexPath{
   NSUInteger row = [indexPath row];
   return row;
}
//设置cell行间隔的高度
-(CGFloat)tableView:(UITableView *)tableView heightForRowAtIndexPath:(NSIndexPath *)indexPath{
    return 60;
}
//设置选中Cell的响应事件
-(void)tableView:(UITableView*)tableView didSelectRowAtIndexPath:(NSIndexPath *)indexPath{

}
//设置选中的行所执行的动作
-(NSIndexPath*)tableView:(UITableView *)tableView willSelectRowAtIndexPath:(NSIndexPath *)indexPath
{
    NSUInteger row = [indexPath row];
    return indexPath;
}
//设置划动cell是否出现del按钮,可供删除数据里进行处理
-(BOOL)tableView:(UITableView *)tableView canEditRowAtIndexPath:(NSIndexPath *)indexPath {
}
//设置删除时编辑状态
-(void)tableView:(UITableView*)tableView commitEditingStyle:(UITableViewCellEditingStyle)editingStyle forRowAtIndexPath:(NSIndexPath*)indexPath
{
}
最后看一下运行的效果