问题
应用需要调度代码以在特定的时间执行。此外,你还想要重复执行任务。
解决方案
使用NSTimer调度代码以在特定的时间执行。为了使用NSTimer,你需要有日期对象与指向应用的运行循环的引用。
注意:
NSTimer需要有运行循环,如果想在Mac或iOS应用中使用定时器,就必须有运行循环。本攻略需要应用带有运行循环。1.11与1.12节分别介绍了创建Mac与iOS应用的步骤。
说明
本攻略的代码位于应用委托中。通常情况下,定时器会放在自定义类或是应用控制器中。
定时器会从特定的日期与时间开始向对象发送消息。如果应用需要重复,那么定时器可能会间隔一段时间后再发送消息。你首先需要有日期对象,用来表示定时器开始向对象发送消息的日期与时间:
NSDate *scheduledTime = [NSDate dateWithTimeIntervalSinceNow:10.0];
上述调度时间位于上面这一行代码执行后的10秒钟。可以在这里使用任何日期。
接下来,通过initWithFireDate:interval:target:selector:userInfo:repeats:构造函数创建定时器:
SString *customUserObject = @"To demo userInfo";
NSTimer *timer = [[NSTimer alloc] initWithFireDate:scheduledTime
interval:2
target:self
selector:@selector(task)
userInfo:customUserObject
repeats:YES];
这里有些内容需要说明一下。第1个参数是日期对象,指定了定时器何时变成活动状态。接下来是间隔时间,是定时器再次发送消息前所需等待的秒数。之后是目标参数描述符,目标是方法所处的对象。selector参数是位于圆括号中的方法名,前面是@selector关键字。由于方法与定时器一样都位于应用委托中,因此可以使用self关键字。
userInfo是定时器使用的自定义内容。可以使用任何对象,并且可以获得正在执行的消息中的对象引用(上面的selector参数)。这里使用了字符串,但通常会使用字典或其他集合以支持更加复杂的活动。
repeats参数表示定时器是发送一次消息,还是根据第2个参数指定的时间间隔重复发送。
接下来需要指向运行循环的引用。可以通过NSRunLoop的currentRunLoop函数获得该引用:
NSRunLoop *runLoop = [NSRunLoop currentRunLoop];
现在,只需要将定时器添加到运行循环中即可:
[runLoop addTimer:timer forMode:NSDefaultRunLoopMode];
10秒钟后,定时器将会开始每隔两秒钟向应用发送task消息。
启动之后,如果想停止定时器,可以向定时器发送invalidate消息。这会从运行循环中删除定时器,代码如下所示:
[timer invalidate];
参见程序清单5-7。
代码
程序清单5-7 main.m
#import "AppDelegate.h"
@implementation AppDelegate
@synthesize window = _window;
- (void)applicationDidFinishLaunching:(NSNotification *)aNotification{
NSDate *scheduledTime = [NSDate dateWithTimeIntervalSinceNow:10.0];
NSString *customUserObject = @"To demo userInfo";
NSTimer *timer = [[NSTimer alloc] initWithFireDate:scheduledTime
interval:2
target:self
selector:@selector(task)
userInfo:customUserObject
repeats:YES];
NSRunLoop *runLoop = [NSRunLoop currentRunLoop];
[runLoop addTimer:timer forMode:NSDefaultRunLoopMode];
}
-(void)task:(id)sender{
NSTimer *localTimer = (NSTimer *)sender;
NSLog(@"Schedule task has executed with this user info: %@", [localTimer userInfo]);
}
@end
使用
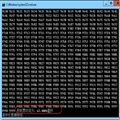
要想使用上述代码,请从Xcode构建并运行Mac应用。注意控制台窗口以及消息何时开始打印到日志中。此处打印出了时间戳,这样就可以看到时间间隔的运作方式了:
2012-01-19 15:23:28.651 Timer[31067:707] Schedule task has executed with this user info: To demo userInfo
2012-01-19 15:23:30.651 Timer[31067:707] Schedule task has executed with this user info: To demo userInfo
2012-01-19 15:23:32.651 Timer[31067:707] Schedule task has executed with this user info: To demo userInfo