上次我们学习了Vue.js的基础,并且通过综合的小实例进一步的熟悉了Vue.js的基础应用。今天我们就继续讲讲Vue.js的组件,更加深入的了解Vue,js的使用。首先我们先了解一下什么是Vue.js的组件,组件其实就是页面组成的一部分,它是一个具有独立的逻辑和功能或页面,组件可以扩展 HTML 元素,封装可重用的代码。组件系统让我们可以用独立可复用的小组件来构建大型应用,几乎任意类型的应用的界面都可以抽象为一个组件树,如下图:

接下来我们就仔细讲讲组件的使用吧。
1 全局组件
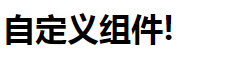
以下就是我们注册的第一个简单的全局组件my-Com。所有实例都能用全局组件,组件在注册之后,便可以作为自定义元素class="Apple-converted-space"> <my-Com></my-Com> 在一个实例的模板中使用。但是要注意全局组件必须写在vue实例之前,才会在跟元素 下面生效,模板里面第一级只能有一个标签,不能并行。
 1 <!DOCTYPE html>
 2 <html>
 3     <head>
 4         <meta charset="UTF-8">
 5         <title></title>
 6     </head>
 7     <body>
 8     <div id="app">
 9           <my-Com></my-Com>
10     </div>
11     </body>
12     <script type="text/javascript" src="js/vue.js" ></script>
13     <script type="text/javascript">
14         // 注册
15         Vue.component('myCom', {
16           template: '<h1>自定义组件!</h1>'
17         })
18         // 创建根实例
19         new Vue({
20           el: '#app'
21         })
22     </script>
23 </html>
2 局部组件
以下就是我们注册的第一个简单的局部组件。其实可以不必把每个组件都注册到全局的,局部组件可以直接在vue实例里,使用components注册,这种封装也适用于其它可注册的 Vue 功能,比如指令。我们建议将模板定义在全局变量。
 1 <!DOCTYPE html>
 2 <html>
 3     <head>
 4         <meta charset="UTF-8">
 5         <title></title>
 6     </head>
 7     <body>
 8     <div id="app">
 9           <mycom></mycom>
10     </div>
11     </body>
12     <script type="text/javascript" src="js/vue.js" ></script>
13     <script type="text/javascript">
14         var Child = {
15           template: '<h1>自定义组件!</h1>'
16         }
17
18         // 创建根实例
19         new Vue({
20           el: '#app',
21           components: {
22             // mycom  将只在父模板可用
23             'mycom': Child
24           }
25         })
26     </script>
27 </html>

3 使用Prop传递数据
组件设计初衷就是要配合使用的,最常见的就是形成父子组件的关系:组件 A 在它的模板中使用了组件 B。在 Vue 中,父子组件的关系可以总结为 prop 向下传递,事件向上传递。父组件通过 prop 给子组件下发数据,子组件通过事件给父组件发送消息。组件实例的作用域是孤立的。这意味着不可以 在子组件的模板内直接引用父组件的数据。prop 是父组件用来传递数据的一个自定义属性。父组件的数据需要通过 props 把数据传给子组件,子组件需要显式地用 props 选项声明 "prop"。
 1 <!DOCTYPE html>
 2 <html>
 3     <head>
 4         <meta charset="UTF-8">
 5         <title></title>
 6     </head>
 7     <body>
 8     <div id="app">
 9           <com message="hello!"></com>
10     </div>
11     </body>
12     <script type="text/javascript" src="js/vue.js" ></script>
13     <script type="text/javascript">
14         // 注册
15         Vue.component('com', {
16           // 声明 props
17           props: ['message'],
18           template: '<span>{{ message }}</span>'
19         })
20         // 创建根实例
21         new Vue({
22           el: '#app'
23         })
24     </script>
25 </html>

4 动态Prop
动态Prop 类似于用 v-bind 绑定 HTML 特性到一个表达式,也可以用 v-bind 动态绑定 props 的值到父组件的数据中。每当父组件的数据变化时,该变化也会传导给子组件。
 1 <!DOCTYPE html>
 2 <html>
 3     <head>
 4         <meta charset="UTF-8">
 5         <title></title>
 6     </head>
 7     <body>
 8     <div id="app">
 9         <div>
10           <input v-model="parent">
11           <br>
12           <child v-bind:message="parent"></child>
13         </div>
14     </div>
15     </body>
16     <script type="text/javascript" src="js/vue.js" ></script>
17     <script type="text/javascript">
18         // 注册
19         Vue.component('child', {
20           // 声明 props
21           props: ['message'],
22           template: '<span>{{ message }}</span>'
23         })
24         // 创建根实例
25         new Vue({
26           el: '#app',
27           data: {
28             parent: '父组件内容'
29           }
30         })
31     </script>
32 </html>

当然我们也能可以使用 v-bind 的缩写语法:
1 <child :my-message="parentMsg"></child>
以下实例中将 v-bind 指令将com传到每一个重复的组件中。
 1 <!DOCTYPE html>
 2 <html>
 3     <head>
 4         <meta charset="UTF-8">
 5         <title></title>
 6     </head>
 7     <body>
 8     <div id="app">
 9         <ol>
10         <item v-for="item in sites" v-bind:com="item"></item>
11           </ol>
12     </div>
13     </body>
14     <script type="text/javascript" src="js/vue.js" ></script>
15     <script type="text/javascript">
16         Vue.component('item', {
17           props: ['com'],
18           template: '<li>{{ com.text }}</li>'
19         })
20         new Vue({
21           el: '#app',
22           data: {
23             sites: [
24               { text: 'Vue.js' },
25               { text: 'BootStrap' },
26               { text: 'JQuery' }
27             ]
28           }
29         })
30     </script>
31 </html>

注意: prop 是单向绑定的:当父组件的属性变化时,将传导给子组件,但是不会反过来。这是为了防止子组件无意间修改了父组件的状态,来避免应用的数据流变得难以理解。但是,每次父组件更新时,子组件的所有 prop 都会更新为最新值。这意味着不可以在子组件内部改变 prop。如果这么做了的话,Vue 会在控制台出现警告。
5 使用 v-on 绑定自定义事件
父组件是使用 props 传递数据给子组件,但如果子组件要把数据传递回去,就需要使用自定义事件,父组件可以在使用子组件的地方直接用 v-on 来监听子组件触发的事件。
我们可以使用 v-on 绑定自定义事件, 每个 Vue 实例都实现了事件接口,即:
$on(eventName) 监听事件$emit(eventName) 触发事件1 <!DOCTYPE html> 2 <html> 3 <head> 4 <meta charset="UTF-8"> 5 <title></title> 6 </head> 7 <body> 8 <div id="app"> 9 <div id="example"> 10 <p>{{ num }}</p> 11 <button-counter v-on:vue="com"></button-counter> 12 </div> 13 </div> 14 </body> 15 <script type="text/javascript" src="js/vue.js" ></script> 16 <script type="text/javascript"> 17 Vue.component('button-counter', { 18 template: '<button v-on:click="vue">{{ counter }}</button>', 19 data: function () { 20 return { 21 counter: 0 22 } 23 }, 24 methods: { 25 vue: function () { 26 this.counter += 1 27 this.$emit('vue') 28 } 29 }, 30 }) 31 new Vue({ 32 el: '#example', 33 data: { 34 num: 0 35 }, 36 methods: { 37 com: function () { 38 this.num += 1 39 } 40 } 41 }) 42 </script> 43 </html>

6 给组件绑定原生事件
如果想在某个组件的根元素上监听一个原生事件。可以使用 v-on 的修饰符 .native。
1 <comv-on:click.native="something"></com>
7 自定义指令
默认情况下,一个组件的 v-model 会使用 value prop 和 input 事件。Vue 也允许注册自定义指令。
以下例子就是我们注册的一个全局指令 v-focus, 该指令的功能就是在页面加载时,元素会自动获得焦点。
 1 <!DOCTYPE html>
 2 <html>
 3     <head>
 4         <meta charset="UTF-8">
 5         <title></title>
 6     </head>
 7     <body>
 8     <div id="app">
 9         <p>页面载入时,input 元素会自动获取焦点:</p>
10         <input v-focus>
11     </div>
12     </body>
13     <script type="text/javascript" src="js/vue.js" ></script>
14     <script type="text/javascript">
15         Vue.directive('focus', {
16           inserted: function (el) {
17             // 聚焦元素
18             el.focus()
19           }
20         })
21         // 创建根实例
22         new Vue({
23           el: '#app'
24         })
25     </script>
26 </html>
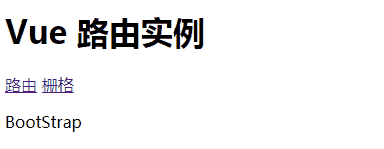
8 Vue 路由实例应用
Vue框架的兼容性非常好,可以很好的跟其他第三方的路由框架进行结合。Vue官方给出了路由的方案 --- vue-router。下面我们就使用Vue的路由实现简单的单页应用。
1 <script type="text/javascript" src="js/vue.js" ></script>
2 <script src="https://unpkg.com/vue-router/dist/vue-router.js"></script>
使用 router-link 组件来导航.,通过传入 `to` 属性指定链接,<router-link> 默认会被渲染成一个 `<a>` 标签。
1 <router-link to="/Vue">路由</router-link>
2 <router-link to="/BootStrap">栅格</router-link>
定义(路由)组件,可以从其他文件 import 进来。
1 const Foo = {
2             template: '<div>Vue</div>'
3         }
4         const Bar = {
5             template: '<div>BootStrap</div>'
6         }
定义路由,每个路由应该映射一个组件。 其中"component" 可以是通过 Vue.extend() 创建的组件构造器,或者只是一个组件配置对象。
1 const routes = [{
2                 path: '/Vue',
3                 component: Foo
4             },
5             {
6                 path: '/BootStrap',
7                 component: Bar
8             }
9         ]
1 const router = new VueRouter({
2             routes
3         })
要通过 router 配置参数注入路由,从而让整个应用都有路由功能。
1 const app = new Vue({
2             router
3         }).$mount('#app')
 1 <!DOCTYPE html>
 2 <html>
 3     <head>
 4         <meta charset="UTF-8">
 5         <title></title>
 6     </head>
 7     <body>
 8     <div id="app">
 9           <h1>Vue 路由实例</h1>
10
11           <p>
12             <router-link to="/Vue">路由</router-link>
13             <router-link to="/BootStrap">栅格</router-link>
14           </p>
15           <!-- 路由出口 -->
16             <!-- 路由匹配到的组件将渲染在这里 -->
17           <router-view></router-view>
18     </div>
19     </body>
20     <script type="text/javascript" src="js/vue.js" ></script>
21     <script src="https://unpkg.com/vue-router/dist/vue-router.js"></script>
22     <script type="text/javascript">
23
24         const Foo = {
25             template: '<div>Vue</div>'
26         }
27         const Bar = {
28             template: '<div>BootStrap</div>'
29         }
30
31         const routes = [{
32                 path: '/Vue',
33                 component: Foo
34             },
35             {
36                 path: '/BootStrap',
37                 component: Bar
38             }
39         ]
40
41         const router = new VueRouter({
42             routes
43         })
44
45         const app = new Vue({
46             router
47         }).$mount('#app')
48
49
50     </script>
51 </html>
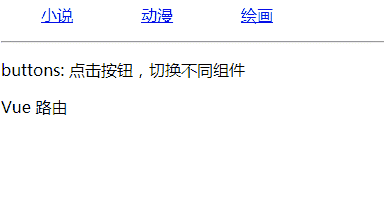
9 综合实例应用
上边已经了解了Vue路由,下边就是一个小小的综合实例,通过点击按钮,在当前页面切换不同的组件。
  1 <!DOCTYPE html>
  2 <html lang="en">
  3
  4     <head>
  5         <meta charset="UTF-8">
  6         <title>综合实例</title>
  7         <script src="https://unpkg.com/vue/dist/vue.js"></script>
  8         <script src="https://unpkg.com/vue-router/dist/vue-router.js"></script>
  9         <style>
 10             ul,
 11             li {
 12                 list-style: none;
 13             }
 14
 15             ul {
 16                 overflow: hidden;
 17             }
 18
 19             li {
 20                 float: left;
 21                 width: 100px;
 22             }
 23
 24             h1 {
 25                 background-color: #98D361;
 26             }
 27
 28             h2 {
 29                 background-color: #FF9209;
 30             }
 31
 32             h3 {
 33                 background-color: #D84C29;
 34             }
 35         </style>
 36     </head>
 37
 38     <body>
 39         <div id="app">
 40             <bar> </bar>
 41             <hr>
 42             <p>buttons: {{ buttons }}</p>
 43             <router-view class="items"></router-view>
 44             <footer-bar></footer-bar>
 45         </div>
 46         <script>
 47             var topbarTemp = `
 48       <nav>
 49         <ul>
 50           <li v-for="item in list">
 51             <router-link :to="item.url">{{ item.name }}</router-link>
 52           </li>
 53         </ul>
 54       </nav>
 55     `;
 56             // 定义组件:topbar
 57             Vue.component('bar', {
 58                 template: topbarTemp,
 59                 data: function() {
 60                     return {
 61                         list: [{
 62                                 name: '小说',
 63                                 url: '/story'
 64                             },
 65                             {
 66                                 name: '动漫',
 67                                 url: '/carton'
 68                             },
 69                             {
 70                                 name: '绘画',
 71                                 url: '/draw'
 72                             },
 73                         ]
 74                     }
 75                 }
 76             });
 77
 78             Vue.component('footer-bar', {
 79                 template: `
 80         <footer>
 81           <p>Vue 路由<p>
 82         </footer>
 83       `
 84             });
 85
 86             var story = {
 87                 template: `<div> <h1>{{ msg }}<h1></div>`,
 88                 data: function() {
 89                     return {
 90                         msg: 'Vue 基础'
 91                     }
 92                 }
 93             };
 94
 95             var carton = {
 96                 template: `<div> <h2>{{ msg }}<h2></div>`,
 97                 data: function() {
 98                     return {
 99                         msg: 'Vue 组件'
100                     }
101                 }
102             }
103
104             var draw = {
105                 template: `<div> <h3>{{ msg }}<h3></div>`,
106                 data: function() {
107                     return {
108                         msg: 'Vue 路由实例'
109                     }
110                 }
111             }
112
113             // 定义路由对象
114             var router = new VueRouter({
115                 routes: [{
116                         path: '/story',
117                         component: story
118                     },
119                     {
120                         path: '/carton',
121                         component: carton
122                     },
123                     {
124                         path: '/draw',
125                         component: draw
126                     }
127                 ]
128             });
129
130             // 初始化一个Vue实例
131             var app = new Vue({
132                 el: '#app',
133                 data: {
134                     buttons: '点击按钮,切换不同组件'
135                 },
136                 router: router
137             });
138         </script>
139     </body>
140
141 </html>
Vue知识还有很多,希望通过对Vue一些基础知识的学习,对于正在学习前端的知识的你可以有所帮助。