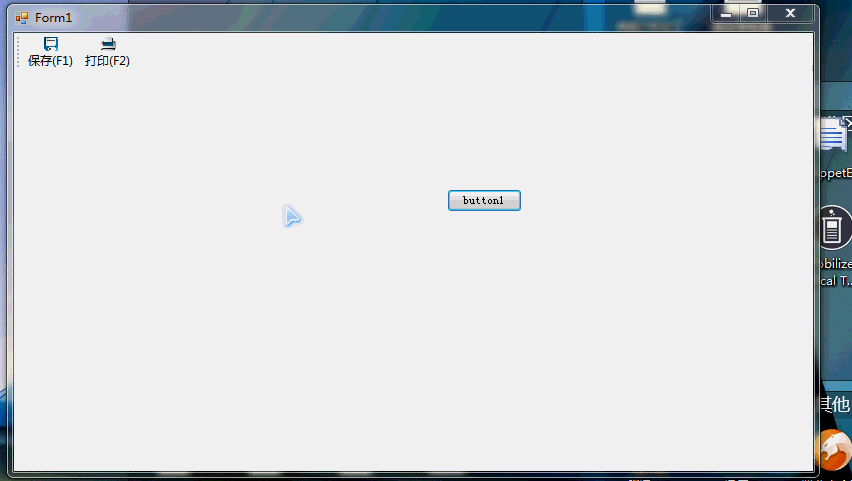
主要是想设计一个自带添加工具按钮和按钮的快捷键的基窗体。这样以后所设计的窗体只要继承自这个窗体就可以实现热键响应和动态加工具按钮的功能了
写这边文章主要是为了以后使用的时候有个参考,因为这只是个demo,长时间不用总会忘记的。到时候可以翻看,同时也可以给博友借鉴。接下来,我详细说明这个窗体如何设计的
I.新建一个winform项目,此时默认自带form1窗体,放置一个toolstrip工具控件
II.引用程序集rabbit.core.dll,也就是我封装好的热键响应帮助类啦
下载源稍后上传
using Rabbit.Core.HotKey;
using Rabbit.UI;
using System;
using System.Collections.Generic;
using System.ComponentModel;
using System.Data;
using System.Drawing;
using System.Linq;
using System.Text;
using System.Threading.Tasks;
using System.Windows.Forms;

namespace HotKeyBindDemo
{
    public partial class Form1 : Form
    {
        //存储所有注册后的热键
        Dictionary<int, ToolStripAndEvent> HotKeyDict = new Dictionary<int, ToolStripAndEvent>();

        public Form1()
        {
            InitializeComponent();
        }

        //窗体激活的时候,注册热键
        private void Form1_Activated(object sender, EventArgs e)
        {

        }

        //窗体失活时撤销热键
        private void Form1_Deactivate(object sender, EventArgs e)
        {
            keyBindHelper.UnregisterHotKey(this, 11);
            keyBindHelper.UnregisterHotKey(this, 12);
        }


        /// <summary>
        /// 对工具栏增加一个按钮
        /// </summary>
        /// <param name="Caption">按钮标题</param>
        /// <param name="image">图案</param>
        /// <param name="ClickEvent">被按下的事件</param>
        /// <param name="Hotkey">快捷键</param>
        public ToolStripButton AddComandButton(string Caption, Image image, EventHandler ClickEvent, int Hotkey)
        {

            ToolStripButton AddButton = new ToolStripButton(Caption, image, ClickEvent);
            try
            {
                AddButton.ImageTransparentColor = Color.Magenta;
                AddButton.Size = new System.Drawing.Size(56, 47);
                AddButton.TextImageRelation = TextImageRelation.ImageAboveText;
                ToolStripAndEvent toolStripAndEvent = new ToolStripAndEvent()
                {
                    BeClickEvent = ClickEvent,
                    TargetButton = AddButton,
                };
                CommandtoolStrip.Items.Add(AddButton);
                HotKeyDict.Add(Hotkey, toolStripAndEvent);


            }
            catch (Exception)
            {

            }
            return AddButton;

        }

        /// <summary>
        /// window一个消息机制,会不停的循环执行该函数,一旦按下了快捷键,就会被捕捉
        /// </summary>
        /// <param name="m"></param>
        protected override void WndProc(ref Message m)
        {
            base.WndProc(ref m);
            if (m.Msg == keyBindHelper.WM_HOTKEY)//一旦按下了快捷键,那么当前消息就是热键相应,被匹配,进入if遇见内部
            {
                int id = m.WParam.ToInt32();
                keyBindHelper.HotKeyOperation(HotKeyDict, id);//响应id对应的点击事件
            }
        }

        private void Form1_Load(object sender, EventArgs e)
        {
            #region 注册热键,其实就是F1与11绑定,F2与12绑定
            keyBindHelper.RegisterHotKey(this, 11, keyBindHelper.KeyModifiers.None, Keys.F1);//F1绑定了11
            keyBindHelper.RegisterHotKey(this, 12, keyBindHelper.KeyModifiers.None, Keys.F2);//F2绑定了12
            #endregion

            #region  工具栏保存按钮点击事件与11绑定,打印单击事件与12绑定
            AddComandButton("保存(F1)", Rabbit.Core.Properties.Resources.保存, save_click, 11);//11绑定了save_click
            AddComandButton("打印(F2)",  Rabbit.Core.Properties.Resources.打印, Print_click, 12);//12绑定了Print_click
            #endregion

            //总结:这样按下F1时,F1会去匹配11这个数字,然后11去匹配了save_click这个事件然后响应这个事件

        }
        //保存功能
        private void save_click(object sender, EventArgs e)
        {
            MessageBox.Show("保存功能被响应!");
        }

        //打印功能
        private void Print_click(object sender, EventArgs e)
        {
            MessageBox.Show("打印功能被响应!");
        }

        //关闭窗体注销热键
        private void Form1_FormClosed(object sender, FormClosedEventArgs e)
        {
            Form1_Deactivate(null, null);
        }


    }
}
View Code
慢慢看,注释写的很清楚,相信你能大致明白怎么使用

简单数一下原理吧,要想实现热键响应,首先得注册热键,然后绑定事件,即热键-》id=》事件,这样消息机制就会捕捉到这样一个流程。
欢迎不是很明白的博友可以留言交流。我的qq:739462304