上一篇为大家分享了关于AsyncTask的使用,本篇结合AsyncTask为大家介绍一个我们经常看到的一个效果,就是当我们点击登录后,会弹出一个请等待的小窗体,这个效果是如何实现的呢?本篇我就带大家简单实现一下。
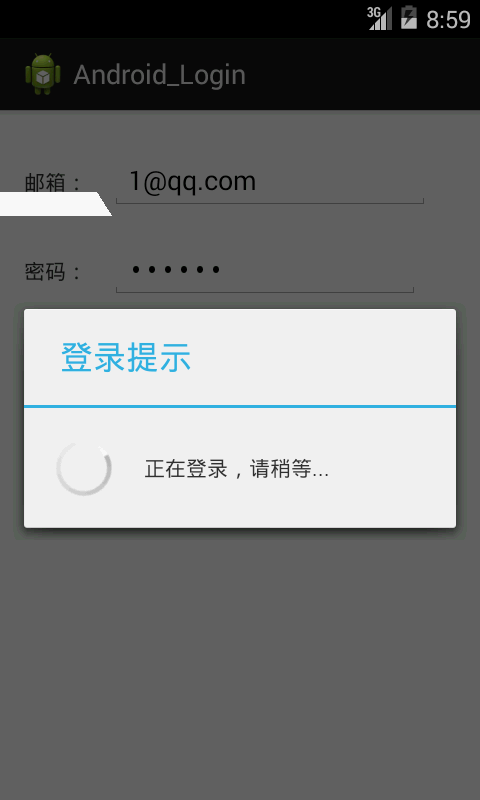
首先请看效果图:

就是当我们填写好个人信息后,点击登录,然后就进入了这个界面,好了,下面我们一起来实现一下。
第一步:布局文件:activity_main.xml
<RelativeLayout xmlns:android="http://schemas.android.com/apk/res/android"
    xmlns:tools="http://schemas.android.com/tools"
    android:layout_width="match_parent"
    android:layout_height="match_parent"
    android:paddingBottom="@dimen/activity_vertical_margin"
    android:paddingLeft="@dimen/activity_horizontal_margin"
    android:paddingRight="@dimen/activity_horizontal_margin"
    android:paddingTop="@dimen/activity_vertical_margin"
    tools:context=".MainActivity" >

    <TextView
        android:id="@+id/textView1"
        android:layout_width="wrap_content"
        android:layout_height="wrap_content"
        android:layout_alignParentLeft="true"
        android:layout_alignParentTop="true"
        android:layout_marginTop="22dp"
        android:text="邮箱:" />

    <EditText
        android:id="@+id/editText1"
        android:layout_width="wrap_content"
        android:layout_height="wrap_content"
        android:layout_alignBaseline="@+id/textView1"
        android:layout_alignBottom="@+id/textView1"
        android:layout_marginLeft="15dp"
        android:layout_toRightOf="@+id/textView1"
        android:ems="10"
        android:inputType="textEmailAddress" />

    <TextView
        android:id="@+id/textView2"
        android:layout_width="wrap_content"
        android:layout_height="wrap_content"
        android:layout_below="@+id/editText1"
        android:layout_marginTop="40dp"
        android:layout_toLeftOf="@+id/editText1"
        android:text="密码:" />

    <EditText
        android:id="@+id/editText2"
        android:layout_width="wrap_content"
        android:layout_height="wrap_content"
        android:layout_alignBaseline="@+id/textView2"
        android:layout_alignBottom="@+id/textView2"
        android:layout_alignLeft="@+id/editText1"
        android:ems="10"
        android:inputType="textPassword" />

    <Button
        android:id="@+id/button1"
        android:layout_width="wrap_content"
        android:layout_height="wrap_content"
        android:layout_below="@+id/editText2"
        android:layout_marginTop="43dp"
        android:layout_toRightOf="@+id/textView2"
        android:text="登录" />

    <Button
        android:id="@+id/button2"
        android:layout_width="wrap_content"
        android:layout_height="wrap_content"
        android:layout_alignBaseline="@+id/button1"
        android:layout_alignBottom="@+id/button1"
        android:layout_marginLeft="34dp"
        android:layout_toRightOf="@+id/button1"
        android:text="注册" />

</RelativeLayout>
第二步:主Activity:
public class MainActivity extends Activity implements OnClickListener{

    private EditText mEditText1;
    private EditText mEditText2;
    private Button mButton1;
    private Button mButton2;

    private String email;
    private String password;

    private myAsyncTast tast;

    private ProgressDialog dialog = null;

    @Override
    protected void onCreate(Bundle savedInstanceState) {
        super.onCreate(savedInstanceState);
        setContentView(R.layout.activity_main);
        init();//对控件进行初始化
    }


    private void init() {
        mEditText1 = (EditText) findViewById(R.id.editText1);
        mEditText2 = (EditText) findViewById(R.id.editText2);
        mButton1 = (Button) findViewById(R.id.button1);
        mButton2 = (Button) findViewById(R.id.button2);
        mButton1.setOnClickListener(this);
        mButton2.setOnClickListener(this);
    }


    @Override
    public void onClick(View arg0) {
        switch (arg0.getId()) {
        case R.id.button1:
            getEditTextValue();//获得用户的输入
            tast = new myAsyncTast();//创建AsyncTask
            tast.execute();//启动AsyncTask
            break;

        case R.id.button2:
            Toast.makeText(MainActivity.this, "注册", Toast.LENGTH_SHORT).show();
            break;
        }
    }

    private void getEditTextValue() {
        email = mEditText1.getText().toString();
        password = mEditText2.getText().toString();
    }

    class myAsyncTast extends AsyncTask<Void, Integer, Void>{

        @Override
        protected void onPreExecute() {
            super.onPreExecute();
            dialog = ProgressDialog.show(MainActivity.this, "登录提示", "正在登录,请稍等...", false);//创建ProgressDialog
        }

        @Override
        protected Void doInBackground(Void... arg0) {

            Http http = new Http();
            int n = http.send(email, password);//发送给服务器
            publishProgress(n);
            return null;

        }

        @Override
        protected void onProgressUpdate(Integer... values) {
            super.onProgressUpdate(values);
            dialog.dismiss();//关闭ProgressDialog
            if(values[0]==1){
                Toast.makeText(MainActivity.this, "登录成功", Toast.LENGTH_SHORT).show();
            }else{
                Toast.makeText(MainActivity.this, "登录失败", Toast.LENGTH_SHORT).show();
            }

        }

    }

}
第三步:服务器端(简单起见,仅仅是模拟)
/*
 * 模拟服务器端
 */
public class Http {
    private int n = 0;
    public int send(String email, String password){

        try {
            Thread.sleep(5000);//模拟网络加载
        } catch (InterruptedException e) {
            e.printStackTrace();
        }
        if(email.equals("1@qq.com")&&password.equals("123456")){
            n=1;
        }

        return n;
    }

}
在这里需要说明的时,当我们真正开发时,需要向服务器发送数据时,我们需要在:AndroidManifest.xml文件中声明访问网络权限。
对于上面的内容,AsyncTask上一篇已经为大家进行了详细的介绍,如果看本篇博客你赶脚有些吃力,请仔细研究一下上一篇的博客,这里就不再赘述,对于ProgressDialog本人也是初次使用,不过可以为大家推荐一篇博客:http://blog.csdn.net/caesardadi/article/details/11982721,这里介绍的非常的详细,有兴趣的童鞋可以好好研究一下。