在WPF中,命令绑定机制是相比于事件更高级的概念,把应用程序的功能划分为多个任务,任务由多种途径触发。
应用Command Binding使代码更符合MVVM模式(Model-View-ViewModel),类似于MVC模式(Model-View-Control)。这两种模式在以后的BLOG中会有详细的介绍。目的都是为了更好的分离前后台逻辑。
一个简单的Button
<Button Content="Button" Click="Button_Click" />
private void Button_Click(object sender, RoutedEventArgs e)
{
        MessageBox.Show("Hello WPF");
}
前台显示需要通过Button_Click方法跟后台关联上,如果想更好的分离这两部分,将Click事件替换成Command
自定义Command
using System;
using System.Windows;
using System.Windows.Input;

public class MyCommand : ICommand
{
    public bool CanExecute(object parameter)
    {
        return true;
    }

    public event EventHandler CanExecuteChanged;

    public void Execute(object parameter)
    {
        MessageBox.Show("Hello WPF");
    }
}
<Button Content="Button" x:Name="btn1" />
public MainWindow()
{
  InitializeComponent();
  btn1.Command = new MyCommand();
}
现在逻辑已经被分离到MyCommand中了
使用预定义Command
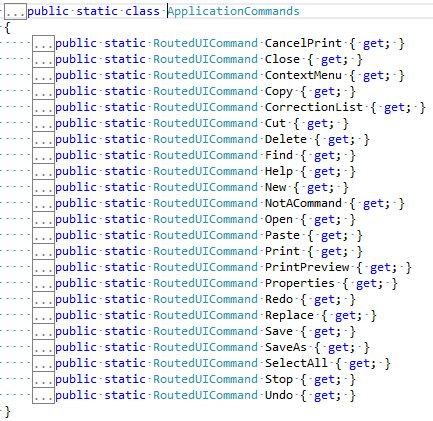
ApplicationCommands提供了很多预定义Command

<Button Content="Button" x:Name="btn2" Command="ApplicationCommands.Close"/>
但是这些命令并没有实现 ("▔□▔)
使用Command Binding添加逻辑
public MainWindow()
{
    InitializeComponent();var OpenCmdBinding = new CommandBinding(
        ApplicationCommands.Close,
        OpenCmdExecuted,
        OpenCmdCanExecute);

    this.CommandBindings.Add(OpenCmdBinding);
}

void OpenCmdExecuted(object target, ExecutedRoutedEventArgs e)
{
    this.Close();
}

void OpenCmdCanExecute(object sender, CanExecuteRoutedEventArgs e)
{
    e.CanExecute = true;
}
有些控件没有Command属性
<Button Grid.Row="2" Height="100" Width="100" HorizontalAlignment="Left" Content="Decrease"  Command="Slider.DecreaseLarge"  CommandTarget="{Binding  ElementName=slider}"/>
<Slider Grid.Row="2" x:Name="slider"  Width="100"></Slider>
<Button Grid.Row="2" Height="100" Width="100" HorizontalAlignment="Right" Content="Increase"  Command="Slider.IncreaseLarge"  CommandTarget="{Binding  ElementName=slider}"/>
CommandParameter可以给命令传递一个值
CommandTarget:触发的命令目标
更多的Command介绍
http://www.cnblogs.com/Curry/archive/2009/07/27/1531798.html
http://www.cnblogs.com/gaixiaojie/archive/2010/09/01/1815015.html
To be continue...