MVVM是一种模式,而WPF的数据绑定机制是一种WPF内建的功能集,两者是不相关的。
但是,借助WPF各种内建功能集,如数据绑定、命令、数据模板,我们可以高效的在WPF上实现MVVM。因此,我们需要对各种MVVM相关的WPF内建功能集进行了解,才能在扎实的基础上对MVVM进行学习与实践。
本文是WPF学习03:Element Binding的后续,将说明实现数据绑定的三个重点:DataContext INotifyPropertyChanged IValueConverter
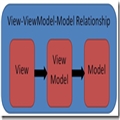
MVVM将User Interface切成了3个部分,View、Model、View Model.
三个部分区分如下:
View:界面代码,并完成数据可视化。
Model:一系列我们与业务层交互的类。
View Model:1.将Model中需要显示的部分,转化为对View友好的数据。 2.管理View与View之间的交互。

依赖关系如上图所示,V依赖于VM,反之不应该成立,VM依赖于M,反之亦不应成立。
在完成了对数据绑定、命令、数据模板的理解后,我们再重新回来解释MVVM。
在WPF学习03:Element Binding中,我们只研究了如何在控件间实现数据绑定,在不指定ElementName时,Binding会在Source与RelativeSource也没有设置的情况下,一级一级的寻找DataContext,直到找到。
例子:

<StackPanel HorizontalAlignment="Center" TextBlock.Foreground="#019AFF" DataContext="{x:Static Colors.White}">
    <!--指定Path,绑定对象的某个属性-->
    <TextBlock Text="{Binding Path=R}"></TextBlock>
    <TextBlock Text="{Binding Path=G}"></TextBlock>
    <TextBlock Text="{Binding Path=B}"></TextBlock>
    <!--不指定Path,绑定整个对象-->
    <TextBlock Text="{Binding}"></TextBlock>
</StackPanel>
比较常用的情况下,我们将DataContext设置在最顶层元素,一般情况下为Window。
我们可以在后台代码中配置DataContext:
public class Person
{
    private Int32 _age;

    public Int32 Age
    {
        get { return _age; }
        set { _age = value; }
    }

    private String _name;

    public String Name
    {
        get { return _name; }
        set { _name = value; }
    }
}

private void Window_Loaded(object sender, RoutedEventArgs e)
{
    person = new Person() { Name = "Kenny", Age = 30 };
    this.DataContext = person;
}

private void Button_Click(object sender, RoutedEventArgs e)
{
    person.Name = "John Locke";
    person.Age = 40;
}
XAML做的改动:
<StackPanel HorizontalAlignment="Center" TextBlock.Foreground="#019AFF">
    <TextBlock Text="{Binding Path=Name}"></TextBlock>
    <TextBlock Text="{Binding Path=Age}"></TextBlock>
    <Button Click="Button_Click">Click me</Button>
</StackPanel>
效果如下:

我们可以看到的确显示了期望值,但是如果点击按键的话,是看不到任何变化的,接下来即解释原因与解决方法。
WPF内建的数据绑定机制中,Dependency Property不需额外做任何配置,即可在一般情况下建立数据绑定关系。WPF自建控件的各类属性都是依赖属性经传统的.Net属性包装而成。
如果我们希望将数据绑定的源设为我们自己定义的对象的属性,且该属性不为依赖属性,那么就只有靠实现INotifyPropertyChanged接口,并在相应的属性改变时调用PropertyChanged事件以通知目标元素。
我们将之前的后台代码做如下的改动:
public class Person : INotifyPropertyChanged
{
    public event PropertyChangedEventHandler PropertyChanged;
    private Int32 _age;
    public Int32 Age
    {
        get { return _age; }
        set {
            _age = value;
            if (PropertyChanged != null)
                PropertyChanged.Invoke(this,new PropertyChangedEventArgs("Age"));
        }
    }

    private String _name;
    public String Name
    {
        get { return _name; }
        set {
            _name = value;
            if (PropertyChanged != null)
                PropertyChanged.Invoke(this, new PropertyChangedEventArgs("Name"));
        }
    }

}
效果如下:

某些特殊的时候,源属性与目标属性是无法连接,需要进行转换,这时,就需要用到ValueConverter.直接给个例子:
数据绑定实现根据年龄不同,文字显示同颜色,效果:


XAML代码:
<TextBlock Text="{Binding Path=Name}"></TextBlock>
<TextBlock Name="AgeTextBlock" Text="{Binding Path=Age}">
<TextBlock.Foreground>
        <Binding Path="Age">
            <Binding.Converter>
                <local:TextBlockColorValueConverter></local:TextBlockColorValueConverter>
            </Binding.Converter>
        </Binding>
</TextBlock.Foreground>
</TextBlock>
后台代码:
[ValueConversion(typeof(Boolean), typeof(Int32))]
public class TextBlockColorValueConverter : IValueConverter
{
    public object Convert(object value, Type targetType, object parameter, System.Globalization.CultureInfo culture)
    {
        if ((int)value < 18)
            return new SolidColorBrush(Colors.Violet);
        else
            return new SolidColorBrush(Colors.Red);
    }

    //这里用不上数据从目标返回源,故返回null
    public object ConvertBack(object value, Type targetType, object parameter, System.Globalization.CultureInfo culture)
    {
        return null;
    }
}
之前的数据绑定都是用XAML实现的,在此给出后台代码实现数据绑定的方法,实现刚才的例子:
首先给两个控件标个Name,并去掉之前的所有绑定相关代码:
<TextBlock Name="NameTextBlock"></TextBlock>
<TextBlock Name="AgeTextBlock"></TextBlock>
后台代码:
var bind = new Binding("Name")
{
    Source = person,
};
NameTextBlock.SetBinding(TextBlock.TextProperty, bind);
bind = new Binding("Age")
{
    Source = person,
};
AgeTextBlock.SetBinding(TextBlock.TextProperty, bind);
bind = new Binding("Age")
{
    Source = person,
    Converter = new TextBlockColorValueConverter()
};
AgeTextBlock.SetBinding(TextBlock.ForegroundProperty, bind);
效果与之前一致。