A.搭建java服务器
使用eclipse、tomcat和
struts2框架搭建一个简单的服务器
1.准备好合适
版本的JDK、eclipse EE、tomcat、struts2 框架包
2.配置JDK和tomcat系统变量
3.在eclipse中创建一个Dynamic Web Project, 勾选创建web.xml
4.解压一个struts2中的app范例,参考其中的web.xml和struts.xml配置
5.
配置tomcat,注意配置正确的服务器的路径和发布路径,不要使用默认的eclipse中的路径
6.引入资源文件,创建相应的ActionSupport就可以处理外部信息了
B.iOS中基本的服务器请求
1.get和post
GET和POST是两种最常用的与服务器进行交互的
HTTP方法
GET
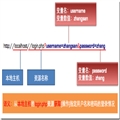
GET的语义是获取指定URL的资源
将数据按照variable=value的形式,添加到action所指向的URL后面,并且两者使用"?"连接,各变量之间使用"&"连接
貌似不安全,因为在传输过程中,数据被放在请求的URL中
传输的数据量小,这主要是因为受URL长度
限制
") POST
POST
POST的语义是向指定URL的资源添加数据
将数据放在数据体中,按照变量和值相对应的方式,传递到action所指向URL
所有数据对用户来说不可见
可以传输大量数据,上传文件只能使用Post
") C.iOS发送网络请求
C.iOS发送网络请求
1.发送步骤
实例化URL(网络资源)
根据URL建立URLRequest(网络请求)
默认为GET请求
对于POST请求,需要创建请求的数据体
利用URLConnection发送网络请求(建立连接)
获得结果
NSURLConnection提供了两个
静态方法可以直接以
同步或
异步的方式向服务器发送网络请求
同步请求:
sendSynchronousRequest:returningResponse:error:
异步请求:
sendAsynchronousRequest:queue: completionHandler:
2.网络传输中的二进制流
在网络请求过程中,接收数据的过程实际上是通过NSURLConnectionDataDelegate来实现的,常用代理方法包括:
服务器开始返回数据,准备工作
(void)connection:didReceiveResponse:
收到服务器返回的数据,本方法会被调用多次
- (void)connection:didReceiveData:
数据接收完毕,做数据的最后处理
(void)connectionDidFinishLoading:
网络连接
错误- (void)connection:didFailWithError:
D.练习代码

1.使用get请求
 1 (1).使用同步方法发送get请求(不常用)
 2 /** 发送get消息 */
 3 - (void) testGet {
 4     NSString *requestStr = [NSString stringWithFormat:@"http://192.168.0.21:8080/MyTestServer/login?user=%@&password=%@", self.userField.text, self.passwordField.text];
 5
 6     NSURL *url = [NSURL URLWithString:requestStr];
 7
 8     // 默认就是get请求
 9     NSURLRequest *request = [NSURLRequest requestWithURL:url];
10
11     // 使用同步方法发送请求
12     [self sendSynRequest:request];
13 }
14
15 /** 同步发送请求 */
16 - (void) sendSynRequest:(NSURLRequest *) request {
17     // 同步发送信息
18     NSData *data = [NSURLConnection sendSynchronousRequest:request returningResponse:nil error:nil];
19
20     [self dealWithResponseData:data];
21 }
22
23 /** 处理返回数据 */
24 - (void) dealWithResponseData:(NSData *) data {
25     // 解析数据
26     if (data) { // 得到返回数据
27         // 解除屏幕锁
28         [MBProgressHUD hideHUD];
29
30         // 解析json数据
31         NSDictionary *dict = [NSJSONSerialization JSONObjectWithData:data options:NSJSONReadingMutableLeaves error:nil];
32
33         // 处理返回的数据
34         NSString *result = dict[@"success"];
35         if (result) {
36             [MBProgressHUD showSuccess:result];
37         } else {
38             result = dict[@"error"];
39             if (result) {
40                 [MBProgressHUD showError:result];
41             }
42         }
43     } else {
44         [MBProgressHUD showError:@"网络繁忙,请稍后再试~"];
45     }
46 }
(2).使用异步方法发送get请求
1 /** 异步发送请求 */
2 - (void) sendAsynRequest:(NSURLRequest *) request {
3     NSOperationQueue *queue = [NSOperationQueue mainQueue];
4     [NSURLConnection sendAsynchronousRequest:request queue:queue completionHandler:^(NSURLResponse *response, NSData *data, NSError *connectionError) {
5
6         [self dealWithResponseData:data];
7     }];
8 }
2.使用NSURLConnectionDataDelegate代理发送异步请求
(1)遵守
协议
1 @interface ViewController () <NSURLConnectionDataDelegate>
(2)设置代理、发送请求
1 /** 使用start & 代理发送、处理异步请求 */
2 - (void) sendAsynRequestWithDelegate:(NSURLRequest *) request {
3     NSURLConnection *connection = [NSURLConnection connectionWithRequest:request delegate:self];
4     [connection start];
5 }
(3)实现代理方法
 1 #pragma mark - NSURLConnectionDataDelegate 代理方法
 2 /** 收到服务器回应 */
 3 - (void)connection:(NSURLConnection *)connection didReceiveResponse:(NSURLResponse *)response {
 4     NSLog(@"didReceiveResponse");
 5     self.data = [NSMutableData data];
 6 }
 7
 8 /** 接收到的数据,会调用多次,数据被分割接收 */
 9 - (void)connection:(NSURLConnection *)connection didReceiveData:(NSData *)data {
10     NSLog(@"didReceiveData");
11     [self.data appendData:data];
12 }
13
14 /** 接收数据完毕 */
15 - (void)connectionDidFinishLoading:(NSURLConnection *)connection {
16     NSLog(@"connectionDidFinishLoading");
17     [self dealWithResponseData:self.data];
18 }
3.使用post请求
 1 #pragma mark - post
 2 - (void) testPost {
 3     NSString *requestStr = [NSString stringWithFormat:@"http://192.168.0.21:8080/MyTestServer/login"];
 4     NSURL *url = [NSURL URLWithString:requestStr];
 5
 6     NSMutableURLRequest *request = [NSMutableURLRequest requestWithURL:url];
 7     request.timeoutInterval = 5;
 8
 9     // 设置为post方式请求
10     request.HTTPMethod = @"POST";
11
12     // 设置请求头
13     [request setValue:@"ios" forHTTPHeaderField:@"User-Agent"];
14
15     // 设置请求体
16     NSString *param = [NSString stringWithFormat:@"user=%@&password=%@", self.userField.text, self.passwordField.text];
17     request.HTTPBody = [param dataUsingEncoding:NSUTF8StringEncoding];
18
19     // 发送请求
20     // 使用主线程来处理UI刷新
21     NSOperationQueue *queue = [NSOperationQueue mainQueue];
22     [NSURLConnection sendAsynchronousRequest:request queue:queue completionHandler:^(NSURLResponse *response, NSData *data, NSError *connectionError) {
23         [self dealWithResponseData:data];
24     }];
25
26 }
4.设置请求属性
(1)设置
超时时限
1     // 使用可变request
2     NSMutableURLRequest *request = [NSMutableURLRequest requestWithURL:url];
3     // 设置请求超时时间
4     request.timeoutInterval = 5;
4.中文转码
使用UTF8转码
[urlStr stringByAddingPercentEscapesUsingEncoding: NSUTF8StringEncoding];
1     NSString *requestStr = [NSString stringWithFormat:@"http://192.168.0.21:8080/MyTestServer/login?user=%@&password=%@", self.userField.text, self.passwordField.text];
2
3     // 由于url不能传送中文,所以需要转码
4     requestStr = [requestStr stringByAddingPercentEscapesUsingEncoding:NSUTF8StringEncoding];