监控HystrixCommand
除了隔离依赖服务的调用外,Hystrix还提供了近乎实时的监控,Hystrix会实时的,累加的记录所有关于HystrixCommand的执行信息,包括执行了每秒执行了多少请求,多少成功,多少失败等等,更多指标请查看:https://github.com/Netflix/Hystrix/wiki/Metrics-and-Monitoring
导出监控数据
有了这些指标,Netflix还提供了一个类库(hystrix-metrics-event-stream:https://github.com/Netflix/Hystrix/tree/master/hystrix-contrib/hystrix-metrics-event-stream)把这些指标信息以‘text/event-stream’的格式开放给外部使用,用法非常简单,首先,把hystrix-metrics-event-stream库添加到项目中:
class="gradle" name="code">dependencies {
    compile(
    		 ...
            'com.netflix.hystrix:hystrix-metrics-event-stream:1.3.9',
            ...
    )
}
然后,在web.xml中配置一个
Servlet来获取Hystrix提供的数据:
<servlet>
        <description></description>
        <display-name>HystrixMetricsStreamServlet</display-name>
        <servlet-name>HystrixMetricsStreamServlet</servlet-name>
        <servlet-class>com.netflix.hystrix.contrib.metrics.eventstream.HystrixMetricsStreamServlet</servlet-class>
    </servlet>

    <servlet-mapping>
        <servlet-name>HystrixMetricsStreamServlet</servlet-name>
        <url-pattern>/hystrix.stream</url-pattern>
    </servlet-mapping>
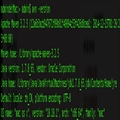
配置好,重新启动应用。访问http://hostname:port/appname/hystrix.stream, 可以看到如下的输出:
data: {"type":"HystrixCommand","name":"Address","group":"Address","currentTime":1393154954462,"isCircuitBreakerOpen":false,"errorPercentage":0,"errorCount":0,"requestCount":0,"rollingCountCollapsedRequests"......
系统会不断刷新以获取实时的数据。
Dashboard
从上面的输出可以看到,这样的纯字符输出可读性实在太差,运维人员很难从中就看出系统的当前状态,于是Netflix又开发了一个
开源项目(Dashboard:https://github.com/Netflix/Hystrix/wiki/Dashboard)来可视化这些数据,帮助运维人员更直观的了解系统的当前状态,Dashboard使用起来非常方便,其就是一个Web项目,你只需要把war包(http://search.maven.org/#browse%7C1045347652)下载下来,放到一个Web容器(Tomcat,Jetty等)中即可。
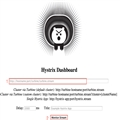
启动WebContainer访问Dashboard主页,可以看到如下的界面:

填入上面获取hystrix.stream的URL,点击Monitor,即可看到实时的监控画面:
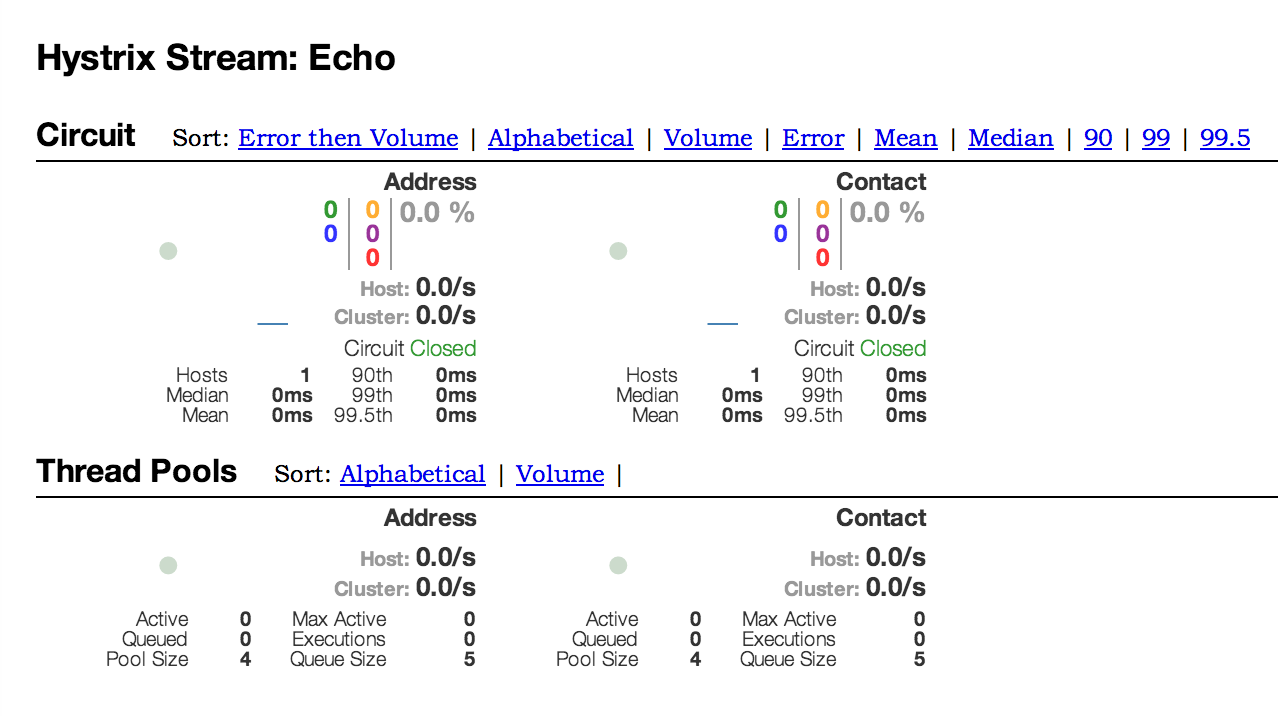
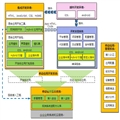
Dashboard主要展示了2类信息,一是HystrixCommand的执行情况,Hystrix Wiki上详细说明了图上的每个指标代表的含义:
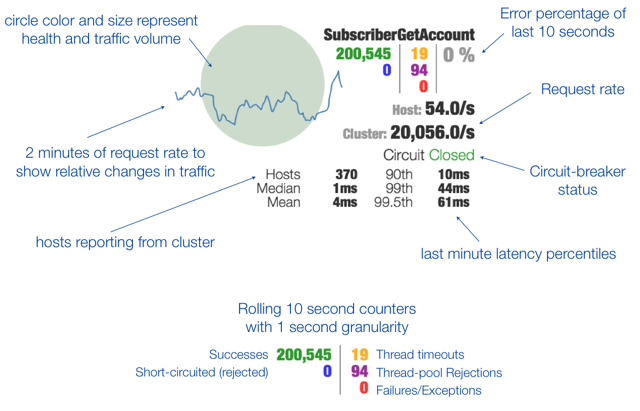
二是
线程池的状态,包括线程池名,大小,当前活跃线程说,最大活跃线程数,排队
队列大小等。
 Turbine
在复杂的
分布式系统中,相同服务的结点经常需要部署上百甚至上千个,很多时候,运维人员希望能够把相同服务的节点状态以一个整体集群的形式展现出来,这样可以更好的
把握整个系统的状态。 为此,Netflix又提供了一个开源项目(Turbine)来提供把多个hystrix.stream的内容聚合为一个数据源供Dashboard展示。
Turbine有2种用法,其一是内嵌Turbine到你的项目中;另外一个是把Turbine当做一个独立的Module。不管哪种用法,配置文件都是一致的。 Turbine默认会在classpath下查找配置文件:config.properties, 该文件中会配置:
1. Turbine在监控哪些集群:turbine.aggregator.clusterConfig=cluster-1,cluster-2
2. Turbine怎样获取到节点的监控信息(hystrix.stream):turbine.
instanceUrlSuffix.<cluster-name> = :/HystrixDemo/hystrix.stream
3. 集群下有哪些节点:turbine.ConfigPropertyBasedDiscovery.cluster-1.instances=localhost:8080,localhost:8081
上面这些都是最简单的
配置方法 Turbine使用了Netflix的另一个开源项目Archaius(https://github.com/Netflix/archaius)来做配置文件的管理,其提供了非常强大的配置文件管理策略,有需要的同学可以深入
研究(https://github.com/Netflix/Turbine/wiki/Configuration)。
使用Turbine的步骤一般如下:
1. 下载Turbine.war(https://github.com/downloads/Netflix/Turbine/turbine-web-1.0.0.war),并把其置于Web容器中。
2. 在Turbine项目的WEB-INF/classes目录下创建配置文件config.properties:
3. 启动Turbine服务
4. 在Dashboard项目中填入Tubine项目提供的stream: http://hostname:port/turbine/turbine.stream也可添加?cluster=<cluster-name>参数只监控某一个Cluster. Dashboard上展示的指标和之前是一样的,只是数据是已经聚合的数据了。
为遗留系统添加Hystrix
最后,来看看如何在不改动已有代码的前提下为应用添加Hystrix支持,在Spring的世界,以不改变已有代码的前提添加功能的最好解决方案就是aop,还是使用上面的示例,假设已有一个Customer
Service, Customer Service会调用ContactDao和AddressDao去获取Contact和Address信息。 如下:
public Customer getCustomerThroughDao(String customerId) {
        logger.info("Get Customer {}", customerId);
        try {
            Customer customer = new Customer(customerId, "xianlinbox");
            customer.setContact(contactDao.getContact(customerId));
            customer.setAddress(addressDao.getAddress(customerId));
            return customer;
        } catch (Exception e) {
            e.printStackTrace();
        }
        return null;
    }

public class AddressDao {
    private Logger logger = LoggerFactory.getLogger(AddressDao.class);

    public Address getAddress(String customerId) throws IOException {
        logger.info("Get address for customer {}", customerId);
        String response = Request.Get("http://localhost:9090/customer/" + customerId + "/address")
                .connectTimeout(1000)
                .socketTimeout(1000)
                .execute()
                .returnContent()
                .asString();

        return new ObjectMapper().readValue(response, Address.class);
    }
}

public class ContactDao {
    private Logger logger = LoggerFactory.getLogger(ContactDao.class);

    public Contact getContact(String customerId) throws IOException {
        logger.info("Get contact for customer {}", customerId);
        String response = Request.Get("http://localhost:9090/customer/" + customerId + "/contact")
                .connectTimeout(1000)
                .socketTimeout(1000)
                .execute()
                .returnContent()
                .asString();

        return new ObjectMapper().readValue(response, Contact.class);
    }
}
下面就来看看如何在不改动已有代码的基础上把ContactDao和AddressDao封装到HystixCommand中,首先创建HystrixComnandAdvice,该类会为创建一个HystrixCommand, 然后把切面封装到该HystrixCommand中:
public class HystrixCommandAdvice {
    private String groupName;
    private String commandName;

    public Object runCommand(final ProceedingJoinPoint pjp) {
        return wrapWithHystrixCommnad(pjp).execute();
    }

    private HystrixCommand<Object> wrapWithHystrixCommnad(final ProceedingJoinPoint pjp) {
        return new HystrixCommand<Object>(setter()) {
            @Override
            protected Object run() throws Exception {
                try {
                    return pjp.proceed();
                } catch (Throwable throwable) {
                    throw (Exception) throwable;
                }
            }

            @Override
            protected Object getFallback() {
                return null;
            }
        };
    }

    private HystrixCommand.Setter setter() {
        return HystrixCommand.Setter
                .withGroupKey(HystrixCommandGroupKey.Factory.asKey(groupName))
                .andCommandKey(HystrixCommandKey.Factory.asKey(commandName));
    }

    public void setGroupName(String groupName) {
        this.groupName = groupName;
    }

    public void setCommandName(String commandName) {
        this.commandName = commandName;
    }
}
然后,只需要再为ContactDao和AddressDao配置上该类示例就行了:
 <bean id="contactDaoCommand" class="com.xianlinbox.hystrix.dao.HystrixCommandAdvice">
        <property name="groupName" value="Contact"/>
        <property name="commandName" value="Contact"/>
    </bean>
    <bean id="addressDaoCommand" class="com.xianlinbox.hystrix.dao.HystrixCommandAdvice">
        <property name="groupName" value="Address"/>
        <property name="commandName" value="Address"/>
    </bean>
    <aop:config>
        <aop:aspect id="contactServiceAspect" ref="contactDaoCommand">
            <aop:pointcut id="contactServiceTarget"
                          expression="execution(* com.xianlinbox.hystrix.dao.ContactDao.getContact(..))"/>
            <aop:around method="runCommand" pointcut-ref="contactServiceTarget"/>
        </aop:aspect>
    </aop:config>

    <aop:config>
        <aop:aspect id="addressServiceAspect" ref="addressDaoCommand">
            <aop:pointcut id="addressServiceTarget"
                          expression="execution(* com.xianlinbox.hystrix.dao.AddressDao.getAddress(..))"/>
            <aop:around method="runCommand" pointcut-ref="addressServiceTarget"/>
        </aop:aspect>
    </aop:config>
该示例的系统行为和前面直接使用HystrixCommand构建的时完全一样的。
总结
从全文涉及的内容中,不难看出Netflix构建了一个完整的Hystrix生态系统,这个生态系统让Hystrix非常易于上手,同时又有非常多的配置选项和高级用法来满足不同系统的个性化需求。对于这样的工具,相信每个开发者都会喜欢。另外,对于Netflix这样把自己的经验变成工具造福整个社区的行为,不由得不赞赏。

- 大小: 335.8 KB

- 大小: 87.9 KB

- 大小: 98 KB

- 大小: 50.1 KB