WPF命令相对来说是一个崭新的概念,因为命令对于之前的WinForm根本没有实现这个概念,但是这并不影响我们学习WPF命令,因为设计模式中有命令模式,关于命令模式可以参考我设计模式的博文:http://www.cnblogs.com/zhili/p/CommandPattern.html。命令模式的要旨在于把命令的发送者与命令的执行者之间的依赖关系分割开了。对此,WPF中的命令也是一样的,WPF命令使得命令源(即命令发送者,也称调用程序)和命令目标(即命令执行者,也称处理程序)分离。现在是不是感觉命令是不是亲切了点了呢?下面就详细分享下我对WPF命令的理解。
上面通过命令模式引出了WPF命令的要旨,那在WPF中,命令是什么呢?对于程序来说,命令就是一个个任务,例如保存,复制,剪切这些操作都可以理解为一个个命令。即当我们点击一个复杂按钮时,此时就相当于发出了一个复制的命令,即告诉文本框执行一个复杂选中内容的操作,然后由文本框控件去完成复制的操作。在这里,复杂按钮就相当于一个命令发送者,而文本框就是命令的执行者。它们之间通过命令对象分割开了。如果采用事件处理机制的话,此时调用程序与处理程序就相互引用了。
所以对于命令只是从不同角度理解问题的一个词汇,之前理解点击一个按钮,触发了一个点击事件,在WPF编程中也可以理解为触发了一个命令。说到这里,问题又来了,WPF中既然有了命令了?那为什么还需要路由事件呢?对于这个问题,我的理解是,事件和命令是处理问题的两种方式,它们之间根本不存在冲突的,并且WPF命令中使用了路由事件。所以准确地说WPF命令应该是路由命令。那为什么说WPF命令是路由的呢?这个疑惑将会在WPF命令模型介绍中为大家解答。
另外,WPF命令除了使命令源和命令目标分割的优点外,它还具有另一个优点:
经过前面的介绍,大家应该已经命令了WPF命令吧。即命令就是一个操作,任务。接下来就要详细介绍了WPF命令模型了。
WPF命令模型具有4个重要元素:
WPF命令模型的核心就在于ICommand接口了,该接口定义命令的工作原理。该接口的定义如下所示:
public interface ICommand
{
    // Events
    event EventHandler CanExecuteChanged;

    // Methods
    bool CanExecute(object parameter);

    void Execute(object parameter);
}
该接口包括2个方法和一个事件。CanExecute方法返回命令的状态——指示命令是否可执行,例如,文本框中没有选择任何文本,此时Copy命令是不用的,CanExecute则返回为false。
Execute方法就是命令执行的方法,即处理程序。当命令状态改变时,会触发CanExecuteChanged事件。
当自定义命令时,不会直接去实现ICommand接口。而是使用RoutedCommand类,该类实是WPF中唯一现了ICommand接口的类。所有WPF命令都是RoutedCommand类或其派生类的实例。然而程序中处理的大部分命令不是RoutedCommand对象,而是RoutedUICommand对象。RoutedUICommand类派生与RoutedCommand类。
接下来介绍下为什么说WPF命令是路由的呢?实际上,RoutedCommand上Execute和CanExecute方法并没有包含命令的处理逻辑,而是将触发遍历元素树的事件来查找具有CommandBinding的对象。而真正命令的处理程序包含在CommandBinding的事件处理程序中。所以说WPF命令是路由命令。该事件会在元素树上查找CommandBinding对象,然后去调用CommandBinding的CanExecute和Execute来判断是否可执行命令和如何执行命令。那这个查找方向是怎样的呢?对于位于工具栏、菜单栏或元素的FocusManager.IsFocusScope设置为”true“是从元素树上根元素(一般指窗口元素)向元素方向向下查找,对于其他元素是验证元素树根方向向上查找。
WPF中提供了一组已定义命令,命令包括以下类:class="sentence" data-guid="4d464ca450650e2fa8c16311a73670ab" data-source="The command library consists of the following classes: <span class="mtpsTagOuterHtml" >ApplicationCommands, <span class="mtpsTagOuterHtml" >NavigationCommands, <span class="mtpsTagOuterHtml" >MediaCommands, <span class="mtpsTagOuterHtml" >EditingCommands, and the <span class="mtpsTagOuterHtml" >ComponentCommands.">ApplicationCommands、NavigationCommands、MediaCommands、EditingCommands 以及ComponentCommands。 这些类提供诸如 Cut、BrowseBack、BrowseForward、Play、Stop 和 Pause 等命令。
前面都是介绍了一些命令的理论知识,下面介绍了如何使用WPF命令来完成任务。XAML具体实现代码如下所示:
 1 <Window x:Class="WPFCommand.MainWindow"
 2         xmlns="http://schemas.microsoft.com/winfx/2006/xaml/presentation"
 3         xmlns:x="http://schemas.microsoft.com/winfx/2006/xaml"
 4         Title="MainWindow" Height="200" Width="300">
 5     <!--定义窗口命令绑定,绑定的命令是New命令,处理程序是NewCommand-->
 6     <Window.CommandBindings>
 7         <CommandBinding Command="ApplicationCommands.New" Executed="NewCommand"/>
 8     </Window.CommandBindings>
 9
10     <StackPanel>
11         <Menu>
12             <MenuItem Header="File">
13                 <!--WPF内置命令都可以采用其缩写形式-->
14                 <MenuItem Command="New"></MenuItem>
15             </MenuItem>
16         </Menu>
17
18         <!--获得命令文本的两种方式-->
19         <!--直接从静态的命令对象中提取文本-->
20         <Button Margin="5" Padding="5" Command="ApplicationCommands.New" ToolTip="{x:Static ApplicationCommands.New}">New</Button>
21
22         <!--使用数据绑定,获得正在使用的Command对象,并提取其Text属性-->
23         <Button Margin="5" Padding="5" Command="ApplicationCommands.New" Content="{Binding RelativeSource={RelativeSource Self},Path=Command.Text}"/>
24         <Button Margin="5" Padding="5" Visibility="Visible" Click="cmdDoCommand_Click" >DoCommand</Button>
25     </StackPanel>
26 </Window>
其对应的后台代码实现如下所示:
public partial class MainWindow : Window
    {
        public MainWindow()
        {
            InitializeComponent();

            //// 后台代码创建命令绑定
            //CommandBinding bindingNew = new CommandBinding(ApplicationCommands.New);
            //bindingNew.Executed += NewCommand;
            //// 将创建的命令绑定添加到窗口的CommandBindings集合中
            //this.CommandBindings.Add(bindingNew);
        }

        private void NewCommand(object sender, ExecutedRoutedEventArgs e)
        {
            MessageBox.Show("New 命令被触发了,命令源是:" + e.Source.ToString());
        }

        private void cmdDoCommand_Click(object sender, RoutedEventArgs e)
        {
            // 直接调用命令的两种方式
            ApplicationCommands.New.Execute(null, (Button)sender);

            //this.CommandBindings[0].Command.Execute(null);
        }

    }
上面程序的运行结果如下图所示:

在开发过程中,自然少不了自定义命令来完成内置命令所没有提供的任务。下面通过一个例子来演示如何创建一个自定义命令。
首先,定义一个Requery命令,具体的实现如下所示:
 public class DataCommands
    {
        private static RoutedUICommand requery;
        static DataCommands()
        {
            InputGestureCollection inputs = new InputGestureCollection();
            inputs.Add(new KeyGesture(Key.R, ModifierKeys.Control, "Ctrl+R"));
            requery = new RoutedUICommand(
              "Requery", "Requery", typeof(DataCommands), inputs);
        }

        public static RoutedUICommand Requery
        {
            get { return requery; }
        }
    }
上面代码实现了一个Requery命令,为了演示效果,我们需要把该命令应用到XAML标签上,具体的XAML代码如下所示:
<!--要使用自定义命令,首先需要将.NET命名空间映射为XAML名称空间,这里映射的命名空间为local-->
    <Window x:Class="WPFCommand.CustomCommand"
        xmlns="http://schemas.microsoft.com/winfx/2006/xaml/presentation"
        xmlns:x="http://schemas.microsoft.com/winfx/2006/xaml"

        xmlns:local="clr-namespace:WPFCommand"
        Title="CustomCommand" Height="300" Width="300" >

    <Window.CommandBindings>
        <!--定义命令绑定-->
        <CommandBinding Command="local:CustomCommands.Requery" Executed="RequeryCommand_Execute"/>
    </Window.CommandBindings>
    <StackPanel>
        <!--应用命令-->
        <Button Margin="5" Command="local:CustomCommands.Requery" Content="{Binding RelativeSource={RelativeSource Self}, Path=Command.Text}"></Button>
    </StackPanel>
</Window>
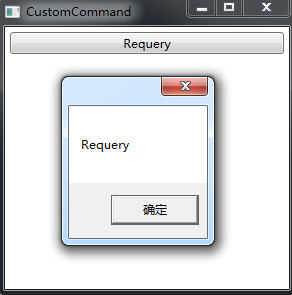
接下来,看看程序的运行效果,具体的运行结果如下图所示:

WPF命令模型缺少的一个特征就是Undo命令,尽管提供了一个ApplicationCommands.Undo命令,但是该命令通常被用于编辑控件,如TextBox控件。如果希望支持应用程序范围内的Undo操作,就需要在内部跟踪以前的命令,并且触发Undo操作时还原该命令。这个实现原理就是保持用一个集合对象保存之前所有执行过的命令,当触发Undo操作时,还要上一个命令的状态。这里除了需要保存执行过的命令外,还需要保存触发命令的控件以及状态,所以我们需要抽象出一个类来保存这些属性,我们取名这个类为CommandHistoryItem。为了保存命令和命令的状态,自然就需要在完成命令之前进行保存,所以自然联想到是否有Preview之类的事件呢?实际上确实有,这个事件就是PreviewExecutedEvent,所以我们需要在窗口加载完成后把这个事件注册到窗口上,这里在触发这个事件的时候就可以保存即将要执行的命令、命令源和命令源的内容。另外,之前的命令自然需要保存到一个列表中,这里使用ListBox控件作为这个列表,如果不希望用户在界面上看到之前的命令列表的话,也可以使用List等集合容器。
上面讲解完了主要实现思路之后,下面我们梳理下实现思路:
有了上面的实现思路之后,实现这个可撤销的命令程序也就是码代码的过程了。具体的后台代码实现如下所示:
  1  public partial class CommandsMonitor : Window
  2     {
  3         private static RoutedUICommand undo;
  4         public static RoutedUICommand Undo
  5         {
  6             get { return CommandsMonitor.undo; }
  7         }
  8
  9         static CommandsMonitor()
 10         {
 11             undo = new RoutedUICommand("Undo", "Undo", typeof(CommandsMonitor));
 12         }
 13
 14         public CommandsMonitor()
 15         {
 16             InitializeComponent();
 17             // 按下菜单栏按钮时,PreviewExecutedEvent事件会被触发2次,即CommandExecuted事件处理程序被触发了2次
 18             // 一次是菜单栏按钮本身,一次是目标源触发命令的执行,所以在CommandExecuted要过滤掉不关心的命令源
 19             this.AddHandler(CommandManager.PreviewExecutedEvent, new ExecutedRoutedEventHandler(CommandExecuted));
 20         }
 21
 22         public void CommandExecuted(object sender, ExecutedRoutedEventArgs e)
 23         {
 24             // 过滤掉命令源是菜单按钮的,因为我们只关心Textbox触发的命令
 25             if (e.Source is ICommandSource)
 26                 return;
 27             // 过滤掉Undo命令
 28             if (e.Command == CommandsMonitor.Undo)
 29                 return;
 30
 31             TextBox txt = e.Source as TextBox;
 32             if (txt != null)
 33             {
 34                 RoutedCommand cmd = e.Command as RoutedCommand;
 35                 if (cmd != null)
 36                 {
 37                     CommandHistoryItem historyItem = new CommandHistoryItem()
 38                     {
 39                         CommandName = cmd.Name,
 40                         ElementActedOn = txt,
 41                         PropertyActedOn = "Text",
 42                         PreviousState = txt.Text
 43                     };
 44
 45                     ListBoxItem item = new ListBoxItem();
 46                     item.Content = historyItem;
 47                     lstHistory.Items.Add(item);
 48                 }
 49
 50             }
 51         }
 52
 53         private void window_Unloaded(object sender, RoutedEventArgs e)
 54         {
 55             this.RemoveHandler(CommandManager.PreviewExecutedEvent, new ExecutedRoutedEventHandler(CommandExecuted));
 56         }
 57
 58         private void UndoCommand_Executed(object sender, RoutedEventArgs e)
 59         {
 60             ListBoxItem item = lstHistory.Items[lstHistory.Items.Count - 1] as ListBoxItem;
 61
 62             CommandHistoryItem historyItem = item.Content as CommandHistoryItem;
 63             if (historyItem == null)
 64             {
 65                 return;
 66             }
 67
 68             if (historyItem.CanUndo)
 69             {
 70                 historyItem.Undo();
 71             }
 72             lstHistory.Items.Remove(item);
 73         }
 74
 75         private void UndoCommand_CanExecuted(object sender, CanExecuteRoutedEventArgs e)
 76         {
 77             if (lstHistory == null || lstHistory.Items.Count == 0)
 78             {
 79                 e.CanExecute = false;
 80             }
 81             else
 82             {
 83                 e.CanExecute = true;
 84             }
 85         }
 86     }
 87
 88     public class CommandHistoryItem
 89     {
 90         public String CommandName { get; set; }
 91         public UIElement ElementActedOn { get; set; }
 92
 93         public string PropertyActedOn { get; set; }
 94
 95         public object PreviousState { get; set; }
 96
 97         public bool CanUndo
 98         {
 99             get { return (ElementActedOn != null && PropertyActedOn != ""); }
100         }
101
102         public void Undo()
103         {
104             Type elementType = ElementActedOn.GetType();
105             PropertyInfo property = elementType.GetProperty(PropertyActedOn);
106             property.SetValue(ElementActedOn, PreviousState, null);
107         }
108     }
109 }
其对应的XAML界面设计代码如下所示:
<Window x:Class="WPFCommand.CommandsMonitor"
        xmlns="http://schemas.microsoft.com/winfx/2006/xaml/presentation"
        xmlns:x="http://schemas.microsoft.com/winfx/2006/xaml"
        Title="CommandsMonitor" Height="300" Width="350"
        xmlns:local="clr-namespace:WPFCommand"
        Unloaded="window_Unloaded">
    <Window.CommandBindings>
        <CommandBinding Command="local:CommandsMonitor.Undo"
                        Executed="UndoCommand_Executed"
                        CanExecute="UndoCommand_CanExecuted"/>
    </Window.CommandBindings>
    <Grid>
        <Grid.RowDefinitions>
            <RowDefinition Height="Auto"></RowDefinition>
            <RowDefinition></RowDefinition>
            <RowDefinition></RowDefinition>
            <RowDefinition></RowDefinition>
        </Grid.RowDefinitions>
        <ToolBarTray Grid.Row="0">
            <ToolBar>
                <Button Command="ApplicationCommands.Cut">Cut</Button>
                <Button Command="ApplicationCommands.Copy">Copy</Button>
                <Button Command="ApplicationCommands.Paste">Paste</Button>
            </ToolBar>
            <ToolBar>
                <Button Command="local:CommandsMonitor.Undo">Reverse Last Command</Button>
            </ToolBar>
        </ToolBarTray>

        <TextBox Margin="5" Grid.Row="1"
             TextWrapping="Wrap" AcceptsReturn="True">
        </TextBox>
        <TextBox Margin="5" Grid.Row="2"
             TextWrapping="Wrap" AcceptsReturn="True">
        </TextBox>

        <ListBox Grid.Row="3" Name="lstHistory" Margin="5" DisplayMemberPath="CommandName"></ListBox>
    </Grid>
</Window>
上面程序的运行效果如下图所示:

到这里,WPF命令的内容就介绍结束了,关于命令主要记住命令模型四要素——命令、命令绑定、命令源和命令目标。后面继续为大家分享WPF的资源和样式的内容。
本文所有源码:WPFCommandDemo.zip