在网页中通过div+css实现半透明效果不难,今天我们看看一种在winfrom中实现的方法:
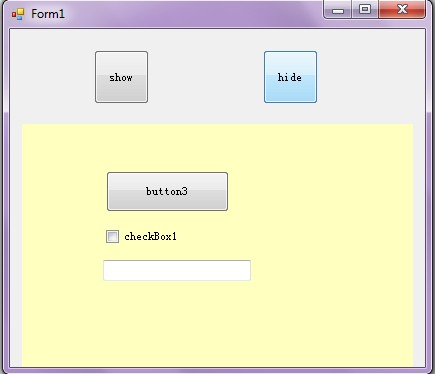
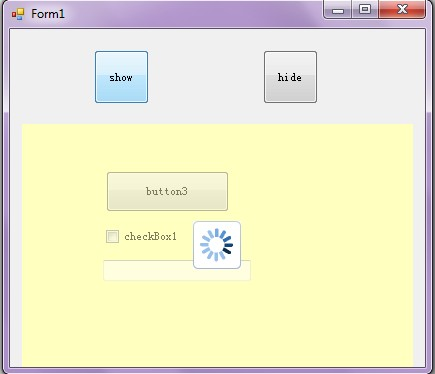
效果图如下,正常时:
 自定义半透明遮罩层 - 1" width="435" height="374" />
显示遮罩层时:
自定义遮罩层控件的源码如下:
View Row Code 1 class="csharp">using System; 2 using System.Drawing; 3 using System.Windows.Forms; 4 using System.function">ComponentModel; 5 6 namespace MyOpaqueLayer 7 { 8 /// <summary> 9 /// 自定义控件:半透明控件 10 /// </summary> 11 /* 12 * [ToolboxBitmap(typeof(MyOpaqueLayer))] 13 * 用于指定当把你做好的自定义控件添加到工具栏时,工具栏显示的图标。 14 * 正确写法应该是 15 * [ToolboxBitmap(typeof(XXXXControl),"xxx.bmp")] 16 * 其中XXXXControl是你的自定义控件,"xxx.bmp"是你要用的图标名称。 17 */ 18 [ToolboxBitmap(typeof(MyOpaqueLayer))] 19 public class MyOpaqueLayer : System.Windows.Forms.Control 20 { 21 private bool _transparentBG = true;//是否使用透明 22 private int _alpha = 125;//设置透明度 23 24 private System.ComponentModel.Container components = new System.ComponentModel.Container(); 25 26 public MyOpaqueLayer() 27 : this(125, true) 28 { 29 } 30 31 public MyOpaqueLayer(int Alpha, bool IsShowLoadingImage) 32 { 33 SetStyle(System.Windows.Forms.ControlStyles.Opaque, true); 34 base.CreateControl(); 35 36 this._alpha = Alpha; 37 if (IsShowLoadingImage) 38 { 39 PictureBox pictureBox_Loading = new PictureBox(); 40 pictureBox_Loading.BackColor = System.Drawing.Color.White; 41 pictureBox_Loading.Image = 加载中.Properties.Resources.loading; 42 pictureBox_Loading.Name = "pictureBox_Loading"; 43 pictureBox_Loading.Size = new System.Drawing.Size(48, 48); 44 pictureBox_Loading.SizeMode = System.Windows.Forms.PictureBoxSizeMode.AutoSize; 45 Point Location = new Point(this.Location.X + (this.Width - pictureBox_Loading.Width) / 2, this.Location.Y + (this.Height - pictureBox_Loading.Height) / 2);//居中 46 pictureBox_Loading.Location = Location; 47 pictureBox_Loading.Anchor = AnchorStyles.None; 48 this.Controls.Add(pictureBox_Loading); 49 } 50 } 51 52 53 protected override void Dispose(bool disposing) 54 { 55 if (disposing) 56 { 57 if (!((components == null))) 58 { 59 components.Dispose(); 60 } 61 } 62 base.Dispose(disposing); 63 } 64 65 /// <summary> 66 /// 自定义绘制窗体 67 /// </summary> 68 /// <param name="e"></param> 69 protected override void OnPaint(System.Windows.Forms.PaintEventArgs e) 70 { 71 float vlblControlWidth; 72 float vlblControlHeight; 73 74 Pen labelBorderPen; 75 SolidBrush labelBackColorBrush; 76 77 if (_transparentBG) 78 { 79 Color drawColor = Color.FromArgb(this._alpha, this.BackColor); 80 labelBorderPen = new Pen(drawColor, 0); 81 labelBackColorBrush = new SolidBrush(drawColor); 82 } 83 else 84 { 85 labelBorderPen = new Pen(this.BackColor, 0); 86 labelBackColorBrush = new SolidBrush(this.BackColor); 87 } 88 base.OnPaint(e); 89 vlblControlWidth = this.Size.Width; 90 vlblControlHeight = this.Size.Height; 91 e.Graphics.DrawRectangle(labelBorderPen, 0, 0, vlblControlWidth, vlblControlHeight); 92 e.Graphics.FillRectangle(labelBackColorBrush, 0, 0, vlblControlWidth, vlblControlHeight); 93 } 94 95 96 protected override CreateParams CreateParams//v1.10 97 { 98 get 99 { 100 CreateParams cp = base.CreateParams; 101 cp.ExStyle |= 0x00000020; //0x20; // 开启 WS_EX_TRANSPARENT,使控件支持透明 102 return cp; 103 } 104 } 105 106 /* 107 * [Category("myOpaqueLayer"), Description("是否使用透明,默认为True")] 108 * 一般用于说明你自定义控件的属性(Property)。 109 * Category用于说明该属性属于哪个分类,Description自然就是该属性的含义解释。 110 */ 111 [Category("MyOpaqueLayer"), Description("是否使用透明,默认为True")] 112 public bool TransparentBG 113 { 114 get 115 { 116 return _transparentBG; 117 } 118 set 119 { 120 _transparentBG = value; 121 this.Invalidate(); 122 } 123 } 124 125 [Category("MyOpaqueLayer"), Description("设置透明度")] 126 public int Alpha 127 { 128 get 129 { 130 return _alpha; 131 } 132 set 133 { 134 _alpha = value; 135 this.Invalidate(); 136 } 137 } 138 } 139 }OpaqueCommand的方法:ShowOpaqueLayer(显示遮罩层)和HideOpaqueLayer(隐藏遮罩层)
View Row Code 1 using System; 2 using System.Windows.Forms; 3 4 namespace 加载中 5 { 6 class OpaqueCommand 7 { 8 private MyOpaqueLayer.MyOpaqueLayer m_OpaqueLayer = null;//半透明蒙板层 9 10 /// <summary> 11 /// 显示遮罩层 12 /// </summary> 13 /// <param name="control">控件</param> 14 /// <param name="alpha">透明度</param> 15 /// <param name="isShowLoadingImage">是否显示图标</param> 16 public void ShowOpaqueLayer(Control control, int alpha, bool isShowLoadingImage) 17 { 18 try 19 { 20 if (this.m_OpaqueLayer == null) 21 { 22 this.m_OpaqueLayer = new MyOpaqueLayer.MyOpaqueLayer(alpha, isShowLoadingImage); 23 control.Controls.Add(this.m_OpaqueLayer); 24 this.m_OpaqueLayer.Dock = DockStyle.Fill; 25 this.m_OpaqueLayer.BringToFront(); 26 } 27 this.m_OpaqueLayer.Enabled = true; 28 this.m_OpaqueLayer.Visible = true; 29 } 30 catch { } 31 } 32 33 /// <summary> 34 /// 隐藏遮罩层 35 /// </summary> 36 public void HideOpaqueLayer() 37 { 38 try 39 { 40 if (this.m_OpaqueLayer != null) 41 { 42 this.m_OpaqueLayer.Visible = false; 43 this.m_OpaqueLayer.Enabled = false; 44 } 45 } 46 catch(Exception ex) 47 { 48 //MessageBox.Show(ex.Message); 49 } 50 } 51 } 52 }自定义半透明遮罩层源码下载:
files.cnblogs.com/JuneZhang/%E8%87%AA%E5%AE%9A%E4%B9%89%E5%8D%8A%E9%80%8F%E6%98%8E%E9%81%AE%E7%BD%A9%E5%B1%82-%E6%BA%90%E7%A0%81.rar