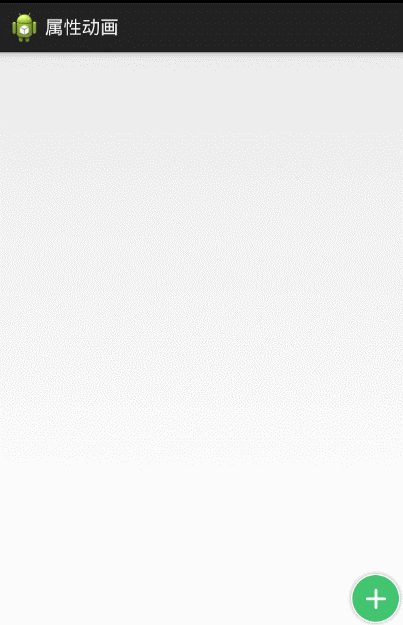
效果图:
Android动画有3类:
1.View Animation (Tween Animation)
2.Drawable Animation (Frame Animation)
2.Property Animation
其中,上述效果是用第二类属性动画做的。
通俗的说,属性动画就是在一定的时间内,按照一定的规律来改变对象的属性(该属性对于该对象应该是从形态(大小,位置等)上可以感受到的),从而是对象展现出动画的效果。
作用:可以定义动画来改变对象的属性( You can define an animation to change any object property over time, regardless of whether it draws to the screen or not. )
允许定义的属性(The property animation system lets you define the following characteristics of an animation:) 1.Duration 2.Time Interpolation 3.repeat count and behavior: 重复次数 和 是否回放 4.animatior set : 一组逻辑动画,可以同时播放、顺序播放、按一定延时播放 5.Frame refresh delay: 刷新时间,默认10ms先来看一个例子:
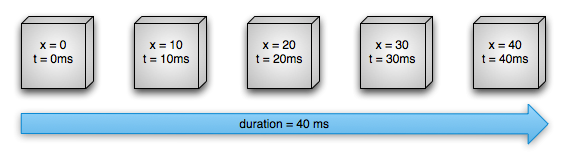
首先假设一个对象在屏幕的水平方向上移动,设定它的持续时间为40ms,位移是40像素长度。每10ms(属性动画默认的每帧的刷新率),它的移动距离是10像素长度。最后,在40ms的时候,这个动画结束了,而该对象停留在水平40像素的位置上(相对出发位置),这是一个使用线性插值器(linear interpolation)的例子。
先来看一下,这过程中主要的类之间是如何计算和工作的。
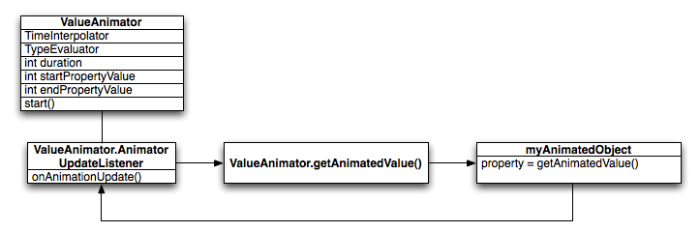
其中:
ValueAnimator : 用来跟踪动画的时机(The ValueAnimator object keeps track of your animation's timing, such as how long the animation has been running, and the current value of the property that it is animating.)
TimeInterpolation : 定义了时间插值器,根据特定的值(与动画刷新频率有关)计算出当前属性值改变的百分比(An interpolator define how specific values in an animation are calculated as a function of time.)
TimeEvaluate: class="Apple-converted-space"> 类型估值算法,它的作用是定义了如何根据当前属性改变的百分比来计算改变后的属性值(defines how to calculate values for the property being animated)
为了开启一个动画,首先新建一个ValueAnimator 实例并在构造的时候给它提供动画对象的属性的开始值(starting) 和 结束值(ending)的两个值和持续时间。从你调用start()方法开始,在整个动画过程,ValueAnimator 计算 了一个基于动画持续时间和动画流逝的时间的百分值(0到1之间)。这个百分值代表着动画完成的百分比,我们叫它为流逝百分比(流逝时间/总的持续时间)。在刚刚的例子中,显而易见地,在时间t=10ms的时候,流逝百分值应该是0.25(10/40)。
当 ValueAnimator 计算完该百分比之后,就会提醒 TimeInterpolator去计算当前属性改变的百分比。属性改变的百分比是一个该时刻对应的属性的值与结束值的百分比(对应上例中就是 (某时刻X的值)/40 ),它是一个与流逝百分比相匹配的值。在上述例子中:插入百分比总是与流逝百分比一样,在t=10ms的时候,流逝百分比是0.25(10/40),插入百分比也是0.25(10/40)。
当插入百分比计算完了之后,ValueAnimator会适当地调用TypeEvaluator基于插入百分比去计算需要改变的属性当前的具体值。对与上例在t=10ms时刻,该值是 0.25*(40-0)=10像素。
Animatiors
ClassDescriptionmonospace; margin-bottom: 0px;">ValueAnimator
The main timing engine for property animation that also computes the values for the property to be animated. It has all of the core functionality that calculates animation values and contains the timing details of each animation, information about whether an animation repeats, listeners that receive update events, and the ability to set custom types to evaluate. There are two pieces to animating properties: calculating the animated values and setting those values on the object and property that is being animated. ValueAnimator does not carry out the second piece, so you must listen for updates to values calculated by the ValueAnimator and modify the objects that you want to animate with your own logic. See the section about Animating with ValueAnimator for more information.
ObjectAnimator
A subclass of ValueAnimator that allows you to set a target object and object property to animate. This class updates the property accordingly when it computes a new value for the animation. You want to use ObjectAnimator most of the time, because it makes the process of animating values on target objects much easier. However, you sometimes want to use ValueAnimator directly because ObjectAnimator has a few more restrictions, such as requiring specific acessor methods to be present on the target object.
AnimatorSet
Provides a mechanism to group animations together so that they run in relation to one another. You can set animations to play together, sequentially, or after a specified delay. See the section about Choreographing multiple animations with Animator Sets for more information.
Evaluator:
Class/InterfaceDescriptionIntEvaluator
The default evaluator to calculate values for int properties.
FloatEvaluator
The default evaluator to calculate values for float properties.
ArgbEvaluator
The default evaluator to calculate values for color properties that are represented as hexidecimal values.
TypeEvaluator
An interface that allows you to create your own evaluator. If you are animating an object property that is not an int, float, or color, you must implement the TypeEvaluator interface to specify how to compute the object property's animated values. You can also specify a custom TypeEvaluator for int, float, and color values as well, if you want to process those types differently than the default behavior. See the section about Using a TypeEvaluator for more information on how to write a custom evaluator.
Interpolator:
Class/InterfaceDescriptionAccelerateDecelerateInterpolator
An interpolator whose rate of change starts and ends slowly but accelerates through the middle.
AccelerateInterpolator
An interpolator whose rate of change starts out slowly and then accelerates.
AnticipateInterpolator
An interpolator whose change starts backward then flings forward.
AnticipateOvershootInterpolator
An interpolator whose change starts backward, flings forward and overshoots the target value, then finally goes back to the final value.
BounceInterpolator
An interpolator whose change bounces at the end.
CycleInterpolator
An interpolator whose animation repeats for a specified number of cycles.
DecelerateInterpolator
An interpolator whose rate of change starts out quickly and and then decelerates.
LinearInterpolator
An interpolator whose rate of change is constant.
OvershootInterpolator
An interpolator whose change flings forward and overshoots the last value then comes back.
TimeInterpolator
An interface that allows you to implement your own interpolator.
可以看到,我们可以使用的动画类有ValueAnimator,ObjectAnimator,AnimatorSet。
其中ObjectAnimator是ValueAnimator的子类,可以更简单的改变对象的属性来展示动画,不过也有自己的局限性(需要改变的对象的属性,该属性必须最小有一个setter方法)
下面我们用AnimatorSet和ObjectAnimator来做出文章开始之前的效果。
首先对于每个菜单的选项,我们需要做一个自定义view,这是一个普通的组合控件.
 选项布局里只需一个TextView+ImageView即可。
自定义View的代码也比较简单:
 1 public class EnvrnoteItemView extends LinearLayout {
 2     private TextView mTextIViewLebal;
 3     private ImageView mImageView;
 4     private Context mContext;
 5     public EnvrnoteItemView(Context context) {
 6         super(context);
 7     }
 8
 9     public EnvrnoteItemView(Context context, AttributeSet attrs) {
10         super(context, attrs);
11          LayoutInflater.from(context).inflate(R.layout.envrnote_item, this,true);
12         mContext=context;
13         mTextIViewLebal=(TextView) findViewById(R.id.item_lebal_id);
14         mImageView=(ImageView) findViewById(R.id.item_image_id);
15     }
16     public void setLebalText(String text){
17         mTextIViewLebal.setText(text);
18         invalidate();
19     }
20     public void setImage(int resId){
21         mImageView.setImageBitmap(BitmapFactory.decodeResource(mContext.getResources(), resId));
22         invalidate();
23     }
24
25 }
剩下的就是动画的展示了:
 logs_code_hide('b9c302c9-f582-4c9f-ab02-72fd23695b9d',event)" src="/Upload/Images/2014081121/2B1B950FA3DF188F.gif" alt="" />
  1 public class FragmentEnvrnote extends Fragment implements OnClickListener {
  2     private final int DIS = 10;
  3     private ImageView mItemCompose;
  4     private EnvrnoteItemView mItemAttachment;
  5     private EnvrnoteItemView mItemAudio;
  6     private EnvrnoteItemView mItemCamera;
  7     private EnvrnoteItemView mItemHandwriting;
  8     private EnvrnoteItemView mItemLock;
  9     private EnvrnoteItemView mItemText;
 10     private boolean isOpened;
 11     private ObjectAnimator mMainAnimator;
 12     private AnimatorSet mAnimatorSet;
 13
 14     @Override
 15     public View onCreateView(LayoutInflater inflater, ViewGroup container,
 16             Bundle savedInstanceState) {
 17         // TODO Auto-generated method stub
 18         isOpened=false;
 19         View view = inflater.inflate(R.layout.fragment_envrnote, null);
 20         mItemCompose = (ImageView) view.findViewById(R.id.envrnote_compose_id);
 21         mItemCompose.setOnClickListener(this);
 22
 23         mItemAttachment = (EnvrnoteItemView) view
 24                 .findViewById(R.id.envrnote_attachment_id);
 25         mItemAttachment
 26                 .setLebalText(getString(R.string.envrnote_attachment_str));
 27         mItemAttachment.setImage(R.drawable.ic_attachment);
 28         mItemAttachment.setOnClickListener(this);
 29
 30         mItemAudio = (EnvrnoteItemView) view
 31                 .findViewById(R.id.envrnote_audio_id);
 32         mItemAudio.setLebalText(getString(R.string.envrnote_audio_str));
 33         mItemAudio.setImage(R.drawable.ic_audio);
 34         mItemAudio.setOnClickListener(this);
 35
 36         mItemCamera = (EnvrnoteItemView) view
 37                 .findViewById(R.id.envrnote_camera_id);
 38         mItemCamera.setLebalText(getString(R.string.envrnote_camera_str));
 39         mItemCamera.setImage(R.drawable.ic_camera);
 40         mItemCamera.setOnClickListener(this);
 41
 42         mItemHandwriting = (EnvrnoteItemView) view
 43                 .findViewById(R.id.envrnote_handwriting_id);
 44         mItemHandwriting
 45                 .setLebalText(getString(R.string.envrnote_handwritting_str));
 46         mItemHandwriting.setImage(R.drawable.ic_handwriting);
 47         mItemHandwriting.setOnClickListener(this);
 48
 49         mItemLock = (EnvrnoteItemView) view.findViewById(R.id.envrnote_lock_id);
 50         mItemLock.setLebalText(getString(R.string.envrnote_lock_str));
 51         mItemLock.setImage(R.drawable.ic_lock);
 52         mItemLock.setOnClickListener(this);
 53
 54         mItemText = (EnvrnoteItemView) view.findViewById(R.id.envrnote_text_id);
 55         mItemText.setLebalText(getString(R.string.envrnote_text_str));
 56         mItemText.setImage(R.drawable.ic_text);
 57         mItemText.setOnClickListener(this);
 58         return view;
 59     }
 60
 61     @Override
 62     public void onClick(View v) {
 63         if (v == mItemCompose) {
 64             if (!isOpened) {
 65                 openMenu();
 66                 isOpened = true;
 67             } else {
 68                 closeMenu();
 69                 isOpened = false;
 70             }
 71         }
 72         else{
 73             if (!isOpened) {
 74                 openMenu();
 75                 isOpened = true;
 76             } else {
 77                 closeMenu();
 78                 isOpened = false;
 79             }
 80         }
 81     }
 82
 83     private void openMenu() {
 84         showItem(mItemAttachment, 0, 6);
 85         showItem(mItemAudio, 1, 6);
 86         showItem(mItemCamera, 2, 6);
 87         showItem(mItemHandwriting, 3, 6);
 88         showItem(mItemLock, 4, 6);
 89         showItem(mItemText, 5, 6);
 90     }
 91
 92     private void closeMenu() {
 93         closeItem(mItemAttachment, 0, 6);
 94         closeItem(mItemAudio, 1, 6);
 95         closeItem(mItemCamera, 2, 6);
 96         closeItem(mItemHandwriting, 3, 6);
 97         closeItem(mItemLock, 4, 6);
 98         closeItem(mItemText, 5, 6);
 99     }
100
101     private void showItem(final View view, int index, int total) {
102         if(view.getVisibility()!= View.VISIBLE){
103             view.setVisibility(View.VISIBLE);
104         }
105         int baseDistance=mItemCompose.getHeight()+DIS;
106         float baseY=mItemCompose.getTranslationY();
107         mAnimatorSet =new AnimatorSet();
108         mAnimatorSet.playTogether(
109                 ObjectAnimator.ofFloat(view, "translationY", baseY-((index+1)*baseDistance)),
110                 ObjectAnimator.ofFloat(view, "scaleX", 0f, 1.0f),
111                 ObjectAnimator.ofFloat(view, "scaleY", 0f, 1.0f),
112                 ObjectAnimator.ofFloat(view, "alpha", 0f, 1.0f));
113         mAnimatorSet.setDuration(100);
114         mAnimatorSet.start();
115     }
116
117     private void closeItem(final View view, int index, int total) {
118         if (view.getVisibility() != View.VISIBLE) {
119             view.setVisibility(View.VISIBLE);
120         }
121         mAnimatorSet =new AnimatorSet();
122         mAnimatorSet.playTogether(
123                 ObjectAnimator.ofFloat(view, "translationY",mItemCompose.getTranslationY()),
124                 ObjectAnimator.ofFloat(view, "scaleX", 1.0f, 0f),
125                 ObjectAnimator.ofFloat(view, "scaleY", 1.0f, 0f),
126                 ObjectAnimator.ofFloat(view, "alpha", 1.0f, 0f));
127         mAnimatorSet.setDuration(100);
128         mAnimatorSet.addListener(new AnimatorListener() {
129
130             @Override
131             public void onAnimationStart(Animator animation) {
132                 // TODO Auto-generated method stub
133
134             }
135
136             @Override
137             public void onAnimationRepeat(Animator animation) {
138                 // TODO Auto-generated method stub
139
140             }
141
142             @Override
143             public void onAnimationEnd(Animator animation) {
144                 // TODO Auto-generated method stub
145                 view.setVisibility(View.GONE);
146             }
147
148             @Override
149             public void onAnimationCancel(Animator animation) {
150                 // TODO Auto-generated method stub
151
152             }
153         });
154         mAnimatorSet.start();
155     }
156
157 }
View Code
主界面的layout:
 1 <?xml version="1.0" encoding="utf-8"?>
 2 <FrameLayout xmlns:android="http://schemas.android.com/apk/res/android"
 3     android:layout_width="match_parent"
 4     android:layout_height="match_parent"
 5     android:orientation="vertical" >
 6
 7     <ImageView
 8         android:id="@+id/envrnote_compose_id"
 9         android:layout_width="wrap_content"
10         android:layout_height="wrap_content"
11         android:layout_gravity="bottom|right"
12         android:background="@drawable/ic_compose"
13         android:padding="5dp"
14         android:scaleType="fitXY" />
15
16     <com.example.drawabeltest.envrnote.EnvrnoteItemView
17         android:id="@+id/envrnote_attachment_id"
18         android:layout_width="wrap_content"
19         android:layout_height="wrap_content"
20         android:layout_gravity="bottom|right"
21         android:padding="5dp"
22         android:visibility="gone" />
23
24     <com.example.drawabeltest.envrnote.EnvrnoteItemView
25         android:id="@+id/envrnote_audio_id"
26         android:layout_width="wrap_content"
27         android:layout_height="wrap_content"
28         android:layout_gravity="bottom|right"
29         android:padding="5dp"
30         android:visibility="gone" />
31
32     <com.example.drawabeltest.envrnote.EnvrnoteItemView
33         android:id="@+id/envrnote_camera_id"
34         android:layout_width="wrap_content"
35         android:layout_height="wrap_content"
36         android:layout_gravity="bottom|right"
37         android:padding="5dp"
38         android:visibility="gone" />
39
40     <com.example.drawabeltest.envrnote.EnvrnoteItemView
41         android:id="@+id/envrnote_handwriting_id"
42         android:layout_width="wrap_content"
43         android:layout_height="wrap_content"
44         android:layout_gravity="bottom|right"
45         android:padding="5dp"
46         android:visibility="gone" />
47
48     <com.example.drawabeltest.envrnote.EnvrnoteItemView
49         android:id="@+id/envrnote_lock_id"
50         android:layout_width="wrap_content"
51         android:layout_height="wrap_content"
52         android:layout_gravity="bottom|right"
53         android:padding="5dp"
54         android:visibility="gone" />
55
56     <com.example.drawabeltest.envrnote.EnvrnoteItemView
57         android:id="@+id/envrnote_text_id"
58         android:layout_width="wrap_content"
59         android:layout_height="wrap_content"
60         android:layout_gravity="bottom|right"
61         android:padding="5dp"
62         android:visibility="gone" />
63
64 </FrameLayout>
View Layout
可以看到,AnimaotrSet和ObjectAnimator使用起来还是比较方便的,不过前面也说过了ObjectAnimator相对ValueAnimator还是有一定局限性,所以为了更深入学习属性动画,还是需要学会如何使用ValueAnimator,另外还需要学会自定义TimeInterpolator和TypeEvaluator,而这也是我下一篇的重点。