作者:杨振林
?
本文将对BMP格式文件进行分析,实现对BMP文件读取、修改、保存的功能。
首先对BMP文件进行分析,分析材料引自互联网。16进制。
class="MsoNormal">
偏移量
域的名称
大小
内容
图象文件
头
0000h
文件标识
2 bytes
两字节的内容用来识别位图的类型:
‘BM’ : Windows 3.1x, 95, NT, …
‘BA’ :OS/2 Bitmap Array
‘CI’ :OS/2 Color Icon
‘CP’ :OS/2 Color Pointer
‘IC’ : OS/2 Icon
‘PT’ :OS/2 Pointer
注:因为OS/2系统并没有被普及开,所以在编程时,你只需判断第一个标识“BM”就行。
0002h
File Size
1 dword
用字节表示的整个文件的大小
0006h
Reserved
1 dword
保留,必须设置为0
000Ah
Bitmap Data Offset
1 dword
从文件开始到位图数据开始之间的数据(bitmap data)之间的偏移量
000Eh
Bitmap Header Size
1 dword
位图信息头(Bitmap Info Header)的长度,用来描述位图的颜色、压缩方法等。下面的长度表示:
28h - Windows 3.1x, 95, NT, …
0Ch - OS/2 1.x
F0h - OS/2 2.x
注:在Windows95、98、2000等操作系统中,位图信息头的长度并不一定是28h,因为微软已经制定出了新的BMP文件格式,其中的信息头结构变化比较大,长度加长。所以最好不要直接使用常数28h,而是应该从具体的文件中读取这个值。这样才能确保程序的兼容性。
0012h
Width
1 dword
位图的宽度,以象素为单位
0016h
Height
1 dword
位图的高度,以象素为单位
001Ah
Planes
1 word
位图的位面数(注:该值将总是1)
图象
信息
头
001Ch
Bits Per Pixel
1 word
每个象素的位数
1 - 单色位图(实际上可有两种颜色,缺省情况下是黑色和白色。你可以自己定义这两种颜色)
4 - 16 色位图
8 - 256 色位图
16 - 16bit 高彩色位图
24 - 24bit 真彩色位图
32 - 32bit 增强型真彩色位图
001Eh
Compression
1 dword
压缩说明:
0 - 不压缩 (使用BI_RGB表示)
1 - RLE 8-使用8位RLE压缩方式(用BI_RLE8表示)
2 - RLE 4-使用4位RLE压缩方式(用BI_RLE4表示)
3 - Bitfields-位域存放方式(用BI_BITFIELDS表示)
0022h
Bitmap Data Size
1 dword
用字节数表示的位图数据的大小。该数必须是4的倍数
0026h
HResolution
1 dword
用象素/米表示的水平分辨率
002Ah
VResolution
1 dword
用象素/米表示的垂直分辨率
002Eh
Colors
1 dword
位图使用的颜色数。如8-比特/象素表示为100h或者 256.
0032h
Important Colors
1 dword
指定重要的颜色数。当该域的值等于颜色数时(或者等于0时),表示所有颜色都一样重要
调色板数据
根据BMP版本的不同而不同
Palette
N * 4 byte
调色板规范。对于调色板中的每个表项,这4个字节用下述方法来描述RGB的值:
1字节用于蓝色分量
1字节用于绿色分量
1字节用于红色分量
1字节用于填充符(设置为0)
图象数据
根据BMP版本及调色板尺寸的不同而不同
Bitmap Data
xxx bytes
该域的大小取决于压缩方法及图像的尺寸和图像的位深度,它包含所有的位图数据字节,这些数据可能是彩色调色板的索引号,也可能是实际的RGB值,这将根据图像信息头中的位深度值来决定。
?
第一步:读取
将文件内容读取一个BMP文件,在文件中提取出“宽”、“高”、“图像数据”三项重要数据。将“图像数据”保存到数组中。这样我们就可以得出每一个点的R、G、B值。注意处理宽度时,由于每四个连续点保存在一起,当宽度到达边界时,如果不足四个,则该行由0补齐。所以在读的时候要跳过可能出现的0。skipWide变量表示的就是需要跳过的像素数(可能为0(不用跳)、1、2、3)。
?
	public void myRead(String str) {

		File f = new File(str);

		DataInputStream dis = null;
		try {

			FileInputStream fis = new FileInputStream(f);
			dis = new DataInputStream(fis);

			// 0-17 跳过
			byte[] bs1 = new byte[18];
			dis.read(bs1);

			// 0x0012h-0x0015h 18-21 宽
			Width = NewInt.readInt(dis);
			// 0x0016h-0x0019h 22-25 高
			Height = NewInt.readInt(dis);

			// 26-53 跳过
			byte[] bs2 = new byte[28];
			dis.read(bs2);

			// 图像数据区

			R = new int[Height][Width];
			G = new int[Height][Width];
			B = new int[Height][Width];

			if (!(Width * 3 % 4 == 0)) {
				skipWide = 4 - Width * 3 % 4;
			}

			for (int h = 0; h < Height; h++) {
				for (int w = 0; w < Width; w++) {
					int blue = dis.read();
					int green = dis.read();
					int red = dis.read();

					R[h][w] = red;
					G[h][w] = green;
					B[h][w] = blue;

					// 跳过补0
					if (w == Width - 1) {
						dis.skipBytes(skipWide);
					}
				}
			}

		} catch (Exception e) {
			e.printStackTrace();
		} finally {
			try {
				dis.close();
			} catch (IOException e) {
				e.printStackTrace();
			}
		}
	}
? 需要注意的是:BMP文件中数据的保存格式是:以字节为单位,多字节数据低位字节在前,高位字节在后。例如 1B 0A 其实表示的是0x0A1Bh,即十进制2587。
我在这里用了一个转换方法。
	/**
	 * 高低位反转
	 */
	public static int readInt(DataInputStream dis)throws IOException {
		int ch1 = 0, ch2 = 0, ch3 = 0, ch4 = 0;

			ch1 = dis.read();
			ch2 = dis.read();
			ch3 = dis.read();
			ch4 = dis.read();

		return ((ch1 << 0) + (ch2 << 0) + (ch3 << 16) + (ch4 << 24));
	}
?
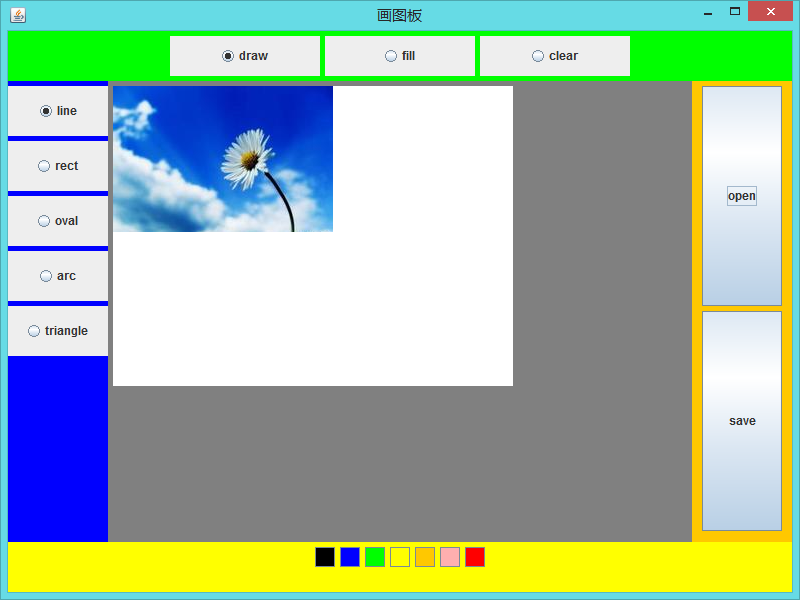
当文件读取到数据中之后,就可以遍历数组中的所有值,进行绘制了。如果不需要修改和保存,那么直接绘制到画布上就可以了。如果想实现修改和保存,就要用到缓冲绘图这个工具,因为缓冲绘图中有getRGB(x,y),这个方法,可以获取缓冲绘图中某个坐标点(x,y)的RGB值。此方法框架JFrame中没有。当绘制到缓冲绘图之后,将缓冲绘图中的内容复制到当前画布即可看到读取的BMP文件。
?
	public void drawBMP() {

		for (int h = 0; h < Height; h++) {
			for (int w = 0; w < Width; w++) {
				gg.setColor(new Color(R[h][w], G[h][w], B[h][w]));
				gg.drawLine(w, Height-h-1, w, Height-h-1);

			}
		}
	}
?
将缓冲绘图中的内容复制到当前画布的代码是:g.drawImage(bf, 0, 0, null);
至此,完成了读取操作。
?
?
?
?
第二步:修改
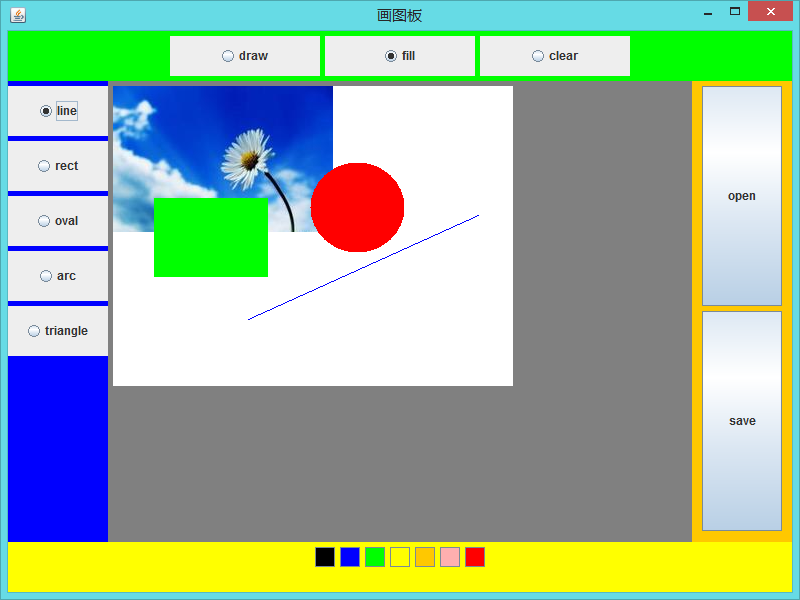
本工程使用的修改方法是画图板的基本方法,可以参照 http://yangzhenlin.iteye.com/blog/1774822 由于不是本文重点,这里略写。需要注意的一点是,修改中绘制的图形都要先保存到缓冲绘图中,再复制到画布上;而不是直接画到画布上。使用MouseListener监听器。本文列出代码。
?
import java.awt.Color;
import java.awt.Graphics;
import java.awt.event.MouseEvent;
import java.awt.event.MouseListener;
import java.awt.image.BufferedImage;
import javax.swing.ButtonGroup;

/**
 * 画图板的监听器,实现鼠标监听器接口
 *
 * @author YangZhenlin
 *
 */
public class DrawListener implements MouseListener {

	private int x1, y1, x2, y2;
	private java.awt.Graphics g;
	private javax.swing.ButtonGroup group;
	private javax.swing.ButtonGroup typegroup;
	private String type = "rect";// 要绘制的形状类型:line直线 rect矩形 oval椭圆
	private String typetype = "draw";
	private Color color;// 要绘制的颜色
	private Draw du;
	private Graphics gg;
	private BufferedImage bf;

	public DrawListener(Graphics g, Graphics gg, ButtonGroup group,
			ButtonGroup typegroup, Draw du, BufferedImage bf) {
		this.g = g;
		this.gg = gg;
		this.group = group;
		this.typegroup = typegroup;
		this.du = du;
		this.bf = bf;

	}

	public void mousePressed(MouseEvent e) {
		// 要绘制的时候才需要知道即将绘制的形状
		// 得到按钮族中被选中的按钮
		javax.swing.ButtonModel bm = group.getSelection();
		// 得到按钮的动作命令,作为要绘制的形状类型
		type = bm.getActionCommand();

		javax.swing.ButtonModel tm = typegroup.getSelection();
		typetype = tm.getActionCommand();

		// 得到选中的颜色
		color = du.selectColor;
		// System.out.println(color);
		// 设置要绘制的颜色
		gg.setColor(color);


		x1 = e.getX();
		y1 = e.getY();
	}

	public void mouseReleased(MouseEvent e) {

		x2 = e.getX();
		y2 = e.getY();

		if (type.equals("line")) {
			// 画直线
			gg.drawLine(x1, y1, x2, y2);
			g.drawImage(bf, 0, 0, null);

		} else if (type.equals("rect")) {
			/**
			 * 画矩形
			 */
			if (typetype.equals("draw")) {
				gg.drawRect(Math.min(x1, x2), Math.min(y1, y2),
						Math.abs(x1 - x2), Math.abs(y1 - y2));
				g.drawImage(bf, 0, 0, null);
			} else if (typetype.equals("fill")) {
				gg.fillRect(Math.min(x1, x2), Math.min(y1, y2),
						Math.abs(x1 - x2), Math.abs(y1 - y2));
				g.drawImage(bf, 0, 0, null);

			} else if (typetype.equals("clear")) {
				gg.setColor(Color.WHITE);
				gg.fillRect(Math.min(x1, x2), Math.min(y1, y2),
						Math.abs(x1 - x2), Math.abs(y1 - y2));
				g.drawImage(bf, 0, 0, null);
			}

		} else if (type.equals("oval")) {
			if (typetype.equals("draw")) {
				gg.drawOval(Math.min(x1, x2), Math.min(y1, y2),
						Math.abs(x1 - x2), Math.abs(y1 - y2));
				g.drawImage(bf, 0, 0, null);
			} else if (typetype.equals("fill")) {
				gg.fillOval(Math.min(x1, x2), Math.min(y1, y2),
						Math.abs(x1 - x2), Math.abs(y1 - y2));
				g.drawImage(bf, 0, 0, null);
			} else if (typetype.equals("clear")) {
				gg.setColor(Color.WHITE);
				gg.fillOval(Math.min(x1, x2), Math.min(y1, y2),
						Math.abs(x1 - x2), Math.abs(y1 - y2));
				g.drawImage(bf, 0, 0, null);
			}
		} else if (type.equals("arc")) {
			if (typetype.equals("draw")) {
				gg.drawArc(Math.min(x1, x2), Math.min(y1, y2),
						Math.abs(x1 - x2), Math.abs(y1 - y2), 90, 90);
				g.drawImage(bf, 0, 0, null);
			} else if (typetype.equals("fill")) {
				gg.fillArc(Math.min(x1, x2), Math.min(y1, y2),
						Math.abs(x1 - x2), Math.abs(y1 - y2), 90, 90);
				g.drawImage(bf, 0, 0, null);
			} else if (typetype.equals("clear")) {
				gg.setColor(Color.WHITE);

				gg.fillArc(Math.min(x1, x2), Math.min(y1, y2),
						Math.abs(x1 - x2), Math.abs(y1 - y2), 90, 90);
				g.drawImage(bf, 0, 0, null);
			}
		} else if (type.equals("triangle")) {
			if (typetype.equals("draw")) {

				gg.drawLine(Math.min(x1, x2), Math.min(y1, y2),
						Math.max(x1, x2), Math.max(y1, y2));
				gg.drawLine(Math.min(x1, x2), Math.min(y1, y2),
						Math.min(x1, x2), Math.max(y1, y2));
				gg.drawLine(Math.min(x1, x2), Math.max(y1, y2),
						Math.max(x1, x2), Math.max(y1, y2));
				g.drawImage(bf, 0, 0, null);
			} else if (typetype.equals("fill")) {
				int xPoints[] = { Math.min(x1, x2), Math.min(x1, x2),
						Math.max(x1, x2) };
				int yPoints[] = { Math.min(y1, y2), Math.max(y1, y2),
						Math.max(y1, y2) };
				gg.fillPolygon(xPoints, yPoints, 3);
				g.drawImage(bf, 0, 0, null);
			} else if (typetype.equals("clear")) {
				int xPoints[] = { Math.min(x1, x2), Math.min(x1, x2),
						Math.max(x1, x2) };
				int yPoints[] = { Math.min(y1, y2), Math.max(y1, y2),
						Math.max(y1, y2) };
				gg.setColor(Color.WHITE);
				gg.fillPolygon(xPoints, yPoints, 3);
				g.drawImage(bf, 0, 0, null);
			}
		}

	}

	public void mouseEntered(MouseEvent e) {
	}

	public void mouseExited(MouseEvent e) {
	}

	public void mouseClicked(MouseEvent e) {
	}
}
?
?
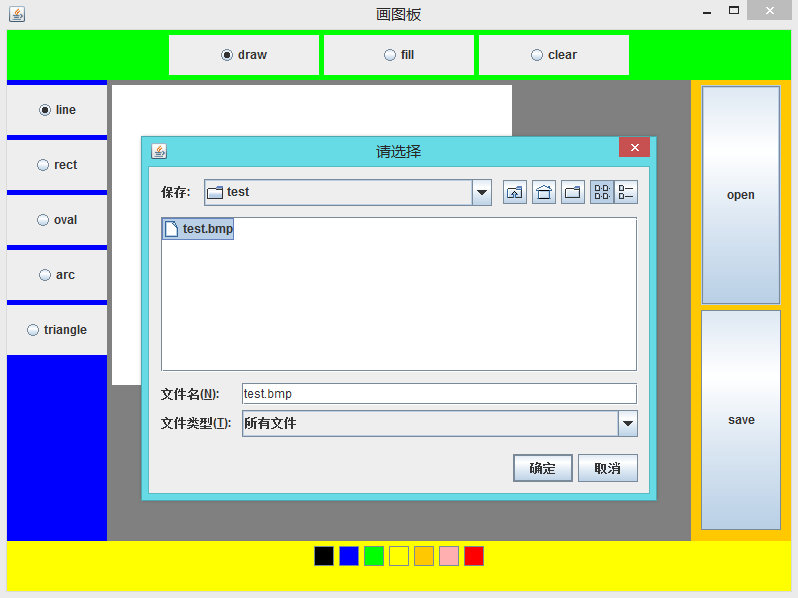
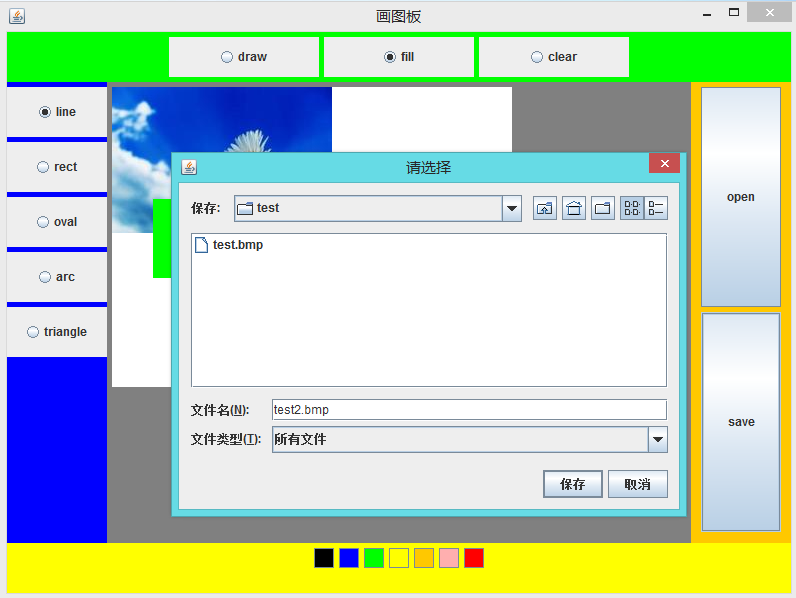
第三步:保存
经过前两步,修改好的数据目前保存在缓冲绘图中。需要先获取缓冲绘图中每个像素的RGB值,然后将RGB值整理好,并在宽度不为4整数的边缘地方补充0,最后做成一个一位数组填到新文件的图像数据区。同样,需要进行高低位转化。
?
高低位转化
	/**
	 * 写四位高低反转
	 */
	public static void writeInt(DataOutputStream dos, int i) throws IOException {
		dos.write(i);
		dos.write(i >> 8);
		dos.write(i >> 16);
		dos.write(i >> 24);
	}

	/**
	 * 写两位高低反转
	 */
	public static void writeShort(DataOutputStream dos, short i) throws IOException {
		dos.write(i);
		dos.write(i >> 8);
	}
?
保存
	public void write(BufferedImage bf, String out) {

		// 获取宽
		int width = bf.getWidth();
		// 三倍宽
		int triWidth = width * 3;
		// 获取高
		int height = bf.getHeight();
		// 三倍宽补0
		int fullTriWidth = 0;
		if (triWidth % 4 == 0) {
			fullTriWidth = triWidth;
		} else if (triWidth % 4 != 0) {
			// 整除取整,加1后变成四倍
			fullTriWidth = 4 * ((triWidth / 4) + 1);
		}
		// px是一个宽乘以高的二维数组
		int[][] px = new int[height][width];

		for (int h = 0; h < height; h++) {
			for (int w = 0; w < width; w++) {
				px[h][w] = bf.getRGB(w, h);
			}
		}

		// rgbcolor数组
		byte[][][] rgbcolor = new byte[height][width][3];

		// r, g, b数组,把px拆分开
		for (int h = 0; h < height; h++) {
			for (int w = 0; w < width; w++) {
				// 分拆24位色
				rgbcolor[h][w][0] = (byte) px[h][w];
				rgbcolor[h][w][1] = (byte) (px[h][w] >>> 8);
				rgbcolor[h][w][2] = (byte) (px[h][w] >>> 16);

			}
		}

		int num = 0;
		byte[] rgbs = new byte[triWidth * height];
		for (int h = 0; h < height; h++) {
			for (int w = 0; w < width; w++) {
				rgbs[num++] = (byte) rgbcolor[h][w][0];
				rgbs[num++] = (byte) rgbcolor[h][w][1];
				rgbs[num++] = (byte) rgbcolor[h][w][2];
			}
		}

		// 补齐扫描行长度为4的倍数
		byte[] fullrgbs = new byte[fullTriWidth * height];
		for (int h = 0; h < height; h++) {
			for (int w = 0; w < fullTriWidth; w++) {
				if (w < triWidth) {
					fullrgbs[fullTriWidth * h + w] = rgbs[(height-h-1) * triWidth + w];
				} else {
					fullrgbs[fullTriWidth * h + w] = 0;
				}
			}
		}

		DataOutputStream dos = null;
		try {
			FileOutputStream fos = new FileOutputStream(out);
			dos = new DataOutputStream(fos);
			dos.write('B');// 0
			dos.write('M');// 1
			NewInt.writeInt(dos, width * height * 3 + 54);// 2-5文件大小
			NewInt.writeInt(dos, 0);// 6-9保留
			NewInt.writeInt(dos, 54);// 10-13偏移量
			NewInt.writeInt(dos, 40);// 14-17头信息
			NewInt.writeInt(dos, width);// 18-21宽
			NewInt.writeInt(dos, height);// 22-25高
			NewInt.writeShort(dos, (short) 1);// 26-27 1帧数
			NewInt.writeShort(dos, (short) 24);// 28-29 24位数
			NewInt.writeInt(dos, 0);// 30-33 压缩
			NewInt.writeInt(dos, 4);// 34-37 size
			NewInt.writeInt(dos, 3800);// 38-41 水平分辨率
			NewInt.writeInt(dos, 3800);// 42-45 垂直分辨率
			NewInt.writeInt(dos, 0);// 46-49 颜色索引 0为所有
			NewInt.writeInt(dos, 0);// 50-53 重要颜色索引 0为所有

			// 写入所有图像数据
			dos.write(fullrgbs);
			dos.flush();

		} catch (FileNotFoundException e) {
			e.printStackTrace();
		} catch (IOException e) {
			e.printStackTrace();
		} finally {
			try {
				dos.close();
			} catch (IOException e) {
				e.printStackTrace();
			}
		}
	}
?
附JAR包
?