目录
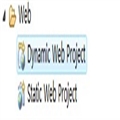
[一]、构建项目
创建项目?xfire-jsr181-demo:
class="brush: bash; gutter: true; first-line: 1">mvn archetype:create -DgroupId=com.micmiu.xfire.demo -DartifactId=xfire-jsr181-demo -DarchetypeArtifactId=maven-archetype-webapp -DinteractiveMode=false
转为Eclipse项目并导入到Eclipse 中:
mvn eclipse:eclipse
配置项目的源目录和编译目录,.classpath?文件内容如下:
<?xml version="1.0" encoding="UTF-8"?>
<classpath>
	<classpathentry kind="src" output="target/classes" path="src/main/java"/>
	<classpathentry kind="src" output="target/classes" path="src/main/resources"/>
	<classpathentry kind="src" output="target/test-classes" path="src/test"/>
	<classpathentry kind="con" path="org.eclipse.jdt.launching.JRE_CONTAINER"/>
	<classpathentry kind="con" path="org.maven.ide.eclipse.MAVEN2_CLASSPATH_CONTAINER"/>
	<classpathentry kind="output" path="target/classes"/>
</classpath>
添加相关的依赖,修改POM.xml?添加如下内容:
    <dependency>
    	<groupId>javax.servlet</groupId>
    	<artifactId>servlet-api</artifactId>
    	<version>2.3</version>
    	<type>jar</type>
    	<scope>compile</scope>
    </dependency>
    <dependency>
    	<groupId>org.codehaus.xfire</groupId>
    	<artifactId>xfire-all</artifactId>
    	<version>1.2.6</version>
    	<type>jar</type>
    	<scope>compile</scope>
    </dependency>
[二]、服务端的实现
创建基础的package:com.micmiu.xfire.demo.jsr181
1.服务端接口:HelloJSR181Service.java
package com.micmiu.xfire.demo.jsr181;

import javax.jws.WebMethod;
import javax.jws.WebParam;
import javax.jws.WebService;

/**
 *
 * @blog http://www.micmiu.com
 * @author Michael
 */
@WebService
public interface HelloJSR181Service {

	/**
	 * return welcome
	 *
	 * @param username
	 * @return
	 */
	@WebMethod
	String sayHello(@WebParam(name = "username") String username);

}
2.服务端接口的实现:HelloJSR181ServiceImpl.java
package com.micmiu.xfire.demo.jsr181;

import javax.jws.WebService;

/**
 * @blog http://www.micmiu.com
 * @author Michael
 */
@WebService(endpointInterface = "com.micmiu.xfire.demo.jsr181.HelloJSR181Service")
public class HelloJSR181ServiceImpl implements HelloJSR181Service {

	public String sayHello(String username) {
		return "Hi," + username + " welcome to my blog http://www.micmiu.com";
	}

}
3.XFire相关配置
在源目录 src/main/java 下创建两级目录:META-INF/xfire?,然后在该目录下创建文件:services.xml?,具体内容如下:
<!-- START SNIPPET: services -->
<beans xmlns="http://xfire.codehaus.org/config/1.0">
	<service>
		<name>HelloJSR181Service</name>
		<serviceClass>com.micmiu.xfire.demo.jsr181.HelloJSR181Service</serviceClass>
		<implementationClass>com.micmiu.xfire.demo.jsr181.HelloJSR181ServiceImpl</implementationClass>
		<serviceFactory>#jsr181ServiceFactory</serviceFactory>
	</service>

	<bean id="config" class="org.codehaus.xfire.aegis.type.Configuration">
		<property name="defaultExtensibleElements" value="false" />
		<property name="defaultExtensibleAttributes" value="false" />
		<property name="defaultNillable" value="false" />
		<property name="defaultMinOccurs" value="1" />
	</bean>

	<bean name="jsr181ServiceFactory"
		class="org.codehaus.xfire.annotations.AnnotationServiceFactory">
		<constructor-arg ref="xfire.transportManager" index="0" />
		<constructor-arg ref="config" index="1"
			type="org.codehaus.xfire.aegis.type.Configuration" />
	</bean>

</beans>

<!-- END SNIPPET: services -->
修改文件: src\main\webapp\WEB-INF\web.xml?,内容如下:
<web-app>
	<display-name>Michael's demo www.micmiu.com</display-name>
	<servlet>
		<servlet-name>XFireServlet</servlet-name>
		<display-name>XFire Servlet</display-name>
		<servlet-class>
			org.codehaus.xfire.transport.http.XFireConfigurableServlet
		</servlet-class>
	</servlet>

	<servlet-mapping>
		<servlet-name>XFireServlet</servlet-name>
		<url-pattern>/servlet/XFireServlet/*</url-pattern>
	</servlet-mapping>

	<servlet-mapping>
		<servlet-name>XFireServlet</servlet-name>
		<url-pattern>/services/*</url-pattern>
	</servlet-mapping>
</web-app>
4.发布webservice
方法一:运用eclipse 中Jetty插件,直接运行该项目,日志如下:
Running Jetty 6.1.26
2012-07-31 21:41:33.415:INFO::Logging to STDERR via org.mortbay.log.StdErrLog
ParentLoaderPriority enabled
Context path:/xfire-jsr181-demo
ProjectClassLoader: entry=...
......
ProjectClassLoader: entry=...
Excluded entry=D:\workspace_dev\xfire-examples\xfire-base-demo\target\test-classes
2012-07-27 14:33:49.112:INFO::jetty-6.1.26
2012-07-27 14:33:49.666:INFO::Started SelectChannelConnector@0.0.0.0:8080
方法二:如果没有安装jetty插件,在POM.xml 文件的节点<build><plugins>…</plugins></build>中增加:
<plugin>
	<groupId>org.mortbay.jetty</groupId>
	<artifactId>maven-jetty-plugin</artifactId>
	<version>6.1.26</version>
	<configuration>
		<webAppSourceDirectory>${basedir}/src/main/webapp</webAppSourceDirectory>
	</configuration>
</plugin>
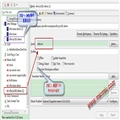
再配置goals 想关参数:jetty:run?运行:

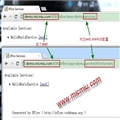
不管用哪种方法运行后,在浏览器中输入:http://localhost:8080/xfire-jsr181-demo/services?或?http://localhost:8080/xfire-jsr181-demo/servlet/XFireServlet/?回车:

看到上述截图信息表示webservice基本已经发布成功。
[三]、客户端测试
编码:HelloJSR181Client.java
package com.micmiu.xfire.demo.jsr181;

import org.codehaus.xfire.client.XFireProxyFactory;
import org.codehaus.xfire.service.Service;
import org.codehaus.xfire.service.binding.ObjectServiceFactory;

/**
 *
 * @blog http://www.micmiu.com
 * @author Michael
 */
public class HelloJSR181Client {

	/**
	 * @param args
	 */
	public static void main(String[] args) {
		String url = "http://localhost:8080/xfire-jsr181-demo/services/HelloJSR181Service";
		try {
			Service serviceModel = new ObjectServiceFactory()
					.create(HelloJSR181Service.class);

			System.out.println(" ----> 初始客户端 <---- ");
			HelloJSR181Service client = (HelloJSR181Service) new XFireProxyFactory()
					.create(serviceModel, url);
			System.out.println(client.sayHello("Michael"));
			System.out.println(" ----> 客户端调用结束 <---- ");
		} catch (Exception e) {
			e.printStackTrace();
		}

	}

}
运行结果:
 ----> 初始客户端 <----
Hi,Michael welcome to my blog http://www.micmiu.com
 ----> 客户端调用结束 <----
从上面的运行日志可以看出客户端已经调用成功。
[四]、嵌入式HTTP服务发布服务
POM.xml?中增加jetty的依赖:
		<dependency>
			<groupId>org.mortbay.jetty</groupId>
			<artifactId>jetty</artifactId>
			<version>6.1.26</version>
			<type>jar</type>
			<scope>compile</scope>
		</dependency>
编写服务发布代码:HelloJSR181ServerStarter.java
?
package com.micmiu.xfire.demo.jsr181;

import org.codehaus.xfire.XFire;
import org.codehaus.xfire.XFireFactory;
import org.codehaus.xfire.annotations.AnnotationServiceFactory;
import org.codehaus.xfire.server.http.XFireHttpServer;
import org.codehaus.xfire.service.Service;
import org.codehaus.xfire.service.invoker.BeanInvoker;

/**
 *
 * @blog http://www.micmiu.com
 * @author Michael
 */
public class HelloJSR181ServerStarter {
	XFireHttpServer server;

	public void start() throws Exception {

		// TypeMappingRegistry registry = new DefaultTypeMappingRegistry();

		AnnotationServiceFactory factory = new AnnotationServiceFactory();

		// 方法一:直接接口创建
		Service service = factory.create(HelloJSR181Service.class);
		service.setInvoker(new BeanInvoker(new HelloJSR181ServiceImpl()));

		// 方法二:service接口的实现类
		// Service service = factory.create(HelloJSR181ServiceImpl.class);

		XFire xfire = XFireFactory.newInstance().getXFire();
		xfire.getServiceRegistry().register(service);

		// Start the HTTP server
		System.out
				.println(" ----> XFire JSR181 publish by embedded HTTP Server <---- ");
		server = new XFireHttpServer();
		server.setPort(8090);
		server.start();

	}

	/**
	 * @param args
	 */
	public static void main(String[] args) {
		try {
			System.out.println(" ----> 服务发布 。。。 <---- ");
			HelloJSR181ServerStarter service = new HelloJSR181ServerStarter();
			service.start();
		} catch (Exception e) {
			e.printStackTrace();
		}

	}

}
运行该启动程序日志如下:
 ----> 服务发布 。。。 <----
 ----> XFire JSR181 publish by embedded HTTP Server <----
2012-07-31 22:04:19.804:INFO::Logging to STDERR via org.mortbay.log.StdErrLog
2012-07-31 22:04:19.845:INFO::jetty-6.1.26
2012-07-31 22:04:19.893:INFO:/:org.codehaus.xfire.transport.http.XFireServlet-20469344: init
2012-07-31 22:04:19.914:INFO::Started SocketConnector@0.0.0.0:8090
浏览器中输入:http://localhost:8090/?或?http://localhost:8090/HelloJSR181Service?wsdl?回车:

修改客户端测试代码:HelloJSR181Client.java
package com.micmiu.xfire.demo.jsr181;

import org.codehaus.xfire.annotations.AnnotationServiceFactory;
import org.codehaus.xfire.client.XFireProxyFactory;
import org.codehaus.xfire.service.Service;

/**
 *
 * @blog http://www.micmiu.com
 * @author Michael
 */
public class HelloJSR181Client {

	/**
	 * @param args
	 */
	public static void main(String[] args) {
		// String url =
		// "http://localhost:8080/xfire-jsr181-demo/services/HelloJSR181Service";
		String url = "http://localhost:8090/HelloJSR181Service";
		try {
			// AnnotationServiceFactory ObjectServiceFactory
			Service serviceModel = new AnnotationServiceFactory()
					.create(HelloJSR181Service.class);

			System.out.println(" ----> 初始客户端 <---- ");
			HelloJSR181Service client = (HelloJSR181Service) new XFireProxyFactory()
					.create(serviceModel, url);
			System.out.println(client.sayHello("Michael"));
			System.out.println(" ----> 客户端调用结束 <---- ");
		} catch (Exception e) {
			e.printStackTrace();
		}

	}

}
运行结果:
 ----> 初始客户端 <----
Hi,Michael welcome to my blog http://www.micmiu.com
 ----> 客户端调用结束 <----
到此已经全部演示结束。