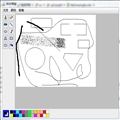
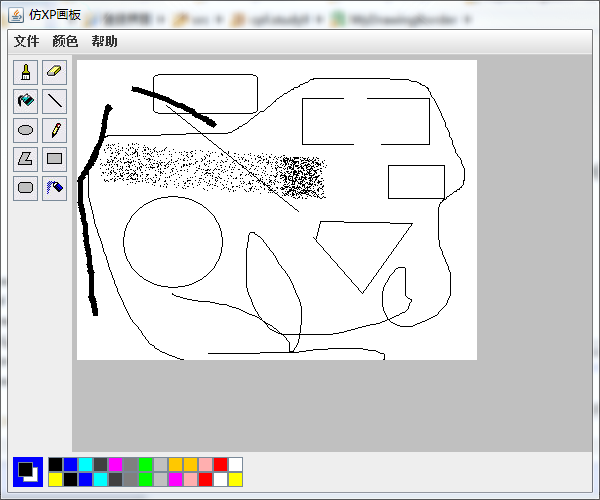
这是一个仿XP的
画图板,再
重绘的基础上可以实现基本的画图、橡皮檫、画多边形、圆等等功能,并且可以左右键点击画图画出不同颜色。
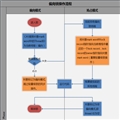
实现思路:将整个画图板分为5块来实现 : 1、
主界面 ( MyDrawingBorder) 2、
监听器(DrawingListener) 3、画图面板(DrawingPanel) 4、颜色板块(ColorPanel) 5、工具板块(ToolsPanel) ,最后将后面的4个板块整合到主界面上。
完整代码见附件
画图板实现:
1、创建主界面 ( MyDrawingBorder) :
设置主界面大小、创建菜单栏、布局格式等等,并将各个板块整合在一起
class="java">
      private void init() {
		this.setTitle("仿XP画板");
		this.setSize(new Dimension(600, 500));
		this.setLocationRelativeTo(null);
		this.setDefaultCloseOperation(3);
		this.setLayout(new BorderLayout());
		// 调用创建菜单栏的方法,获取到菜单栏的对象
		JMenuBar jmb = createMenuBar();
		// 将菜单栏的对象设置为窗体的菜单栏
		this.setJMenuBar(jmb);
		// 实例化ToolsPanel类的对象,该对象要添加到窗体西边
		ToolsPanel tp = new ToolsPanel();
		this.add(tp, BorderLayout.WEST);
		// 实例化ColorPanel类的对象,该对象要添加到窗体南边
		ColorPanel cp = new ColorPanel();
		this.add(cp, BorderLayout.SOUTH)
		// 实例化DrawingPanel类的对象,该对象要添加到窗体中边
		DrawingPanel dp = new DrawingPanel();
		this.add(dp, BorderLayout.CENTER);

		this.setVisible(true);

		//获取画图区域上的画布对象
		JPanel panel = dp.getJPanel();
		//实例化一个事件处理类的对象
		DrawingListener dl = new DrawingListener(panel,tp,cp);
		//给面板添加鼠标监听器方法
    	panel.addMouseListener(dl);
    	panel.addMouseMotionListener(dl);

//     	dl.getColor();
	}


	/**
	 * 创建菜单栏的方法
	 *
	 * @return 返回JMenuBar的对象
	 */
	private JMenuBar createMenuBar() {
		// 实例化一个JMenuBar的对象
		JMenuBar jmb = new JMenuBar();
		// 菜单项的数组
		String[] arrayMenu = { "文件", "颜色", "帮助" };
		// 菜单子项的数组
		String[][] arrayMenuItem = { { "新建", "保存", "打开", "退出" }, { "编辑颜色" },
				{ "帮助主题", "关于画图" } };
		// 根据数据循环来创建菜单栏
		for (int i = 0; i < arrayMenu.length; i++) {
			// 实例化一个JMenu的对象
			JMenu menu = new JMenu(arrayMenu[i]);
			// 将menu添加到jmb对象中
			jmb.add(menu);
			for (int j = 0; j < arrayMenuItem[i].length; j++) {
				// 实例化JMenuItem的对象
				JMenuItem jmi = new JMenuItem(arrayMenuItem[i][j]);
				// 将jmi对象添加到menu中
				menu.add(jmi);
			}
		}
		return jmb;
	}
2、 监听器(DrawingListener): 监听动作,画图
public class DrawingListener extends MouseAdapter {

	//定义存储坐标的属性
	private int x0,y0,x1,y1,x2,y2, x3, y3, i =0,j=0;
	private int c;
	public static Boolean a=true;
	private ToolsPanel tp;//用来获取图形的
	private ColorPanel cp;//用来获取颜色的
	private Graphics g;//用来画图的
	private Color color;//用来存储前景色和背景色
	private JPanel panel; //hua tu ban de dui xiang
	//robot lei
	private Robot robot;
	private Rectangle rect;
	/**
	 * 构造方法
	 * @param panel用来获取画布的
	 * @param tp用来获取图形的
	 * @param cp用来获取颜色的
	 */
	public DrawingListener(JPanel panel,ToolsPanel tp,ColorPanel cp){
		g = panel.getGraphics();
		this.panel = panel;
		this.tp = tp;
		this.cp = cp;
		try {
			robot = new Robot();
		}catch (AWTException e){
			e.printStackTrace();
		}
	}

	/**
	 * 鼠标按下时执行的事件方法
	 */
	public void mousePressed(MouseEvent e) {

		if(e.getButton() == 1){//左键,获取背景色
			color = cp.getbColor();
		}else if(e.getButton() ==3){//右键,获取前景色
			color = cp.getfColor();
		}
		//获取按下的坐标
		x1 = e.getX();
		y1 = e.getY();
	}

	/**
	 * 鼠标释放时执行的事件方法
	 */
	public void mouseReleased(MouseEvent e) {
		a= false;
		Graphics2D g2 = (Graphics2D) g;
		//获取释放的坐标
		x2 = e.getX();
		y2 = e.getY();
		//设置颜色
		Color a = g2.getBackground();


		//设置画图的颜色

		g.setColor(color);


		//判断是否是直线
		if( tp.getValue().equals("line")){
			g.drawLine(x1, y1, x2, y2);


		}


	    else if (tp.getValue().equals("oval")){
			g.drawOval(Math.min(x1,x2), Math.min(y1,y2) ,Math.abs(x2-x1),Math.abs(y1-y2));

		}


		else if(tp.getValue().equals("rect")){
			g.drawRect(Math.min(x1,x2), Math.min(y1,y2) ,Math.abs(x2-x1),Math.abs(y1-y2));
		}


		else if(tp.getValue().equals("polygon")){
			if (x3 == 0 && y3 == 0) {
				g.drawLine(x1, y1, x2, y2);
				x0 = x1;
				y0 = y1;
				x3 = x2;
				y3 = y2;
			} else {
				g.drawLine(x3, y3, x2, y2);
				x3 = x2;
				y3 = y2;
			}
			if (c == 2) {
				g.drawLine(x0, y0, x2, y2);
				g.drawLine(x3, y3, x2, y2);
				x3 = y3 = 0;
		 }
		}

		else if(tp.getValue().equals("roundrect")){
			g.drawRoundRect(Math.min(x1,x2), Math.min(y1,y2) ,Math.abs(x2-x1),Math.abs(y1-y2), Math.abs(x2-x1)/5, Math.abs(y1-y2)/5);
		}
		getColor();
	}


	// 监听鼠标拖拽操作
	public void mouseDragged(MouseEvent e) {
		Graphics2D g2 = (Graphics2D) g;
		// 获取坐标
		x2 = e.getX();
		y2 = e.getY();


		// 判断作图
		if (tp.getValue().equals("pencil")) {
			System.out.print("      ");
//			g2.setStroke(new BasicStroke(1));
			g.drawLine(x1, y1, x2, y2);
			// 交换坐标
			x1 = x2;
			y1 = y2;
		} else if (tp.getValue().equals("easer")) {
			g2.setColor(Color.WHITE);
			// g.fillRect(x2-20, y2-20, 40, 40);
			g2.setStroke(new BasicStroke(20));
			g2.drawLine(x1, y1, x2, y2);
			// 交换坐标
			x1 = x2;
			y1 = y2;
			g2.setStroke(new BasicStroke(1));

		} else if (tp.getValue().equals("brush")) {
			// g.fillOval(x1-5,y1-5,10,10);
			g2.setStroke(new BasicStroke(5));
			g2.drawLine(x1, y1, x2, y2);
			// 交换坐标
			x1 = x2;
			y1 = y2;
			g2.setStroke(new BasicStroke(1));
		} else if (tp.getValue().equals("spray")) {
			Random rand = new Random();
			for (int i = 0; i < 60; i++) {
				int w = rand.nextInt(4);
				int p = rand.nextInt(20);
				int q = rand.nextInt(20);
				if (w == 1) {
					g.drawLine(x2 + p, y2 + q, x2 + p, y2 + q);
				} else if (w == 2) {
					g.drawLine(x2 - p, y2 - q, x2 - p, y2 - q);
				} else if (w == 3) {
					g.drawLine(x2 + p, y2 - q, x2 + p, y2 - q);
				} else {
					g.drawLine(x2 - p, y2 + q, x2 - p, y2 + q);
				}
			}
		}
	}

	//获取像素点
	public void getColor(){
		BufferedImage image = onScreen();
		//定位高和宽在数组在数组中的位置
		System.out.println("----->"+image.getWidth());
		System.out.println("----->"+image.getHeight());

		//遍历iamge
		for ( i = 0;i <image.getWidth();i++){
			for( j=0;j <image.getHeight();j++){

				DrawingPanel.array[i][j] = image.getRGB(i,j);

			}
		}
	}

	//根据坐标获取颜色图像上的像素点
	public int getColor(int x,int y){
		//调用截屏
		BufferedImage image = onScreen();
		//返回对应像素的值
		return image.getRGB(x, y);
	}
	//截屏方法,及返回图片
	private BufferedImage onScreen(){
		//获取到画图板的相对于屏幕的坐标
		Point point  = panel.getLocationOnScreen();

		//实例化一个封装的矩形
		Rectangle rect = new Rectangle((int)point.getX(),(int)point.getY(),panel.getWidth(), panel.getHeight() );

	//截屏
	BufferedImage image = robot.createScreenCapture(rect);
	   return image;

}
}
3画图面板(DrawingPanel)
设置画图区域的大小 和重绘
/**
 * 画图区域面板的实现类,该类继承自JPanel类
 *
 * @author Administrator
 *
 */
public class DrawingPanel extends JPanel {
	/**
	 * 构造方法
	 */
	public DrawingPanel() {
		init();// 调用初始化面板的方法
	}

	// 实例化一个JPanel类的对象属性,用来获取画布
	private JPanel panel = new JPanel(){
		//方法重写
		public void paint(Graphics g){
			  super.paint(g);
			if(DrawingListener.a==false){
			  for(int i=0;i < array.length;i++){
				  for(int j =0;j<array[i].length;j++){
					  Color color = new Color(array[i][j]);
					  g.setColor(color);
					  g.drawLine(i, j, i, j);
					  }
				  }
			  }
		}

	};
	//定义一个存画板上像素点的二维数组
	public static int [][]array = new int [400][300];

	/**
	 * 获取JPanel对象
	 */
	public JPanel getJPanel() {

		return panel;
	}


	private void init() {
		// 设置DrawingPanel的布局为流式布局布局
		this.setLayout(new FlowLayout(FlowLayout.LEFT));
		this.setBackground(Color.LIGHT_GRAY);

		panel.setBackground(Color.WHITE);
		panel.setPreferredSize(new Dimension(400, 300));
		// 将panel添加到DrawingPanel上
		this.add(panel);

	}

}
4、工具面板(ToolsPanel )
public class ToolsPanel extends JPanel {
	/**
	 * 构造方法
	 */
	public ToolsPanel() {
		init();// 调用初始化面板的方法
	}

	//声明一个存储图形的属性
	private String value = "line";

	/**
	 * 获取图形属性的方法
	 */
	public String getValue(){
		return value;
	}

	/**
	 * 定义一个匿名内部类
	 */
	private ActionListener al = new ActionListener() {
		/**
		 * 事件处理方法
		 */
		public void actionPerformed(ActionEvent e) {
			// 获取到事件源对象
			// JButton btn = (JButton)e.getSource();
			// 获取事件源的动作命令值
			value = e.getActionCommand();
			System.out.println("你选择的图形是:"+value);
		}

	};

	private void init() {
		// 设置ToolsPanel的布局为流式布局布局
		this.setLayout(new FlowLayout());

		// 实例化一个JPanel类的对象
		JPanel panel = new JPanel();
		// 设置panel的布局为网格布局
		panel.setLayout(new GridLayout(5, 2, 4, 4));
		// 定义一个数组
		String[] array = { "image/brush.jpg", "image/easer.jpg",
				"image/fillRect.jpg", "image/line.jpg", "image/oval.jpg",
				"image/pencil.jpg", "image/polygon.jpg", "image/rect.jpg",
				"image/roundrect.jpg", "image/spray.jpg" };
		// 根据数组循环实例化按钮对象
		for (int i = 0; i < array.length; i++) {
			// 实例化一个ImageIcon的对象
			ImageIcon image = new ImageIcon(array[i]);
			// 实例化按钮对象,并设置按钮的图标
			JButton btn = new JButton(image);
			// 截取图片的名字
			String fileName = array[i].substring(
					array[i].indexOf("/") + 1,
					array[i].lastIndexOf(".jpg"));
			//设置按钮的动作命令值
			btn.setActionCommand(fileName);
			// 设置按钮的大小
			btn.setPreferredSize(new Dimension(25, 25));
			//给按钮添加动作监听器方法,绑定动作事件处理类的对象al
			btn.addActionListener(al);
			// 将按钮添加到panel上
			panel.add(btn);
		}
		// 将panel添加到ToolsPanel上
		this.add(panel);
	}

}
5\颜色面板( ColorPanel)
public class ColorPanel extends JPanel {
	/**
	 * 构造方法
	 */
	public ColorPanel() {
		init();// 调用初始化面板的方法
	}

	// 定义一个背景色属性和前景色属性
	private Color bColor = Color.BLACK, fColor = Color.WHITE;

	/**
	 * 获取背景色
	 */
	public Color getbColor() {
		return bColor;
	}

	/**
	 * 获取前景色
	 */
	public Color getfColor() {
		return fColor;
	}

	private void init() {
		// 设置ColorPanel的布局为流式布局布局
		this.setLayout(new FlowLayout(FlowLayout.LEFT));

		// 实例化一个JPanel类的对象
		JPanel panelFB = new JPanel();
		panelFB.setBackground(Color.BLUE);
		panelFB.setPreferredSize(new Dimension(30, 30));
		// 设置panel的布局为空布局
		panelFB.setLayout(null);
		final JButton btnB = new JButton();
		btnB.setBackground(Color.BLACK);
		btnB.setBounds(5, 5, 15, 15);
		final JButton btnF = new JButton();
		btnF.setBackground(Color.WHITE);
		btnF.setBounds(10, 10, 15, 15);
		panelFB.add(btnB);
		panelFB.add(btnF);

		this.add(panelFB);


		/**
		 * 定义一个匿名内部类
		 */
		MouseAdapter ml = new MouseAdapter() {
			/**
			 * 鼠标按下时的事件处理方法
			 */
			public void mousePressed(MouseEvent e) {
				// 获取到事件源对象
				JButton btn = (JButton) e.getSource();
				// e.getButton()返回的值是1表示是左键,如果是3表示右键,如果是2表示滚轮的
				if (e.getButton() == 1) {
					// 获取到按钮上的背景色
					bColor = btn.getBackground();
					btnB.setBackground(bColor);//设置按钮的背景色
					System.out.println("你选择的颜色是:" + bColor);
				} else if (e.getButton() == 3) {
					// 获取到按钮上的背景色
					fColor = btn.getBackground();
					btnF.setBackground(fColor);//设置按钮的背景色
					System.out.println("你选择的颜色是:" + fColor);
				}
			}

		};

		// 实例化一个JPanel类的对象
		JPanel panel = new JPanel();
		// 设置panel的布局为网格布局
		panel.setLayout(new GridLayout(2, 12));
		// 定义一个颜色数组
		Color[] array = { Color.BLACK, Color.BLUE, Color.CYAN, Color.DARK_GRAY,
				Color.MAGENTA, Color.GRAY, Color.GREEN, Color.LIGHT_GRAY, Color.ORANGE,
				Color.orange, Color.PINK, Color.RED, Color.WHITE, Color.YELLOW,
				Color.black, Color.blue, Color.cyan, Color.darkGray, Color.gray,
				Color.green, Color.lightGray, Color.magenta, Color.pink, Color.red,
				Color.white, Color.yellow };
		// 根据数组循环实例化按钮对象
		for (int i = 0; i < array.length; i++) {
			// 实例化按钮对象,并设置按钮的图标
			JButton btn = new JButton();
			// 设置按钮的背景色
			btn.setBackground(array[i]);
			// 设置按钮的大小
			btn.setPreferredSize(new Dimension(15, 15));
			// 给事件源btn按钮添加鼠标监听器方法,绑定事件处理类的对象al
			btn.addMouseListener(ml);
			// 将按钮添加到panel上
			panel.add(btn);
		}
		// 将panel添加到ColorPanel上
	this.add(panel);
	}

}
实现图片

- 大小: 40.1 KB
- 画图板.rar (25.3 KB)
- 下载次数: 0