这三种东西:CGContextRef,CGPath和UIBezierPath。本质上都是一样的,都是使用Quartz来绘画。只不过把绘图操作暴露在不同的API层面上,在具体实现上,当然也会有一些细小的差别。
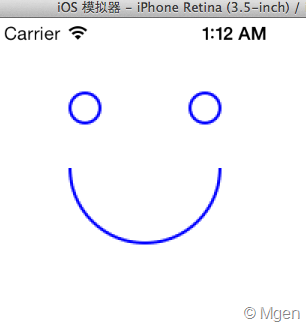
我们将主要使用这3个类型,绘制出同一张图片,如下,一个笑脸:

首先使用Quartz的CGPath来做这张图。很简单,首先创建用于转移坐标的Transform,然后创建一个CGMutablePathRef(属于CGPath类型)对象。接着通过两个CGPathAddEllipseInRect和一个CGPathAddArc函数来绘制Path中的两个眼睛和一个嘴,注意把CGAffineTransform的地址传进去,这样Transform才会应用。接着把这个创建好的CGPath加入到当前CGContextRef中,最后通过CGContextRef执行绘画。
代码:
- (void)viewDidLoad
{
[super viewDidLoad];
//开始图像绘图
UIGraphicsBeginImageContext(self.view.bounds.size);
//获取当前CGContextRef
CGContextRef gc = UIGraphicsGetCurrentContext();
//创建用于转移坐标的Transform,这样我们不用按照实际显示做坐标计算
CGAffineTransform transform = CGAffineTransformMakeTranslation(50, 50);
//创建CGMutablePathRef
CGMutablePathRef path = CGPathCreateMutable();
//左眼
CGPathAddEllipseInRect(path, &transform, CGRectMake(0, 0, 20, 20));
//右眼
CGPathAddEllipseInRect(path, &transform, CGRectMake(80, 0, 20, 20));
//笑
CGPathMoveToPoint(path, &transform, 100, 50);
CGPathAddArc(path, &transform, 50, 50, 50, 0, M_PI, NO);
//将CGMutablePathRef添加到当前Context内
CGContextAddPath(gc, path);
//设置绘图属性
[[UIColor blueColor] setStroke];
CGContextSetLineWidth(gc, 2);
//执行绘画
CGContextStrokePath(gc);
//从Context中获取图像,并显示在界面上
UIImage *img = UIGraphicsGetImageFromCurrentImageContext();
UIGraphicsEndImageContext();
UIImageView *imgView = [[UIImageView alloc] initWithImage:img];
[self.view addSubview:imgView];
}
接下来,我们不去使用CGPath类型的相关函数,而完全使用CGContextRef相关的函数,这些函数执行起来其实是和上面讲的的CGPath完全等价的。
这里需要注意的是,完全使用CGContextRef的话,Transform的应用需使用CGContextTranslateCTM函数。
完整代码:
- (void)viewDidLoad
{
[super viewDidLoad];
//开始图像绘图
UIGraphicsBeginImageContext(self.view.bounds.size);
//获取当前CGContextRef
CGContextRef gc = UIGraphicsGetCurrentContext();
//使用CGContextTranslateCTM函数来转移坐标的Transform,这样我们不用按照实际显示做坐标计算
CGContextTranslateCTM(gc, 50, 50);
//左眼
CGContextAddEllipseInRect(gc, CGRectMake(0, 0, 20, 20));
//右眼
CGContextAddEllipseInRect(gc, CGRectMake(80, 0, 20, 20));
//笑
CGContextMoveToPoint(gc, 100, 50);
CGContextAddArc(gc, 50, 50, 50, 0, M_PI, NO);
//设置绘图属性
[[UIColor blueColor] setStroke];
CGContextSetLineWidth(gc, 2);
//执行绘画
CGContextStrokePath(gc);
//从Context中获取图像,并显示在界面上
UIImage *img = UIGraphicsGetImageFromCurrentImageContext();
UIGraphicsEndImageContext();
UIImageView *imgView = [[UIImageView alloc] initWithImage:img];
[self.view addSubview:imgView];
}
同样会绘制出上面的图形。
最后我们使用UIBezierPath类型来完成上述图形,UIBezierPath很有意思,它包装了Quartz的相关API,自己存在于UIKit中,因此不是基于C的API,而是基于Objective-C对象的。那么一个非常重要的点是由于离开了Quartz绘图,所以不需要考虑Y轴翻转的问题,在画弧的时候,clockwise参数是和现实一样的,如果需要顺时针就传YES,而不是像Quartz环境下传NO的。
其次椭圆的创建需使用bezierPathWithOvalInRect方法,这里名字是Oral而不是Quartz中的Ellipse。
最后注意UIBezierPath的applyTransform方法需要最后调用。
完整代码:
- (void)viewDidLoad
{
[super viewDidLoad];
//开始图像绘图
UIGraphicsBeginImageContext(self.view.bounds.size);
//创建UIBezierPath
UIBezierPath *path = [UIBezierPath bezierPath];
//左眼
[path appendPath:[UIBezierPath bezierPathWithOvalInRect:CGRectMake(0, 0, 20, 20)]];
//右眼
[path appendPath:[UIBezierPath bezierPathWithOvalInRect:CGRectMake(80, 0, 20, 20)]];
//笑
[path moveToPoint:CGPointMake(100, 50)];
//注意这里clockwise参数是YES而不是NO,因为这里不知Quartz,不需要考虑Y轴翻转的问题
[path addArcWithCenter:CGPointMake(50, 50) radius:50 startAngle:0 endAngle:M_PI clockwise:YES];
//使用applyTransform函数来转移坐标的Transform,这样我们不用按照实际显示做坐标计算
[path applyTransform:CGAffineTransformMakeTranslation(50, 50)];
//设置绘画属性
[[UIColor blueColor] setStroke];
[path setLineWidth:2];
//执行绘画
[path stroke];
//从Context中获取图像,并显示在界面上
UIImage *img = UIGraphicsGetImageFromCurrentImageContext();
UIGraphicsEndImageContext();
UIImageView *imgView = [[UIImageView alloc] initWithImage:img];
[self.view addSubview:imgView];
}
OK!