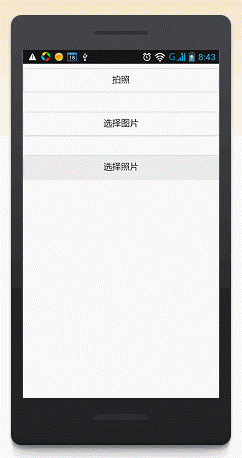
程序运行效果

相关代码
<!DOCTYPE html>
<html>
  <head>
    <title>
      PhoneGap Device Ready Example
    </title>
    <link
        href="content/css/themes/default/jquery.mobile.structure-1.4.0-beta.1.min.css"
        rel="stylesheet"
        type="text/css"/>
    <link href="content/css/themes/default/jquery.mobile-1.4.0-beta.1.min.css" rel="stylesheet" type="text/css"/>

    <script src="content/js/jquery.js" type="text/javascript">
    </script>
    <script src="content/js/jquery.mobile-1.4.0-beta.1.js" type="text/javascript">
    </script>
    <script src="content/js/cordova.js" type="text/javascript">
    </script>
    <script type="text/javascript">
      //提示信息
      function showAlert(text) {
        $.mobile.loading( "show", {
          text: text,
          textVisible: true,
           theme: "b",
          textonly: true
          });
        }
        function Alert(text) {
          console.log('Alert');
          console.log('text');
          showAlert(text);
        }

        //退出app
        function exitApp() {
          console.log('exitApp');
          navigator.app.exitApp();
        }
      </script>
      <script type="text/javascript">
        var pictureSource;        //图片来源
        var destinationType;        //设置返回值的格式
        $(function(){
          //当PhoneGap被完全加载后会触发该事件。
          document.addEventListener('deviceready',onDeviceReady,false);

          })
          // PhoneGap准备就绪,可以使用!
          function onDeviceReady() {
            pictureSource=navigator.camera.PictureSourceType;
            destinationType=navigator.camera.DestinationType;
            document.addEventListener('backbutton',Backbutton,false);
          }
          function Backbutton(){
            Alert('再次点击返回键切换到桌面!');

            document.removeEventListener("backbutton", Backbutton, false);
            document.addEventListener("backbutton", exitApp, false);

            var intervalID = window.setTimeout(function() {
              $.mobile.loading( "hide" );
              window.clearTimeout(intervalID);
              document.removeEventListener("backbutton", exitApp, false);
              document.addEventListener("backbutton", Backbutton, false);
              }, 3000);

            }
            // 当成功获得一张照片的Base64编码数据后被调用
            function onPhotoDataSuccess(imageData) {
              alert('imageURI: ' + imageURI);
              // 取消注释以查看Base64编码的图像数据
              // console.log(imageData);
              // 获取图像句柄
              var smallImage = document.getElementById('smallImage');

              // 取消隐藏的图像元素
              smallImage.style.display = 'block';

              // 显示拍摄的照片
              // 使用内嵌CSS规则来缩放图片
              smallImage.src = "data:image/jpeg;base64," + imageData;
            }

            // 当成功得到一张照片的URI后被调用
            function onPhotoURISuccess(imageURI) {

              // 取消注释以查看图片文件的URI
              console.log(imageURI);
              alert('imageURI: ' + imageURI);
              // 获取图片句柄
              var largeImage = document.getElementById('largeImage');

              // 取消隐藏的图像元素
              largeImage.style.display = 'block';

              // 显示拍摄的照片
              // 使用内嵌CSS规则来缩放图片
              largeImage.src = imageURI;
            }

            // “Capture Photo”按钮点击事件触发函数
            function capturePhoto() {
              // 使用设备上的摄像头拍照,并获得Base64编码字符串格式的图像
              navigator.camera.getPicture(onPhotoURISuccess,onFail, { quality: 50 });
            }

            //“From Photo Library”/“From Photo Album”按钮点击事件触发函数
            function getPhoto(source) {

              // 从设定的来源处获取图像文件URI

              //如果Camera.sourceType = Camera.PictureSourceType.PHOTOLIBRARY或Camera.PictureSourceType.SAVEDPHOTOALBUM,系统弹出照片选择对话框,用户可以从相集中选择照片。
              navigator.camera.getPicture(onPhotoURISuccess, onFail, { quality: 50,
              destinationType: destinationType.FILE_URI,sourceType: source });
            }

            // 当有错误发生时触发此函数
            function onFail(mesage) {
              alert('Failed because: ' + message);
            }
          </script>
        </head>
        <body>
          <button onclick="capturePhoto();">
            拍照
          </button>
          <br>
          <button onclick="getPhoto(pictureSource.PHOTOLIBRARY);">
            选择图片
          </button>
          <br>
          <button onclick="getPhoto(pictureSource.SAVEDPHOTOALBUM);">
            选择照片
          </button>
          <br>
          <img style="display:none;width:250px;height:250px;" id="smallImage" src="" />
          <img style="display:none;width:250px;height:250px;" id="largeImage" src="" />
        </body>
      </html>
源代码示例包[调试通过]
点击下载
声明:本博客高度重视知识产权保护,发现本博客发布的信息包含有侵犯其著作权的链接内容时,请联系我,我将第一时间做相应处理,联系邮箱ffgign@qq.com。