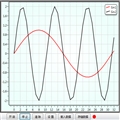
DynamicDataDisplay控件是一个功能很强的绘图工具,除了能生成曲线外,还有很多其他功能,具体见http://dynamicdatadisplay.codeplex.com/。这里你也能下载到其DLL文件。在项目中利用定时器产生数据,下面是我的示波器界面,暂时实现了开始,停止和清除功能:

示波器添加了一个边框,途中模拟了两个通道,注意要添加相关引用,另外我还弄了一个渐变画刷,看起来是不是很漂亮,界面xaml代码:
//添加引用
xmlns:d="http://research.microsoft.com/DynamicDataDisplay/1.0"

//添加资源
<RadialGradientBrush x:Key="ChartPlotterBrush" GradientOrigin="0.6,0.5">
            <GradientStop Color="White" Offset="0"/>
            <GradientStop Color="#FFEDFFFB" Offset="1"/>
</RadialGradientBrush>

//添加控件
<Border Margin="0,1,0,0" Grid.Row="0" Background="#FF5F5A5A">
            <d:ChartPlotter Name="plotter" Margin="5"  Background="{StaticResource ChartPlotterBrush }"></d:ChartPlotter>
        </Border>
View Code

 <StackPanel Grid.Column="0" Grid.Row="1" Background="{StaticResource ToolBarBackgroundBrush}" Orientation="Horizontal">
            <Button Width="50" Margin="30,2,5,0" Click="OscilloscopeStart_Click">开 启</Button>
            <Button Width="50" Margin="5,2,5,0"  Click="OscilloscopeStop_Click">停 止</Button>
            <Button Width="50" Margin="5,2,5,0" Click="OscilloscopeClear_Click">清 除</Button>
            <Button Width="50" Margin="5,2,5,0" Click="OscilloscopeSet_Click">设 置</Button>
            <Button Width="70" Margin="5,2,5,0" Click="OscilloscopeDataLoad_Click">载入数据</Button>
            <Button Width="70" Margin="5,2,5,0" Click="OscilloscopeDataSave_Click">存储数据</Button>
            <Ellipse Width="15" Height="15" Margin="5,2,5,0" Fill="Red"></Ellipse>
        </StackPanel>
View Code
后台程序代码
using System;
using System.Collections.Generic;
using System.Linq;
using System.Text;
using System.Windows;
using System.Windows.Controls;
using System.Windows.Data;
using System.Windows.Documents;
using System.Windows.Input;
using System.Windows.Media;
using System.Windows.Media.Imaging;
using System.Windows.Navigation;
using System.Windows.Shapes;

using System.Data.OleDb;
using System.Data;
using System.Collections.ObjectModel;
using System.Globalization;
using System.IO;

using System.Windows.Threading;
using Microsoft.Research.DynamicDataDisplay;
using Microsoft.Research.DynamicDataDisplay.DataSources;

using System.Windows.Forms;

namespace MotorDriver1
{

    /// <summary>
    /// MainWindow.xaml 的交互逻辑
    /// </summary>
    public partial class MainWindow : Window
    {
        private ObservableDataSource<Point> dataSource1 = new ObservableDataSource<Point>();
        private ObservableDataSource<Point> dataSource2 = new ObservableDataSource<Point>();
        private DispatcherTimer timer = new DispatcherTimer();
        private LineGraph graphSin1 = new LineGraph();
        private LineGraph graphSin2 = new LineGraph();
        private int i = 0;


        public MainWindow()
        {
            InitializeComponent();
        }

        private void OscilloscopeStart_Click(object sender, RoutedEventArgs e)
        {
            //plotter.AddLineGraph(dataSource, Colors.Green, 2);
            timer.Interval = TimeSpan.FromSeconds(0.1);
            timer.Tick += new EventHandler(AnimatedPlot);
            timer.IsEnabled = true;
            if (i==0)
            {
                graphSin1 = plotter.AddLineGraph(dataSource1, Colors.Red, 2, "Sin1");
                graphSin2 = plotter.AddLineGraph(dataSource2, Colors.Black, 2, "Sin2");
            }
            plotter.Viewport.FitToView();

        }
        private void AnimatedPlot(object sender, EventArgs e)
        {

            double x = i;
            double y1 = Math.Sin(i*0.2);
            double y2 =2* Math.Sin(i * 0.6);
            Point point1 = new Point(x, y1);
            Point point2 = new Point(x, y2);
            dataSource1.AppendAsync(base.Dispatcher, point1);
            dataSource2.AppendAsync(base.Dispatcher, point2);
            i++;
        }

        private void OscilloscopeStop_Click(object sender, RoutedEventArgs e)
        {
            timer.IsEnabled = false;
        }

        private void OscilloscopeClear_Click(object sender, RoutedEventArgs e)
        {
            i = 0;
            timer.IsEnabled = false;
            plotter.Children.Remove(graphSin1);
            plotter.Children.Remove(graphSin2);
            dataSource1 = new ObservableDataSource<Point>();
            dataSource2 = new ObservableDataSource<Point>();

        }
View Code
需要注意的就是清除示波器数据时,除了要用plotter.Children.Remove()指令,将此通道曲线移除,还要将数据源里的数据清干净,这里我们直接重新分配内存了。如果不清除干净,新的图线将在原来图线基础上继续画。