��Ϊһ���ձ�ҵ�Ĵ�ѧ������Ҫ�����Լ�ʱʱ�̿�Ҫѧϰ��
�����listview�����ܾ���ǰ��һ��demo,�������ư������Ǿ�ֻ�кúü����ˡ�
�������ṫ˾��һ��Ա��д��ѧϰ���ͣ����ڱ���Ӣ�����������ǰ����Լ����������ģ�������Щ�ط��������ģ������λ������
The standard Android list view has support for quite a lot of things and covers almost all the use-cases you could think of. However, the look of the list is quite ordinary and while you can do some things by extending it, you will not be able to do that much in the end. Another disadvantage of the standard ListView is the lack of good physics (and the ability to change it). Therefore, if you want your UI to be a bit less ordinary looking, you simply need to implement your own view.
android�ٷ��ṩ��ListView�Ѿ�֧���˺ö�ܺ������˼���ȫ����������뵽�������ǣ�Listview���������չʱ�����Եú�һ�㣬������Ҳ�������������ʲô����һ������LIstviewȱ���õĿ��ơ���ˣ������㲻������UI�Եúܴ��ڣ��Ǿ�Ҫ����ʵ�����Լ���View��
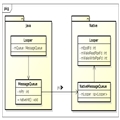
Since we��re aiming for a list (that will show other views) we need to extend a ViewGroup and the most fitting of those are AdapterView. (The reason, or rather one reason, we��re not extending AbsListView is that it will not allow us to do bounce effects on the list.) So let��s start by creating a new Android project and create a class, MyListView, that extends AdapterView<Adapter>. AdapterView has four abstract methods that we need to implement: getAdapter(), setAdapter(), getSelectedView() and setSelection(). getAdapter() and setAdapter() are straight forward to implement. The other two will for the moment just throw an exception.
��Ϊ������Ҫչʾһϵ�����ݣ�������Ҫ�Լ�����չViewGroup��������ʵ���AdapterView�ˡ�������չAbsListview��һ�����ɾ�����������������listview��ÿһ���߽���������һЩ��Ч������������������һ��ANdroid���̺�һ���̳���AdapterView<Adapter>. Mylistview�ࡣAdapterView<Adapter>��������ĸ����DZ���Ҫʵ�ֵĺ������Ǿ���getAdapter(), setAdapter(), getSelectedView() and setSelection(). ����ǰ������ֱ����ʵ�֣���������ֱ���׳��쳣��
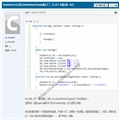
package com.sonyericsson.tutorial.list;

import android.content.Context;
import android.util.AttributeSet;
import android.view.View;
import android.widget.Adapter;
import android.widget.AdapterView;

public class MyListView extends AdapterView {

    /** The adapter with all the data */
    private Adapter mAdapter;

    public MyListView(Context context, AttributeSet attrs) {
        super(context, attrs);
    }

    @Override
    public void setAdapter(Adapter adapter) {
        mAdapter = adapter;
        removeAllViewsInLayout();
        requestLayout();
    }

    @Override
    public Adapter getAdapter() {
        return mAdapter;
    }

    @Override
    public void setSelection(int position) {
        throw new UnsupportedOperationException("Not supported");
    }

    @Override
    public View getSelectedView() {
        throw new UnsupportedOperationException("Not supported");
    }
}
The only thing here worth mentioning is the setAdapter method. When we get a new adapter we clear all the views we might have had previously and then we request a layout to get and position the views from the adapter. If we at this point create a test activity and an adapter with some fake data and use our new view, we will not get anything on the screen. This is because if we want to get something on the screen we need to override the onLayout() method.
������е�������Ҫע�����setAdapter�����������ǵõ�һ���µ�adapter��������Ҫ�����ǰ�����ӵ����е�view������Ϊÿһ����Adapter���view�������²��֡������ʱ���Ǵ���һ�����Ե�Activity��һ��Adapter
��һЩģ�����ݺ��µ���ͼView������Ļ�ϻ�ʲôҲ������ʾ��������Ϊ��Ҫ������Ļ����ʾ�����DZ���ʵ��OnLayout������
It is in onLayout where we get the views from the adapter and add them as child views.
������onLayout��������Ǵ�Adapter������õ���ÿ��view�������������ӵ�list��ͼ�
@Override
protected void onLayout(boolean changed, int left, int top, int right, int bottom) {
    super.onLayout(changed, left, top, right, bottom);

    // if we don't have an adapter, we don't need to do anything
    if (mAdapter == null) {
        return;
    }

    if (getChildCount() == 0) {
        int position = 0;
        int bottomEdge = 0;
        while (bottomEdge< getHeight() && position< mAdapter.getCount()) {
            View newBottomChild = mAdapter.getView(position, null, this);
            addAndMeasureChild(newBottomChild);
            bottomEdge += newBottomChild.getMeasuredHeight();
            position++;
        }
    }

    positionItems();
}
So, what happens here? First a call to super and a null check are performed, and then we continue with the actual code. If we haven��t added any children yet, we start by doing that. The while statement loops through the adapter until we��ve added enough views to cover the screen. When we get a view from the adapter, we start by adding it as a child and then we need to measure it in order for the view to get it��s correct size. After we��ve added all the views, we position them in the correct place.
�ţ����Ǹ����أ������ǵ���super�������������adapter�Ƿ�Ϊ�գ������Ǿ�ִ����ش��롣����û����view�ɼ��뵽listview�У�����viewʱ��ͨ��Adapter��ѭ����ȡ��view֪�����ǽ����е���view��䵽��Ļ�С������Ǵ�adapter��ȡһ��viewʱ�����Ǿͽ������뵽listview�в������ȡ����ȷ�ijߴ磬����ͽ���������طŵ���ȷ��λ���ϡ�
/**
 * Adds a view as a child view and takes care of measuring it
 *
 * @param child The view to add
 */
private void addAndMeasureChild(View child) {
    LayoutParams params = child.getLayoutParams();
    if (params == null) {
        params = new LayoutParams(LayoutParams.WRAP_CONTENT, LayoutParams.WRAP_CONTENT);
    }
    addViewInLayout(child, -1, params, true);

    int itemWidth = getWidth();
    child.measure(MeasureSpec.EXACTLY | itemWidth, MeasureSpec.UNSPECIFIED);
}

/**
 * Positions the children at the "correct" positions
 */
private void positionItems() {
    int top = 0;

    for (int index = 0; index< getChildCount(); index++) {
        View child = getChildAt(index);

        int width = child.getMeasuredWidth();
        int height = child.getMeasuredHeight();
        int left = (getWidth() - width) / 2;

        child.layout(left, top, left + width, top + height);
        top += height;
    }
}
The code here is straight forward and self-explanatory so I won��t go into details. I��ve taken some shortcuts when measuring the child view but the code works quite well in most cases. positionItems() starts at the top (0) and layouts the child views one after the other without any padding between them. Also worth noting is that we��re ignoring the possible padding that the list can have.
If we run this code we will now get something on the screen. However, it��s not very interactive. It does not scroll when we touch the screen and we can��t click on any item. To get touch working in the list we need to overrideonTouchEvent().
The touch logic for just scrolling is pretty simple. When we get a down event, we save both the position of the down event and the position of the list. We will use the top of the first item to represent the list position. When we get a move event we calculate how far we are from the down event and then re-position the list using the difference in distance from the start position. If we have
no child views, we just return false.
@Override
public boolean onTouchEvent(MotionEvent event) {
    if (getChildCount() == 0) {
        return false;
    }
    switch (event.getAction()) {
        case MotionEvent.ACTION_DOWN:
            mTouchStartY = (int)event.getY();
            mListTopStart = getChildAt(0).getTop();
            break;

        case MotionEvent.ACTION_MOVE:
            int scrolledDistance = (int)event.getY() - mTouchStartY;
            mListTop = mListTopStart + scrolledDistance;
            requestLayout();
            break;

        default:
            break;
    }
    return true;
}
The position of the list is now determined by mListTop and whenever it changes we need to request a layout in order to actually re-position the views. Our previous implementation of positionItems() always started to layout from 0. Now we need to change it so that it starts from mListTop.
If we try this out now the scrolling will work fine but we can also spot some obvious problems with our list. First, the scrolling has no limits so we can scroll the list so that all items are outside of the screen. We will need some kind of limits check to prevent us from doing that. Second, if we scroll down we also see that only the items that we had from the beginning are displayed. No new items are displayed even though the adapter contains more items. We postpone the fix of the first problem to a later tutorial but let��s fix the second problem right away.