本文是翻译版本,来源:http://www.codeproject.com/Articles/12587/Building-Applications-with-the-SharpDevelop-Core,希望有翻译不对的地方各位能指正。
介绍
这篇文章目的在于显示给你看在SharpDevelop(IDE)中所使用的插件体系结构,还有的是你怎么把它(插件体系结构)运用到你自己的应用程序当中,插件体系结构是开源授权的,所以能被用在任意的应用程序(开源或者商业闭源解决方案),它被证明了大约有30万行代码的项目例如在SharpDevelop里面,所以如果它真的是你的需要,那么就去看一些这些代码吧。
大多数应用程序都使用了一些插件结构,但是大多数插件仅仅限制在于只做很少一部分的特殊工作-例如扩展已经存在的菜单或者处理一些新的文件格式。
SharpDevelop的插件体系结构的目的在于使一些能被扩展的应用程序能够更容易的去提供扩展点给外界去扩展应用程序的功能。事实上,我们想要使它(去扩展应用程序)变得更容易操作因为我们所有时间都是使用它(去扩展应用程序),这样你就能让插件能扩展几乎任何东西。
在这篇文章,我会创建一个小的文本编译器应用程序,下面就是这个编译器的要点:
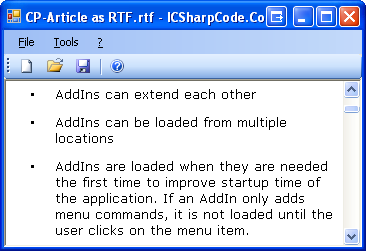
1.插件们能够互相扩展。
2.插件们能够在多个位置被加载。
3.当插件们需用到应用程序的话,在程序开始运行的时候被加载。如果一个插件只添加了一些菜单命令,它不会被加载直到用户按了那个菜单项。
各种特点
插件结构提供了下面一些功能
1.插件之间能互相扩展。
2.插件只能能在多个位置被加载
3.当插件们需用到应用程序的话,在程序开始运行的时候被加载。如果一个插件只添加了些 菜单命令,它不会被加载知道用户按了那个菜单项。
4.包含了能(使用+禁用),卸载,更新这些基本功能
5.一个图形化的插件管理员能作为一个插件从文件包中安装新的一些别的插件(看下图)

它不会做什么:
1.提供一个拥有预先定义好的user-interface,pads,docking, file management etc“应 用程序平台”,但是能在core程序集里面创建(SharpDevelop所做的)
2.它不会使用很多应用程序域去加载各种插件,所有东西都放在一个主的应用程序域,所 以,卸载插件们或者禁用插件们要求重新启动应用程序。
基于Core的应用程序结构
让我们通过我们那个简单的应用程序的程序集视图来开始
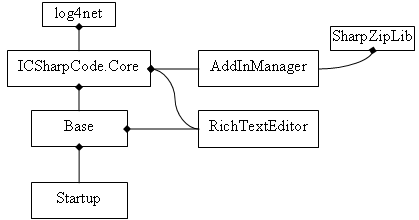
Core程序集使用了log4net程序集来记录日志(在LoggingService类中),如果你想使用不同的日记驱动器,你只需修改LoggingService.cs文件。
插件们里面必须引用ICSharpCode.Core,还有引用Base(除了一些不需要和主应用程序进行交互的)。插件们也能互相引用还有他们能来自于别的一些额外库中。
Core程序集
Core程序集负责加载插件们和储存一个扩展点列表并且用加载的插件们去扩展他们(扩展点)。所有扩展点都被储存在一个叫AddIn tree的属性结构当中。
此外,ICSharpCode.Core包括了一些代码为了:
1.保存/加载 配置,
2.日记跟踪,
3.为用户显示消息,
4.阅读(本地化)资源,
5.创建能被插件们扩展的菜单栏和工具栏
有什么在Base里面呢?
Base是应用程序的基本插件。对于Core,他只是一个普通插件,但是它(Base)提供了一些其他所有插件们需要引用的必要的功能
Base包含了控制应用程序主窗口的代码和像文件管理等主要行为的接口(撤销,重做,能停靠的面板)
在这篇文章的示例代码中,Base中包含了一个好像笔记本一样的应用程序,Download包含了两个插件-AddInManager和RichTestEditor。AddInManager能让用户去安装各种插件包。从这里你能得到更多信息:http://laputa.sharpdevelop.net/AddInManagerVideoTutorial.aspx
插件树
完成的插件包含了两个文件(或者更过);一个是XML格式的插件配置文件,一个是类库文件(.dll)还有也许会有附加的一些文件或者类库. XML定义了插件在应用程序开始的时候怎么样呈现还有结合到单独树结构中:AddIn Tree
插件树像是文件系统那样的结构,例如,如果你想访问SubNode2,我们必须详细指定位置:/Path1/SubPath1/Node1/SubNode2.
一个路径代表了应用程序的扩展点。一个节点是一些通过插件添加到扩展点的行为,节点们能有子节点,就像在这个示例路径中所呈现的。
插件树最通常的使用时去扩展菜单栏和工具栏,当应用程序的一些部分需要去创建菜单和工具,它在插件树中使用一个路径,引用SharpDevelop的一个例子:路径"/SharpDevelop/MainMenu"包含了主菜单的所有项,路径"/SharpDevelop/Browser/Toolbar"包含了browser的工具栏(在SD中,browser在开始页和整合帮助中使用)。
所以,你怎么加载这样一个toolbar呢?这里很感谢Core里面提供的ToolBarService。
toolStrip = ToolbarService.CreateToolStrip(this,
                         "/SharpDevelop/Browser/Toolbar");
toolStrip.GripStyle = ToolStripGripStyle.Hidden;
this.Controls.Add(toolStrip);
正如你所看到的,创建一个能扩展的toolbars是多么的容易。
这个toolbar在哪里得到被加载的呢?当然,就在XML配置文件的Path中(这个XML文件就是插件文件)
<Path name = "/SharpDevelop/Browser/Toolbar">
  <ToolbarItem id      = "Back"
               icon    = "Icons.16x16.BrowserBefore"
               tooltip = "${res:AddIns.HtmlHelp2.Back}"
               class   = " SharpDevelop.BrowserDisplayBinding.GoBack"/>
  <ToolbarItem id      = "Forward"
               icon    = "Icons.16x16.BrowserAfter"
               tooltip = "${res:AddIns.HtmlHelp2.Forward}"
               class   = " SharpDevelop.BrowserDisplayBinding.GoForward"/>
  [...]
  <ToolbarItem id = "Separator1" type  = "Separator"/>
  <ToolbarItem id      = "GoHome"
               icon    = "Icons.16x16.BrowserHome"
               tooltip = "${res:AddIns.HtmlHelp2.Homepage}"
               class   = "SharpDevelop.BrowserDisplayBinding.GoHome"/>
  [...]
这段XML文件定义了Path""/SharpDevelop/Browser/Toolbar"".它包含了子节点"/SharpDevelop/Browser/Toolbar/Back",每个节点都有一个密码子(Codeon)相连,一个密码子是插件树节点的内存的外部表现形式,当插件树被加载,一个密码子的实例被创建,它的名字被设置为(Toolbaritem),它的ID属性设为"Back",其他的特征被放到一个“Properties”的容器里面(好像Hashtable一样工作)
icon特征引用了储存在ResourceService中的图片。tooltip特征被解析为“StringParser”服务添加的本地字符串。class被设置成命令的完全限定名(命令里面执行一些动作,事情),这个class指定的类必须继承ICommadn类,但是这里有一个特殊的例子“ToolbarItem”,你能用插件树去储存任何信息。
有一个重要的事实就是:插件树的构造是结合于所有的插件们所有的定义。例如help AddIn中的HtmlHelp2.addin 文件包括这些:
<Path name = "/SharpDevelop/Browser/Toolbar">
  <Condition name = "BrowserLocation" urlRegex = "^ms-help:">
    <ToolbarItem id      = "SyncHelpTopic"
                 icon    = "Icons.16x16.ArrowLeftRight"
                 tooltip = "${res:AddIns.HtmlHelp2.SyncTOC}"
                 class   = "HtmlHelp2.SyncTocCommand"
                 insertafter = "Separator1"/>
    [...]
你能看到插件们能够添加新的项到已经存在的路径中,并且用一些特殊的特征insertafter和insertbefore来控制插入的位置.
你能看到密码子们(Codeons)能拥有Conditions分配给它们自己,我会在下一篇详细解释Conditions。
一下的一些密码子名字能被Core程序集支持
Class
通过System.Reflection的反射机制用无参构造函数来创建的类实例
FileFilter
为OpenFileDialog或者SaveFileDialog创建文件选择器入口
Include
从插件树中其他位置引入一个或多个项. 你能用特征 "item" (去引入一个单独项) 或者特征 "path" (去引入目标路径中所有的项).
Icon
被用于创建文件类型和图标之间的关联
MenuItem
创造一个用在菜单栏的项: System.Windows.Forms.ToolStrip*
ToolbarItem
创建一个用在工具栏的项:System.Windows.Forms.ToolStrip*
当然,插件们(或者你的基本应用程序)能通过添加custom doozers为其他数据创建新的项类型。Doozers 其实就是一个类,它从Codon创建对象。ICSharpCode.Core中包含了在表中提到的Codeon类型所对应的的Doozer类. Custom doozers 会在别的文章中提到。
然而,在大多数例子中用Class已经足够了,它能让你把任何对象放到AddIn tree上,如果放到一个路径上的所有的Class都实现了特殊接口(IMyInterface),你能这样用:
foreach (IMyInterface obj in AddInTree.BuildItems(
                           "/Path/SubPath", this, false)) {
  // the third parameter means that no exception should
  // be thrown if the path doesn’t exist
  obj.SomeMethod(…);
}
你能通过这种方式在AddIn tree上定义一些文件类型处理器或者设置一些在某些行为上触发的命令。
假如一个插件需要在程序开始的时候执行一些动作,"/Workspace/Autostart" 是一个预先已经定义好的路径,这个路径里面的内容会在core初始化的时候运行(在加载完插件树之后立刻执行),储存在这个路径中的对象必须继承自ICommand.
The example application
现在让我们回到我们的简单应用程序:小型文本编译器。主form叫做:"Workbench",并且它显示出Main Munu,一个ToolBar,还有一个就是ViewContent,ViewContent可以是任何东西(想一个文件那样有远程行为表现),我们的应用程序一次只能显示一个ViewContent。
"Edit"和"格式化"菜单是有意被忽略的,在下一篇文章,我会以插件的方式添加到这个应用程序中。
这个应用程序只是为你演示你能用ICSharpCode.Core做些什么,它不能作为一个成熟的文本编译器来使用,因为它压根不支持编码(只有UTF-8),作为插件的一个例子,下载到的文件夹中包含了一个叫"RuchTextEditor"插件,它能提供简单的富文本编译器。
我们为以下面的步骤来创建这个应用程序:
1.在Starup中的代码要求建立起程序核心(一些配置的东西)
2.代码要建立起应用程序窗口
3.用PropertyService来加载和保存应用程序的配置。
4.实现菜单命令
5.用能扩展的"display bindings"来打开文件
6.利用本地资源
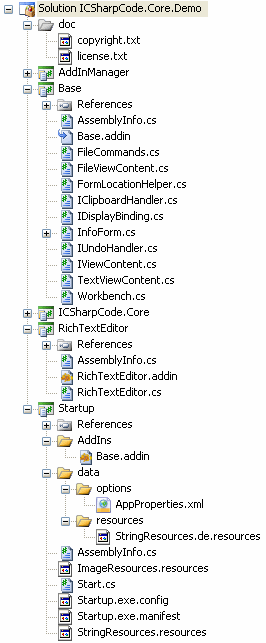
为了能让你能更清楚看到项目结构,下面是项目资源管理器的截图:
Startup
让我们看一下StartUp的代码(在Startuo项目中的文件 Start.cs,方法Start.Main)还有一些在这里使用ICSharpCode.Core库里面代码的细节.
// The LoggingService is a small wrapper around log4net.
// Our application contains a .config file telling log4net to write
// to System.Diagnostics.Trace.
LoggingService.Info("Application start");

// Get a reference to the entry assembly (Startup.exe)
Assembly exe = typeof(Start).Assembly;

// Set the root path of our application.
// ICSharpCode.Core looks for some other
// paths relative to the application root:
// "data/resources" for language resources,
// "data/options" for default options
FileUtility.ApplicationRootPath = Path.GetDirectoryName(exe.Location);

LoggingService.Info("Starting core services...");

// CoreStartup is a helper class
// making starting the Core easier.
// The parameter is used as the application
// name, e.g. for the default title of
// MessageService.ShowMessage() calls.
CoreStartup coreStartup = new CoreStartup("Test application");
// It is also used as default storage
// location for the application settings:
// "%Application Data%\%Application Name%", but you
// can override that by setting c.ConfigDirectory

// Specify the name of the application settings
// file (.xml is automatically appended)
coreStartup.PropertiesName = "AppProperties";

// Initializes the Core services
// (ResourceService, PropertyService, etc.)
coreStartup.StartCoreServices();

// Registeres the default (English) strings
// and images. They are compiled as
// "EmbeddedResource" into Startup.exe.
// Localized strings are automatically
// picked up when they are put into the
// "data/resources" directory.
ResourceService.RegisterNeutralStrings(
  new ResourceManager("Startup.StringResources", exe));
ResourceService.RegisterNeutralImages(
  new ResourceManager("Startup.ImageResources", exe));

LoggingService.Info("Looking for AddIns...");
// Searches for ".addin" files in the
// application directory.
coreStartup.AddAddInsFromDirectory(
  Path.Combine(FileUtility.ApplicationRootPath, "AddIns"));

// Searches for a "AddIns.xml" in the user
// profile that specifies the names of the
// AddIns that were deactivated by the
// user, and adds "external" AddIns.
coreStartup.ConfigureExternalAddIns(
  Path.Combine(PropertyService.ConfigDirectory, "AddIns.xml"));

// Searches for AddIns installed by the
// user into his profile directory. This also
// performs the job of installing,
// uninstalling or upgrading AddIns if the user
// requested it the last time this application was running.
coreStartup.ConfigureUserAddIns(
  Path.Combine(PropertyService.ConfigDirectory, "AddInInstallTemp"),
           Path.Combine(PropertyService.ConfigDirectory, "AddIns"));

LoggingService.Info("Loading AddInTree...");
// Now finally initialize the application.
// This parses the ".addin" files and
// creates the AddIn tree. It also
// automatically runs the commands in
// "/Workspace/Autostart"
coreStartup.RunInitialization();

LoggingService.Info("Initializing Workbench...");
// Workbench is our class from the base
// project, this method creates an instance
// of the main form.
Workbench.InitializeWorkbench();

try {
  LoggingService.Info("Running application...");
  // Workbench.Instance is the instance of
  // the main form, run the message loop.
  Application.Run(Workbench.Instance);
} finally {
  try {
    // Save changed properties
    PropertyService.Save();
  } catch (Exception ex) {
    MessageService.ShowError(ex, "Error storing properties");
} }
LoggingService.Info("Application shutdown");
Workbench 初始化
在"Base"工程里面的Workbench类是我们应用程序的主窗口,在它的构造函数中(Workbench.InitializeWorkbench),它用了MenuService和ToolbarService去创建主窗体的内容
// restore form location from last session
FormLocationHelper.Apply(this, "StartupFormPosition");

contentPanel = new Panel();
contentPanel.Dock = DockStyle.Fill;
this.Controls.Add(contentPanel);

menu = new MenuStrip();
MenuService.AddItemsToMenu(menu.Items,
             this, "/Workbench/MainMenu");

toolbar = ToolbarService.CreateToolStrip(this,
                          "/Workbench/Toolbar");

this.Controls.Add(toolbar);
this.Controls.Add(menu);

// Start with an empty text file
ShowContent(new TextViewContent());

// Use the Idle event to update the
// status of menu and toolbar items.
Application.Idle += OnApplicationIdle;
Core程序集没有提供FormLocationHelper,但是作为在"Base"项目中的一个帮助类,它用了PropertyService去加载和储存主窗口的位置信息(窗口大小,位置等等).
PropertyService
在Core中包含了一个类叫做”PropertyService“,它能用来储存应用程序的配置信息,当你看一下代码中怎样保存和恢复Form的位置信息之后,你会发现,一切都十分简单:
public static void Apply(Form form, string propertyName)
{
  form.StartPosition = FormStartPosition.Manual;
  form.Bounds = Validate(
    PropertyService.Get(propertyName, GetDefaultBounds(form)));
  form.Closing += delegate {
    PropertyService.Set(propertyName, form.Bounds);
  };
}
PropertyService的Get和Set方法都是泛型方法:
public static T Get<T>(string property, T defaultValue)
public static void Set<T>(string property, T value)
C#编译器能从GetDefaultBounds中推断出类型,GetDefaultBounds方法只是返回在屏幕的中间位置范围,还有查看属性,Validate函数用来确保位置是一个有效的位置;我们不希望在不在存在的扩展屏幕中显示窗口(应该是笑话),当Form关闭的时候,新的窗口位置就会被储存起来,PropertyService支持类型有提供一个TypeConverter,所以你能使用大多数.net内建的类型类还有为用户自定义类型提供支持也是很容易的。另外,PropertyService支持储存一维数组,前提是数组元素拥有一个TypeConverter。
Menu Commands
你已经看到过再.addin文件中声明的菜单命令了,这里有为我们的文本编译器特制的一些命令:
<Path name = "/Workbench/MainMenu">
    <MenuItem id = "File"
             type = "Menu"
             label = "${res:Demo.Menu.File}">
        <MenuItem id = "New"
                 label = "&New"
                 shortcut = "Control|N"
                 icon = "Icons.New"
                 class = "Base.NewFileCommand"/>
现在来看一下NewFileCommand类(明显不是Core程序集提供的)
public class NewFileCommand : AbstractMenuCommand
{
    public override void Run()
    {
        Workbench workbench = (Workbench)this.Owner;
        if (workbench.CloseCurrentContent()) {
                workbench.ShowContent(new TextViewContent());
}   }   }
用来创建menu或者toolbar的"Owner"工作台是自动被传递的。
ToolbarService.CreateToolStrip(this, "/Workbench/Toolbar");
第一个参数是工作台的拥有者,所有为toolbar创建的一些命令在创建toolstrip的时候都会设置它的Owner属性,这在创建某个菜单的子项的时候非常有用.
现在讲注意力移到打开已存在的文件当中,我们不知道用户想要打开的文件是怎样的文件类型,并且我们想让插件的作者能够添加一些别的类型文件的支持,所以,在OpenFileDialog 中使用的file filter必须能被扩展,还有的是插件们应该有能力为用户所选择的文件来创建custom view contents。
using (OpenFileDialog dlg = new OpenFileDialog()) {
    dlg.CheckFileExists = true;
    dlg.DefaultExt = ".txt";
    dlg.Filter = FileViewContent.GetFileFilter("/Workspace/FileFilter");
    if (dlg.ShowDialog() == DialogResult.OK) {
        IViewContent content =
          DisplayBindingManager.CreateViewContent(dlg.FileName);
        if (content != null) {
            workbench.ShowContent(content);
}   }   }
首先看文件筛选器怎样被建立起来的:
<Path name = "/Workspace/FileFilter">
<FileFilter id = "Text" name = "Text files" extensions = "*.txt"/>
<FileFilter id = "LogFiles" name = "Log files" extensions = "*.log"/>
</Path>
还有GetFileFilter函数
public static string GetFileFilter(string addInTreePath)
{
    StringBuilder b = new StringBuilder();
    b.Append("All known file types|");
    foreach (
     string filter in AddInTree.BuildItems(addInTreePath, null, true)) {
        b.Append(filter.Substring(filter.IndexOf('|') + 1));
        b.Append(';');
    }
    foreach (
     string filter in AddInTree.BuildItems(addInTreePath, null, true)) {
        b.Append('|');
        b.Append(filter);
    }
    b.Append("|All files|*.*");
    return b.ToString();
}
正如你所见的,在这个例子中BuildItems方法返回一个字符串数组,对于文件筛选器,我们不需要任何的拥有者,这是为什么BuildItens方法的第二个参数是null。
FileFilter doozer从"name|extensions"返回一些字符串,这些字符串用于把筛选文本连接起来。
现在让我们看一下View content的创建。正如在“Features”部分已经说过,Core没有为了这个任务(创建View content)来为你提供一个预先定义好的类,但是,DisplayBindingManager 是非常容易写的
我们会定义一个叫IDisplayBinding的新接口还有一个在插件树的新路径,插件们能够用<Class>元素来添加已经继承了那个接口的类的实例到插件树中,我们的DisplayBindingManager构造这些对象并且会请求这些对象去为文件创建view content。第一个能够打开文件的对象能被使用。
实现这个行为是很简单的:
/// <summary>
/// Interface for classes that are able to open a file
/// and create a <see cref="IViewContent"/> for it.
/// </summary>
public interface IDisplayBinding
{
    /// <summary>
    /// Loads the file and opens a <see cref="IViewContent"/>.
    /// When this method returns <c>null</c>,
    /// the display binding cannot handle the file type.
    /// </summary>
    IViewContent OpenFile(string fileName);
}

public static class DisplayBindingManager
{
    static ArrayList items;

    public static IViewContent CreateViewContent(
                                  string fileName)
    {
        if (items == null) {
            items = AddInTree.BuildItems(
                     "/Workspace/DisplayBindings", null, true);
        }
        foreach (IDisplayBinding binding in items) {
            IViewContent content = binding.OpenFile(fileName);
            if (content != null) {
                return content;
            }
        }
        return null;
}   }
正如你所见的,我们简单的构造出在插件树中的所有DisplayBinding类,第一个能够打开文件display绑定被使用。
在"Base"项目中其插件的声明,Base.addin,尝试以文本文件的方式打开任何东西,我们的"RichTextEditor"插件例子已经使用"insertbefore" 来确保它首先被使用。
<Path name = "/Workspace/DisplayBindings">
    <Class id = "RTF"
           class = "RichTextEditor.DisplayBinding"
           insertbefore = "Text"/>
</Path>
如果你没有用"insertbefore",Base中的文本编译器会取代rich text的源代码,并且我们的rich text editor不会被要求去打开文件。
这里就是display binding class的代码:
public class DisplayBinding : IDisplayBinding
{
    public IViewContent OpenFile(string fileName)
    {
        if (Path.GetExtension(fileName).ToLowerInvariant() == ".rtf") {
            return new RichTextViewContent(fileName);
        }
        return null;
}   }
这个方法能够在一个文件第一次打开的时候致使所有display binding AddIns都被加载进来,在以后的文章中,我会展示给你看一个更好方法(把扩展名检察移动到XML文件中)。
从别的插件树路径中引进项
<include>在.addin XML文件中是很有用的元素:
<Path name = "/Workbench/MainMenu">
  <MenuItem id = "Tools"
            type = "Menu"
            label = "&Tools">
    <Include id = "ToolList" path = "/Workspace/Tools"/>
  </MenuItem>
</Path>
这里会提取所有在/Workspace/Tools中的元素然后添加它们到<Include>点的位置,/Workspace/Tools是一个标准化的路径,它在base应用程序中没有紧密耦合,但只是当它们在菜单栏中的Tools项中被点击的时候打开一个新的窗口。在这里插件管理器插件包含了一个下载的用法, 所以你能启动插件管理器并且用它来禁用或者启动各个插件。
Resorces
core支持本地多语言资源文件的使用,ResourceService从本地众多路径中阅读资源,
*主要的英语StringResources文件通常植入到Starup应用程序中,它这样被注册:
ResourceService.RegisterNeutralStrings(
    new ResourceManager("Startup.StringResources", assembly));
*ResourceService从字典data/resources自动阅读language-specific.resources文件(相对于应用程序根路径)这是一个普通的方法去提供本地字符串支持。
当然,它也能让插件们提供它们的本地字符串提供支持,以AddInManager这个插件为例,它包含了German和English资源文件。两个都被设置成“EmbeddedResource”。所以英语资源文件被包含在插件程序集中并且德语资源被放在satellite程序集里面
当AddInManager启动得时候:
ResourceService.RegisterStrings(
    "ICSharpCode.AddInManager.StringResources",
                               typeof(ManagerForm).Assembly);
ResourceService会从插件程序集中加载文本资源并且它会为本地语言查看satellite程序集,ResourceService.GetString() 会探索所有已经注册了的资源并且返回一个代表当前语言的字符串。
然而,不能简单地从Xml文件中执行一个函数,我们必须在这里用一种别的方式。
StringParser是一个在core中的静态类,它扩展了"{xyz}"-style属性值。StringParser被用在于所有在插件树中菜单项的Labels,所以你能包含字符串解析方式或者其他变量:
<MenuItem id = "File" type = "Menu" label = "${res:Demo.Menu.File}">
你能用${res:ResourceName}从ResourceService中包含字符串进来。你也能用${property:PropertyName}从ResourceService中包含属性值进来,或者${env:VariableName} 引进环境变量,额外变量能这样设置:StringParser.Properties. Moreover,你能通过PropertyService.PropertyObject注册新的预定义,一个属性对象可以是任何对象(成员是利用反射来访问的)。 ${exe:PropertyName}能被用于访问任何在入口程序集中的FileVersionInfo对象中的任何属性
ICSharpCode.Core 和AddInManager 是开源的,总之,你能在商业项目中使用这些类库,但是你必须发表你对库做的任何修改。
在这个例子中的"Base"和"Startup"是免费使用的。
这篇文章展现给你看如何在你的应用程序当中运用ICSharpCode.Core。我们讨论了core提供的服务并且你需要怎样在你的应用程序中实现,我们用AddInTree去储存菜单项,工具栏项,文件筛选条目和个人用户对象。对于延迟加载,Custom doozers和条件,会在下篇文章讨论