一个好的应用程序离不开人性化的用户界面。在学习其他东西之前。理应先学习编写程序的布局(外观)
今天,我们就来学习android的UI布局----LinearLayout。
LinearLayout,即线性布局。从名字我们就可以知道,它的元素是线型排列的。
注意:在以后的部分代码编写当中,我们采用硬编码的方式将字符串值写入android:text等标签中,
不会另外在strings.xml文件中定义字符串值,这个时候eclipse IDE会出现黄色的下划线警告,我们忽略就可以了
主要知识点:
android:layout_width
android:layout_height
android:orientation
android:id
我们先创建一个名叫Layouts的项目,项目名称首字母记得大写,虽然不是必须,但这是一个最佳实践。
我们依然用layouts目录下的activity_main.xml文件作为示范,不多说,直接上代码
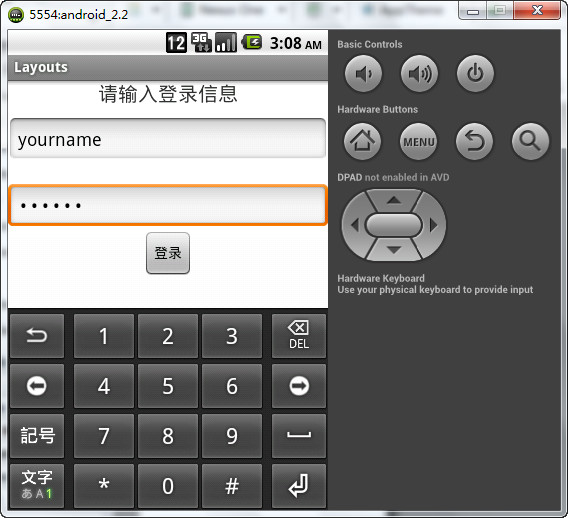
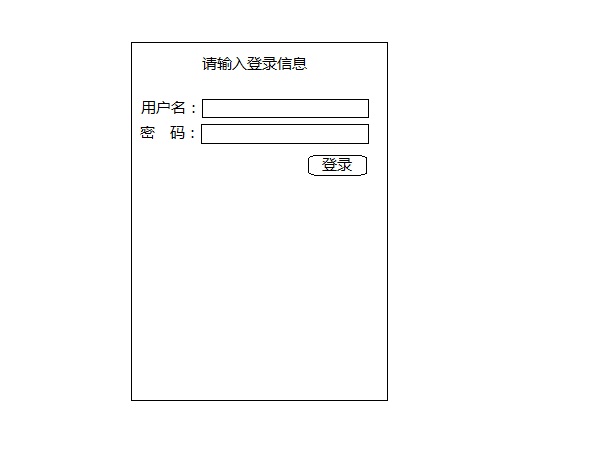
 1 <LinearLayout
 2     android:layout_width="fill_parent"
 3     android:layout_height="fill_parent"
 4     android:orientation="vertical"
 5     xmlns:android="http://schemas.android.com/apk/res/android">
 6
 7     <TextView
 8         android:layout_width="wrap_content"
 9         android:layout_height="wrap_content"
10         android:text="请输入登录信息"
11         android:textSize="20sp"
12         android:layout_gravity="center"/>
13
14     <EditText
15         android:id="@+id/userName"
16         android:layout_width="fill_parent"
17         android:layout_height="wrap_content"
18         android:layout_marginTop="10dp"
19         android:hint="输入你的用户名"/>
20
21     <EditText
22         android:id="@+id/passwd"
23         android:password="true"
24         android:layout_width="fill_parent"
25         android:layout_height="wrap_content"
26         android:layout_marginTop="18dp"
27         android:hint="输入你的密码" />
28
29     <Button
30         android:id="@+id/btnLogin"
31         android:layout_width="wrap_content"
32         android:layout_height="wrap_content"
33         android:text="登录"
34         android:layout_gravity="center" />
35 </LinearLayout>
看一下运行效果
接下来我们解释一下代码的结构和原理
我们编写了一个LinearLayout的布局,需要注意的是,LinearLayout标签必须是一个根元素,它的外面不能出现任何元素。但是里面能嵌套任何布局元素。即,最外层的布局不能有兄弟元素(同级元素)
因此,下面的情况不能出现
<LinearLayout
    android:layout_width="fill_parent"
    android:layout_height="wrap_content"
    android:orientation="vertical"
    xmlns:android="http://schemas.android.com/apk/res/android">

   <!-- 其他元素 -->

</LinearLayout>

<LinearLayout
    android:layout_width="fill_parent"
    android:layout_height="wrap_content"
    android:orientation="vertical">

    <!-- 其他元素 -->

</LinearLayout>
现在知道什么是线性布局了吧
它们一个跟在另一个的后面排列,就像一条线一样。
认识新标签:
<TextView />:我们昨天说过,不再重复
<EditText />:文本框,用于接收用户的输入
<Button />:按钮,当用户点击的时候处理相应的事件
设置元素属性:
我们主要简单说一下下面的几个属性,其他的可以自己研究一下。
android:layout_width="fill_parent"
layout_width: 设置元素长度,值可以是fill_parent(填充父元素,最外层的父元素就是Activity窗体)、wrap_content(根据内容的长度自适应)、或者用单位控制,如10dp,20dp,100dp等等
android:layout_height="fill_parent"
layout_height: 设置元素高度,layout_width的设置同样适用于layout_height
android:orientation="vertical"
orientation:布局的排列方向,值可以是vertical(垂直)和horizontal(水平),如果忽略这个属性,默认是horizontal
android:layout_gravity="center"
layout_gravity:元素的对齐方向,常用的有right,left,center等,有多个值可以选择,这里就自己测试吧,多动手,学得快。
android:id="@+id/idName"
android:id: 为元素添加一个独一无二的身份标识。@符号的作用我们说过了。那么+号的作用又是什么呢?
当我们第一次为一个元素添加一个身份标识的时候,就需要用到+号,这样,程序编译的时候,就会在gen目录下的R.java文件中生成一个资源ID,
以后我们就可以通过这个ID引用这个标签中的内容。
除了添加自己的ID名称之外,我们还可以使用android内置的ID。这个时候+号就不需要了,如:
@android:id/list、@android:id/empty
这样,我们定义的元素就会使用android.R类中预先定义的ID值
上面的使用方法,以后会说到,这里不进一步解释。
那么,第二个文本框中的效果又是怎样实现的呢
很简单,就是android:password="true",这样,我们看到的就是一个个黑点,而不是我们输入的字母和数字等
上面的代码中,android:orientation的值是vertical,现在我们将它换成horizontal,看又是什么情况
<LinearLayout
    android:layout_width="fill_parent"
    android:layout_height="fill_parent"
    android:orientation="horizontal"
    xmlns:android="http://schemas.android.com/apk/res/android">


    <EditText
        android:layout_width="0dp"
        android:layout_weight="1"
        android:layout_height="wrap_content"
        android:hint="send message"/>

    <Button
        android:layout_width="wrap_content"
        android:layout_height="wrap_content"
        android:text="发送"/>

</LinearLayout>
View Code
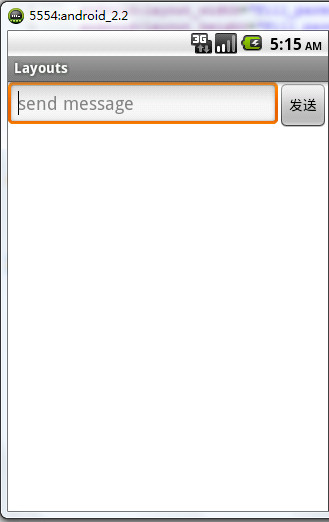
没有错,元素现在向水平方向排列,我们再添加多几个元素看看
<LinearLayout
    android:layout_width="fill_parent"
    android:layout_height="fill_parent"
    android:orientation="horizontal"
    xmlns:android="http://schemas.android.com/apk/res/android">


    <TextView
        android:layout_width="wrap_content"
        android:layout_height="wrap_content"
        android:text="信息标题:"/>

    <EditText
        android:layout_width="0dp"
        android:layout_height="wrap_content"
        android:layout_weight="1"
        android:hint="message title here"/>

    <TextView
        android:layout_width="wrap_content"
        android:layout_height="wrap_content"
        android:text="message content"/>

    <EditText
        android:layout_width="wrap_content"
        android:layout_height="wrap_content"
        android:hint="message title here"/>
    <Button
        android:id="@+id/btnSend"
        android:layout_width="wrap_content"
        android:layout_height="wrap_content"
        android:text="发送"/>

</LinearLayout>
运行效果:
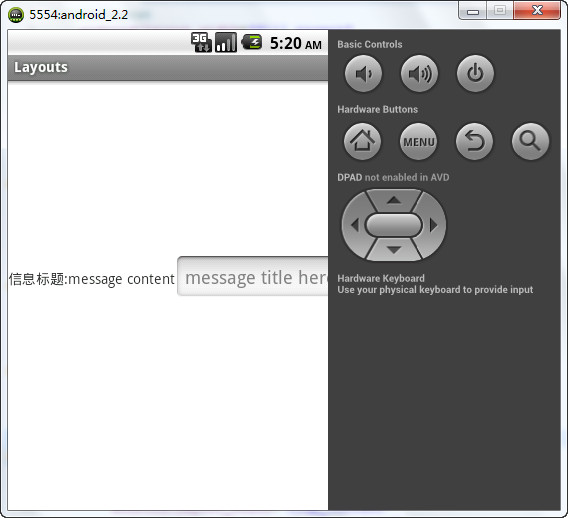
乱套了,为什么
当水平排列的时候,如果元素的长度超过activity本身的长度的时候,元素就会溢出,导致部分元素无法显示。
我们先不管android:layout_weight="1"是什么,也不管为什么要将android:layout_width的值设置为0dp。后面会说。
现在,我们应该对LinearLayout有所了解了。代码最好自己敲一次,这样学习才有意思
那么我就布置一道简单的练习题吧
请用LinearLayout完成下图中的布局

![[原创] 浅谈开源项目Android-Universal-Image-Loader(Part 3.1)](/Upload/SmallIMG/2013082319/5423EA81348128C7.png)