Silverlight中的独立存储是其内部的可信任的可访问文件空间,在这里你可以使用Silverlight 随意的创建、读取、写入、删除目录和文件,它有一些类似于Cookie,但是它可以在客户端保存大量的数据。这个空间默认是1M,如果不够的时候可以申请 扩大容量。
网站+用户+应用程序定位一个独立存储,也就是说必须得相同网站,相同用户,相同应用程序才能够访问这个独立的存储空间。独立存 储是IsolatedStorageFile密封类来进行设置的,这个类分布在命名空间System.IO.IsolatedStorag。我们引用 System.IO命名空间对文件进行操作。下面我们来看一个演示的Xaml代码如下:
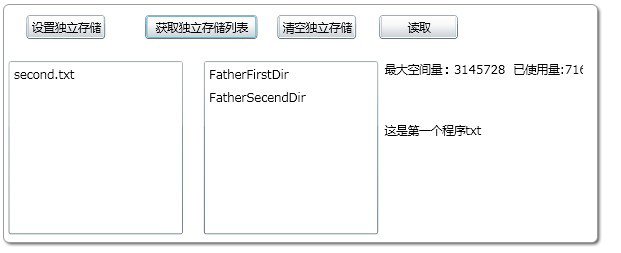
View Row Code class="xml"> <Grid x:Name="LayoutRoot" Background="White"> <Button Content="设置独立存储" Height="23" HorizontalAlignment="Left" Margin="29,79,0,0" Name="btnSetStorage" VerticalAlignment="Top" Width="75" Click="btnSetStorage_Click" /> <Button Content="清空独立存储" Height="23" HorizontalAlignment="Left" Margin="268,79,0,0" Name="btnClearStorage" VerticalAlignment="Top" Width="75" Click="btnClearStorage_Click" /> <Button Content="获取独立存储列表" Height="23" HorizontalAlignment="Left" Margin="142,79,0,0" Name="btnGetStorage" VerticalAlignment="Top" Width="107" Click="btnGetStorage_Click" /> <ListBox Height="165" HorizontalAlignment="Left" Margin="12,123,0,0" Name="listBox1" VerticalAlignment="Top" Width="166" /> <ListBox Height="165" HorizontalAlignment="Left" Margin="198,123,0,0" Name="listBox2" VerticalAlignment="Top" Width="166" /> <Button Content="读取" Height="23" HorizontalAlignment="Left" Margin="365,79,0,0" Name="button1" VerticalAlignment="Top" Width="75" Click="button1_Click" /> <sdk:Label Height="28" HorizontalAlignment="Left" Margin="370,123,0,0" Name="label1" VerticalAlignment="Top" Width="189" /> <sdk:Label Height="28" HorizontalAlignment="Left" Margin="370,181,0,0" Name="label2" VerticalAlignment="Top" Width="189" /> </Grid>然后我们来看Xaml.cs代码中使用IsolatedStorageFile对独立存储进行添加目录,添加文件,读取文件,删除文件及目录,扩展独立存储空间等操作。
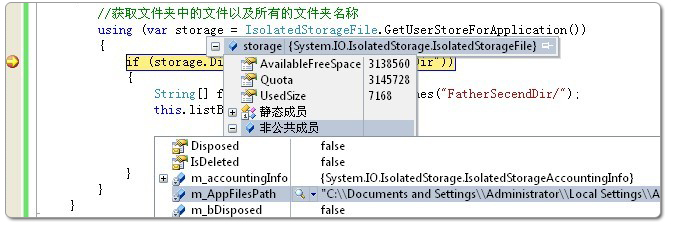
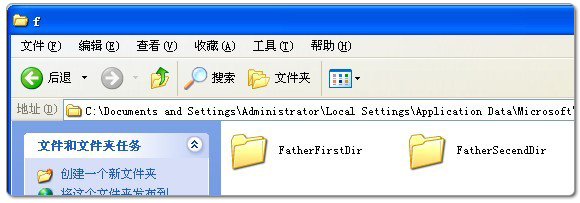
View Row Code public partial class MainPage : UserControl { public function">MainPage() { InitializeComponent(); } private void btnSetStorage_Click(object sender, RoutedEventArgs e) { using (var storage = IsolatedStorageFile.GetUserStoreForApplication()) { //创建First父目录 if(!storage.DirectoryExists("FatherFirstDir")) { storage.CreateDirectory("FatherFirstDir"); //创建子目录 string SonDir = Path.Combine("FatherFirstDir", "SonFirstDir"); storage.CreateDirectory(SonDir); //创建文件 IsolatedStorageFileStream fileStream = storage.CreateFile(Path.Combine(SonDir, "First.txt")); using (StreamWriter swriter = new StreamWriter(fileStream)) { swriter.Write("这是第一个程序txt"); } fileStream.Close(); } //创建Secend父目录 if (!storage.DirectoryExists("FatherSecendDir")) { storage.CreateDirectory("FatherSecendDir"); //在一级目录下添加一个文件 IsolatedStorageFileStream fileStream = storage.CreateFile(Path.Combine("FatherSecendDir", "second.txt")); using (StreamWriter swriter = new StreamWriter(fileStream)) { swriter.Write("新的txt程序"); } fileStream.Close(); } //当前的独立存储状态 this.label1.Content = "最大空间量:" + storage.Quota + " 已使用量:" + storage.UsedSize; //获取文件First.txt的值 using (StreamReader reader = new StreamReader(storage.OpenFile("FatherFirstDir\\SonFirstDir\\First.txt", FileMode.Open, FileAccess.Read))) { this.label2.Content = reader.ReadToEnd(); } } } private void btnGetStorage_Click(object sender, RoutedEventArgs e) { //获取文件夹中的文件以及所有的文件夹名称 using (var storage = IsolatedStorageFile.GetUserStoreForApplication()) { if (storage.DirectoryExists("FatherSecendDir")) { String[] fileList = storage.GetFileNames("FatherSecendDir/"); this.listBox1.ItemsSource = fileList; String[] dirList = storage.GetDirectoryNames("*"); this.listBox2.ItemsSource = dirList; } } } private void btnClearStorage_Click(object sender, RoutedEventArgs e) { //删除所有的文件以及文件夹 using (var storage = IsolatedStorageFile.GetUserStoreForApplication()) { //在这里简单做一个判断,实际应用过程中不可 if (storage.FileExists("FatherFirstDir\\SonFirstDir\\First.txt")) { storage.DeleteFile("FatherFirstDir\\SonFirstDir\\First.txt"); storage.DeleteDirectory("FatherFirstDir\\SonFirstDir"); storage.DeleteDirectory("FatherFirstDir"); storage.DeleteFile("FatherSecendDir\\second.txt"); storage.DeleteDirectory("FatherSecendDir"); } } } private void button1_Click(object sender, RoutedEventArgs e) { int addSpaceSize = 2097152; //增加最大独立存储空间量 using (var storage = IsolatedStorageFile.GetUserStoreForApplication()) { if (storage.AvailableFreeSpace < addSpaceSize) { storage.IncreaseQuotaTo(storage.Quota+ addSpaceSize); } this.label1.Content = "最大空间量:" + storage.Quota + " 已使用量:" + storage.UsedSize; } } }现 在我们来看看如何去看独立存储中的文件夹以及文件,在下图位置设置断点,然后调试,先点击"设置独立存储",然后点击"获取独立存储",然后安装下面去找 到m_AppFilesPath字段的值,复制这个值到Windows文件夹的地址栏,按下确定键即可进入独立存储空间的目录下。在这里你可以看到以下的 独立存储文件夹。