你可能已经注意到,验证模对象改变了你在单元测试中执行的那类测试的本质。传统的单元测试中,通过断言(Assertion)来进行大多数的验 证。这是一种对应用程序状态的测试。模对象的测试,是测试测试中调用过程十分符合预期。它测试的是应用程序的行为。至少潜在能力上,行为测试更容易将期望 行为与实际的实现方法分开。
行为驱动设计(BDD)的口号是试图将测试设计从实现空间移到问题空间。部分地使用设计 BDD工具集,测试可以通过指定更接近自然语言的关键词来进行。BDD工具充分利用模对象,既作为说明问题的方法,也作为区分单独的个别单元测试的方法。 使用传统的TDD测试,低层方法的修改会导致很多测试失败。BDD认为一个代码的改变能产生许多测试失败表明这个测试不是真正
意义上的单元测试,而是集成 测试,尽管是非常小的范围内。TDD方式的测试只有在实际对象不能得到或者不好用的情况下才会使用模对象,BDD方式则更加积极地使用模对象来将测试中的 函数与系统的其它部分分离。
这个章节将概要地介绍一下RSpec(Ruby中最流行的BDD测试包)。RSpec与Rails集成得非常好,包括单独地测试Controller, View和Helper函数的能力。
安装RSpec
RSpec即可以作为Ruby gem也可以作为Rails plugin。在Rails里面使用时,可以使用下面的命令同时安装RSpec plugin和RSpec Rails plugin。
Ruby代码
ruby script/plugin install -x svn://rubyforge.org/var/svn/rspec/tags/CURRENT/rspec
ruby script/plugin install -x svn://rubyforge.org/var/svn/rspec/tags/CURRENT/rspec_on_rails
ruby script/plugin install -x svn://rubyforge.org/var/svn/rspec/tags/CURRENT/rspec
ruby script/plugin install -x svn://rubyforge.org/var/svn/rspec/tags/CURRENT/rspec_on_rails
通常,如果你不想将RSpec作为扩展组件安装到你的
版本控制服务器中的话,你可以将-x选项去掉。
Windows用户还需要为RSpec安装一个叫win32console的gem来更好的运行RSpec。
在安装好RSpec之后,
你需要运行下面命令来生成RSpec的路径与文件。
Ruby代码
ruby script/generate rspec
ruby script/generate rspec
这 个命令的最主要的目的是在Rails的根目录下创建一个spec子目录,里面有一个类似标准test_helper.rb文件的 spec_helper.rb。它还创建了一些
脚本,另一些文件你目前还用不着。然而,这个命令不会创建符合Rails命名规则的子目录。你需要手工来 做。
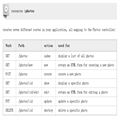
RSpec使用Rails现有的命名规则。下面的表格可以看出它通过简单的名字来命名的。
Test Type Example Name
Controller test spec/
controllers/reciper_controller_spec.rb
Helper test spec/
helpers/reciper_helper_spec.rb
Model test spec/models/reciper_spec.rb
View test spec/views/recipe/new_spec.rb
在这个章节中,由于我们已经生成了Model, View, Controller和Helper文件,所以我们将要手工创建这些规格文件。
如 果你是用RSpec新建项目的话,可以使用: rspec_controller, rspec_model和rspec_scaffold这3个RSpec
自定义的生成器。它们和原来的生成器形式相同,使用一样的参数。唯一的区别是在 spec目录下创建了RSpec的原始测试文件,而不是test目录下的Test::Unit文件。
你可以使用 rake spec命令来运行所有的RSpec规格。如果你只想运行其中的一套,你可以用更明确的命令,例如:rake spec:models。一共有:controllers, helpers, models, plugings和views几个子任务。如果你安装了rcov,所有命令后面都可以加上“:rcov”来生成一个覆盖报告(用gem install rcov来安装rcov)。但是,就算有为view模板写RSpec测试,rcov也不会为ERB模板生成覆盖报告。在Rails 2.0中,默认的rake任务会同时运行test目录下的测试和spec目录下的RSpec规格。
写RSpec规格
一 个RSpec规格文件包含一个和多个行为,每一个包含有一个或多个
例子。注意,命名方式已经表明了RSpec与Test::Unit之间的区别:"行为" 和"例子"讨论的是测试中功能和期望的概念,而"测试"和"断言"则关注实现。一个RSpec行为大约与一个Test::Unit类等价,虽然你经常可以 看到在一个规格文件中有多个行为,而很少看到一个Test::Unit类文件中有多个类。
描述一个行为的方法是:describe,而描述一个例子的方法是:it。一个规格文件的框架大概是这个样子:
Ruby代码
describe Foo do
it “should not crash when I call it” do
# do something testable here
end
end
describe Foo do
it “should not crash when I call it” do
# do something testable here
end
end
可以注意到这个例子是用自然语言来描述的而不是用函数名。
在 一个行为中,你可以通过"befort"和"after"函数来指定初始环境和清除。这些函数有两个用法。默认的是“:each”,表示每一个单独的例子 运行之前或之后将要运行的代码块,就像在Test::Unit里面的setup和teardown函数一样。另一个用法是":all",表示在所有例子运 行前后所有例子完成之后运行的代码块。你可以用同样的方法指定多个before和after块,所有的块都会在合适的时间执行。
在一个行为中,任何用Ruby普通的def
关键字声明的函数可以被所有行为中的例子使用,这样你就可以写一些自定义的验证函数和通用函数。
并且,虽然例子通常有一个代码块,但是你也可以临时仅仅为例子指定一个字符串而不提供代码块,例如:
Ruby代码
it “should do something that
hasn’t been implemented yet”
it “should do something that hasn’t been implemented yet”
RSpec将把这个测试标示为待完成,并且报表会将待完成的数量从通过数量或失败数量中分离出来。
你也可以再进一步,有一段代码,你知道会出错的测试,但是还是希望测试通过,通常的样子是这样的:
Ruby代码
it “should fix this silly bug” do
pending(“this is Bob’s problem”) do
#specify the failing test here
end
end
it “should fix this silly bug” do
pending(“this is Bob’s problem”) do
#specify the failing test here
end
end
在这个用例里,RSpec将运行pending块中的代码,如果失败,将报告测试待完成,如果成功,将得到一个预期的失败,告诉你这个测试不再失败,你不需要用pending了。
写Model测试
接下来的几个部分,你将看到一些基于已经写的Test::Unit测试上RSpec规范的一些例子。测试目标因为已经写过,这里不再完全重新说明,我们着重于看看RSpec的测试是怎样工作的,并看看它们与Test::Unit之间的区别。我们先看看Model。
为了能让这些测试运行,需要将test/fixtures里的YAML文件复制到spec。下面的代码是从“spec/models/recipe_spec.rb”复制过来的:
Ruby代码
require File.dirname(__FILE__) + ‘/../spec_helper’
describe Recipe, “basic test suite” do
fixtures :recipes
fixtures :ingredients
it “should have ingredients in order” do
subject = Recipe.find(1)
subject.ingredients.collect { |i| i.order_of }.should == [1, 2, 3]
end
end
require File.dirname(__FILE__) + ‘/../spec_helper’
describe Recipe, “basic test suite” do
fixtures :recipes
fixtures :ingredients
it “should have ingredients in order” do
subject = Recipe.find(1)
subject.ingredients.collect { |i| i.order_of }.should == [1, 2, 3]
end
end
这个几乎是从第一章的单元测试直接翻译过来的。describe块建立了行为(还没有before和after代码)。it快建立了一个指定的期望:这个用例,我们期望ingredient成员总是排序的。
should函数(和他的兄弟should_not)是RSpec中测试状态的关键字。它后面紧接"=="。这个方法用来执行一个断言,右边的值是希望的值,左边的值(接在should之后)是实际的值。
你 可以在should之后接任何东西。特别的,任何be_<something>形式的语句都会自动地被RSpec翻译 成<something>?。因为nul?在所有对象中都被定义,你总是可以用should be_nil和should_not be_nil来测试。在一个
Rails项目中,你总是可以测试should be_blank;数组可以测试should be_empty;等等。如果你想更方便阅读,你可以加上be_a或者be_an前缀。RSpec也非常聪明,可以在have/has之间做调整,这样一 个hash的should have_key将测试has_key?术语。记住,我们这里说的都是在名字中用了问号的方法,即使你在RSpec中不使用问号。
第 一个测试确实与原来的单元测试类似,下一个测试显示出更多RSpec与Test::Unit之间的区别。在第一章中,我们写了一堆测试来验证一个 Ingredient对象中
解析一个像"2 cups of carrots, chopped"这样字符串的代码。还有一个测试来验证一个recipe能接受很多这样字符串,并且将它们转换成一个ingredient的列表。用 RSpec写的的recipe的测试如下:
Ruby代码
it “should split ingredient strings into separate lines” do
Ingredient.should_receive(:parse).exactly(3).times.and_return do |s, rec, ord|
Ingredient.new(:recipe_id = > rec.id,rder_of = > ord, :amount = > 2,
:ingredient = > ord)
end
subject = Recipe.find(2)
subject.ingredient_string =
“2 cups carrots, diced\n\n1/2 tablespoon salt\n\n1 1/3 cups stock”
subject.ingredients.count.should == 3
subject.ingredients.collect { |i| i.order_of }.should == [1, 2, 3]
subject.ingredients.collect { |i| i.ingredient }.should == %w[1 2 3]
end
测试中有两个部分。为recipe对象提供了一个包含3个ingredient和两个空行的字符串。我们假定recipe会忽视空行而
解析其他行。
这 Test::Unit的测试中,调用了ingredient的parser函数,并且指定了用来得到期望解析结果的recipe中的对象。在RSpec的 测试中,你不需要调用ingredient的parser函数,因为你不需要测试它。取而代之的是第一行中,你你创建了一个Ingredient类的临时 模对象,返回一个虚拟的ingredient对象,并且断言它将正好被调用3次。这个虚拟的ingredient对象并不比较解析器实际的输出(它们仅仅 为了不产生nil
异常而创建了最小限度的数据),但是你完全不必关心:解析器是否正确会在后面的解析器的测试中进行。这个测试仅仅是测试recipe是不 是能够接受有空行的数据,你不必关心解析器是不是正确。这里的关键是关注的测试中的实际函数并且为这个函数建立一圈围墙来让它完成测试。
RSpec 使用它自己的模对象规范,和
FlexMock类似。(如果你已经使用过FlexMock或者其他Ruby的模对象工具,类似地配置RSpec很简单)。模 规范should_receive与FlexMock的模认证规范很类似。它可以用once, twice, times(n), at_least和at_most参数来指定所有的值。除了and_return,你还可以用带异常参数的and_raise来验证在
错误环境下测试得到 的异常。用and_yield来指定一个代码块参数,为不是一个值。
在这个测试中使用的模定义了一个动态部分。因为你 为and_return设置了一段代码参数,所以你可以为通过设置参数,得到指定recipe id和order值的ingredient对象。虽然通常使用静态无互联的模对象
比较好,在这个用例中有一个需要被验证的关联关系。ingredient 的order不是在parser自身设置的,而是通过recipe对象参数传进来的。如果ingredient的order是在模对象中静态设置的,就没 有办法验证order是不是真的被设置了。因此,像上面的代码,这个测试允许通过设置参数来动态设置order,并且为每个ingredient设置指定 的order,这个就可以完全验证recipe的order。
上面的测试是说明RSpec怎样让你可以将行为测试和状 态测试混合起来的好例子。RSpec也可以将函数名处理成易于阅读的形式。当我开始为ingredient解析器写集成测试的时候,我决定完全利用这一优 势。我在“spec/model/ingredient_spec.rb”中编写了以下代码:
Ruby代码
require File.dirname(__FILE__) + ‘/../spec_helper’
class String
def parsing_to?(hash)
expected = Ingredient.new(hash)
actual = Ingredient.parse(self, Recipe.find(1), 1)
actual == expected
end
end
describe Ingredient, “basic parsing suite” do
fixtures :ingredients, :recipes
it “should parse a basic string” do
“2 cups carrots, diced”.should be_parsing_to(:recipe_id = > 1,
rder_of = > 1, :amount = > 2, :unit = > “cups”,
:ingredient = > “carrots”, :instruction = > “diced”)
end
end
其实这个例子中唯一特别的地方就是我为String类增加了一个函数。这也正是那些正统工程师在学习到Ruby可以为已有类随意增加函数时感到紧张的地方。
不 管怎样,因为这个函数只在测试中使用,我想就编程稳定性的观点来看还是没问题的。而且经过RSpec的神奇名字处理,“"2 cups carrots, diced".should be_parsing_to”这样的描述确实是更加丰富而易懂。实际上,我觉得是不是有必要为程序本身添加一个 String#parse_to_ingredient函数,不过先就这样吧。
写控制器的规格书
RSpec 在将controller, view和helper分开各自测试的处理上与标准的Rails
测试工具比起来有很多优势。控制器的测试放在"spec/controllers"目录 下。这里为RecipesController规格书开了个头,我写了验证index函数的运行情况的测试,然后通过HTML的GET方法调用new函 数。第一个部分通过before(:each)方法来创建一个recipe的模对象。为了单独测试Controller而不使用Model和数据库,你需 要使用RSpec桩来阻止ActiveRecord类的new或者find函数的调用,这样可以不返回实际的ActiveRecord对象,而是返回模对 象。最后,你可以将所有代码放在“spec/controllers/recipes_controller_spec.rb”里面:
Ruby代码
require File.dirname(__FILE__) + ‘/../spec_helper’
describe RecipesController do
before(:each) do
@recipe = mock(“person”)
@recipe.stub!(:new_record?).and_return(false)
Recipe.stub!(:new).and_return(@recipe)
Recipe.stub!(:find).and_return(@recipe)
end
...
end
require File.dirname(__FILE__) + ‘/../spec_helper’
describe RecipesController do
before(:each) do
@recipe = mock(“person”)
@recipe.stub!(:new_record?).and_return(false)
Recipe.stub!(:new).and_return(@recipe)
Recipe.stub!(:find).and_return(@recipe)
end
...
end
RSpec的桩的用法与FlexMock方法有些小区别。代码设置了Recipe#new和Recipe#find的桩,并且前面两句代码让它们返回作为桩的recipe实例。
第一个规格说明了当用户执行index函数请求时所
希望得到的结果:
Ruby代码
it “should get an index when
requested” do
get “index”
response.should be_success
assigns[:recipes].should_not be_nil
end
it “should get an index when requested” do
get “index”
response.should be_success
assigns[:recipes].should_not be_nil
end
这 个规格里面显示了一些RSpec用来测试控制器的结果的特殊函数。如果响应返回状态码200的话,should be_success将返回true。相类似的response.should be_redirect将测试重定向的状态。值得说一下,即使你没有为Controller写相关的View,测试should be_success也不会失败。
测试Controller是否正常渲染了View用带有希望被调用的模板路径作为参 数的should render_template来测试,如果Controller只是返回纯文本,可以用should have_text来验证它的文本内容。如果你要验证重定向,你可以用should redirect_to来验证,它可以指定一个完整的URL或者一个URL的本地路径,或者用url_for加上一组Hash选项。
最后一行代码用assigns的Hash,它类似于标准功能测试里面的assigns函数,它表示Controller创建的变量实例。你也可以访问flash和session等Hash,这样你可以验证Controller中的变量。
第二个Controller的测试像这样检查new函数:
Ruby代码
it “should respond to GET new with a captcha” do
@token = mock_model(Token)
captcha = mock(MathCaptcha)
MathCaptcha.should_receive(:create).with(3).and_return(captcha)
get “new”
assigns[:captcha].should == captcha
end
it “should respond to GET new with a captcha” do
@token = mock_model(Token)
captcha = mock(MathCaptcha)
MathCaptcha.should_receive(:create).with(3).and_return(captcha)
get “new”
assigns[:captcha].should == captcha
end
如果你与传统的单元测试相比,原来的单元测试中用了大量的
assert_select来验证View中的结果,而在RSpec中将在View的测试中来验证这些,这里你只需要测试Controller创建的变量或者数据库操作。
下面对
HTTP的PUT的更新操作的测试显示了RSpec规格与单元测试之间的区别。
Ruby代码
it “should respond to a PUT with an update” do
@recipe.should_receive(:update_attributes).with(
{“title” = > “Grandma’s Chicken Soup”}).and_return(@recipe)
put “update”, :id = > 1, :recipe = > {:title = > “Grandma’s Chicken Soup”}
response.should redirect_to(“http://test.host/recipes/#{@recipe.id}”)
end
这 个例子很简单,第一行建立了唯一一个recipe模对象,它表示我们希望得到一个update_attibutes调用。第二行执行了一个更新调用,第三 行验证了重定向到一个指定的URL上。同样,什么不用测试是很重要的:我们在这里不需要测试Recipe在调用update_attibutes之后是不 是真的更改了对应的属性,这里只测试Controller相关的行为。
说明View的行为
要 是说关于RSpec我还有什么需要讲的,那就是用一个RSpec例子来说明怎样通过努力地封装函数来测试系统的其他部分。所以你也不用感到惊奇,我们可以 将View从Controller和数据库中分离出来测试。下面的例子我将给你说明一下new.html.erb是怎样渲染面板的。实际上View的大多 数工作是在_from子模板中完成的。所以规格应该针对子模板来写。但是,实际上我假设我在写测试的时候还没有想好用子模板来处理,所以我写的规格书是针 对整个视图的。
这个面板上面有一个逻辑点,如果指定了MathCaptcha对象,那么将显示这个对象,否则不显示。另外,需要创建一个Recipe模对象和一个User模对象来进行测试。
下面的代码在spec/views/recipes/new_spec.rb文件中,显示了怎样创建模对象:
Ruby代码
require File.dirname(__FILE__) + ‘/../../spec_helper’
describe ‘recipe/new’ do
before(:each) do
@recipe = mock_model(Recipe)
@recipe.should_receive(:title).and_return(“Grandma’s Soup”)
@recipe.should_receive(:servings).and_return(“2”)
@recipe.should_receive(:ingredient_string).and_return(“carrots”)
@recipe.should_receive(:description).and_return(“description”)
@recipe.should_receive(:directions).and_return(“directions”)
@recipe.should_receive(:tag_list).and_return(“yummy”)
@user = mock_model(User)
assigns[:recipe] = @recipe
assigns[:user] = @user
end
...
end
现 在你对这个模式已经很熟悉了。首先,你创建了一个模实例,并且为它指定了参数。然后将模对象直接加入到assigns 的Hash中。与Controller测试不同,这里不需要模拟ActiveRecord类。通常View也不像Controller那样
创建对象,所以 在View中显示对象就足够了。View的测试中也像Controller测试一样用到了assigns, flash和session。
下面的例子演示了没有CAPTCHA对象的行为:
Ruby代码
it “should display an entire form” do
render “/recipes/new”
response.should have_tag(“form”) do
with_tag “input[name *= title]”
with_tag “input[name *= servings]”
with_tag “textarea[name *= ingredient_string]”
with_tag “textarea[name *= description]”
with_tag “textarea[name *= directions]”
with_tag “input[name *= tag_list]”
end
end
想你从代码中看到的那样,render函数为测试模拟执行了指定View。should have_tag和with_tag只是你的老朋友assert_select的同义词。用同样的语法来验证输出里的各种各样HTML元素是否存在。
此外,有一个模板对象,你可以用来模拟或者桩调用Helper函数。因为你可以单独地测试Helper函数。这是一个好主意,使用的是通常的RSpec模框架的语法,看上去像这样:
Ruby代码
template.stub!(:helper_method).and_return(“flintstone”)
template.should_receive(:helper_method).once.and_return(“rubble”)
template.stub!(:helper_method).and_return(“flintstone”)
template.should_receive(:helper_method).once.and_return(“rubble”)
这个对测试登录/登出特别有用,因为在我们的应用程序里这部本代码在Helper函数里。
当然,你也可以模拟别的测试中的其他对象。你可以像这样通过创建一个模对象来验证当存在CAPTCHA对象时View的行为:
Ruby代码
it “should display captcha” do
@token = mock_model(Token)
@token.should_receive(:token).and_return(“a_token”)
captcha = mock(MathCaptcha)
captcha.should_receive(:display_string).and_return(“display string”)
captcha.should_receive(:token).and_return(@token)
assigns[:captcha] = captcha
render “/recipes/new”
response.should have_tag(“form”) do
with_tag “input[name *= captcha_value]”
with_tag “input[name *= token]”
end
end
这 个例子和Controller的测试一样地创建了一个模对象,除了在这个用例中在CAPTCHA中放置了另外的模变量(也就是View将会请求显示字符串 和Token)。CAPTCHA放在assigns的Hash中,这样View就可以渲染它了。(重要的安全提示:在启动渲染之前为所有变量赋值,否则测 试将无法
发现它们。)这个例子中,为了简洁我只测试了新增的部分。在实际的测试中,你可能希望同时测试一下原来的东西是不是还在。
测试Helper
RSpec允许从View中脱离出来单独测试Helper函数。Helper测试文件放在spec/helpers目录下,
文件名和描述对象都需要与被测试的Helper想对应。例如,在application_helper.rb文件中有这样的函数:
Ruby代码
def inflect(singular, count, plural = nil)
plural ||= singular.pluralize
if count == 1 then singular else plural end
end
def inflect(singular, count, plural = nil)
plural ||= singular.pluralize
if count == 1 then singular else plural end
end
在spec/helpers/application_helper_spec.rb中应该有这样的测试:
Ruby代码
require File.dirname(__FILE__) + ‘/../spec_helper’
describe ApplicationHelper do
it “should inflect a word” do
inflect(“banana”, 3).should == “bananas”
inflect(“banana”, 1).should == “banana”
inflect(“is”, 2, “are”).should == “are”
end
end
require File.dirname(__FILE__) + ‘/../spec_helper’
describe ApplicationHelper do
it “should inflect a word” do
inflect(“banana”, 3).should == “bananas”
inflect(“banana”, 1).should == “banana”
inflect(“is”, 2, “are”).should == “are”
end
end
把要测试的Helper类作为describe的参数,所有这个Helper类里面的函数的测试放在里面的行为中。这意味着,你不需要任何引用就可以直接使用这个Helper函数,就像例子里调用inflect函数这样。
没 有什么办法在Helper测试中得到模板或者Controller对象,这也许会出现些难题,比如当你想测试一段直接通过concat将纯文本直接连接到 模板中的代码时。我建议你将文本生成函数与文本插入函数分开,这样可以方便测试,或者在View测试中测试这些Helper。
一些现有的Test::Unit pluging与RSpec有冲突,所以你需要在运行
他们之前将你的spec目录删除。