? ? ? 用yii1.8框架执行简单的数据库的增删改查,及部分页面配置(yii框架的下载不再讲解);
一、yii框架的开发前的基本配置:
? ? ? 首先在config/main.php中配置默认的controller (框架默认的controller为SiteController),我们在这里创建IndexController,切记我们的一个Controller对应一个同名字的前端页面文件夹 (同目录的views下),例如IndexController对应的是views/index的文件夹;默认的方法定义:
?
class="php">return array(
	'basePath'=>dirname(__FILE__).DIRECTORY_SEPARATOR.'..',
	'name'=>'My Web Application',

	// preloading 'log' component
	'preload'=>array('log'),
    //加上这句话,就是默认 的Controller为IndexController
    'defaultController'=>'Index',
?然后我们可以在上述的views/index下创建index.php,然后在IndexController 直接跳转:
?
?
class IndexController extends Controller
{
    public function actionIndex(){
        $this->render('index');
    }
}
?因为上文 已经讲述 他们是一一对应的关系,所以默认的就是views/index目录下的index.php页面;
?
? ? ? ? 然后我们就配置 一下数据库,就开始一个小网站demo的建立,回到 我们的 config /main.php页面,写入以下代码
?
'db'=>array(
'connectionString' => 'mysql:host=127.0.0.1;dbname=db_blog',
'emulatePrepare' => true,
'username' => 'root',
'password' => '',
'charset' => 'utf8',
//数据库的表前缀
'tablePrefix' => 't_',
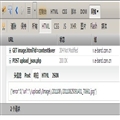
//打开数据库调试
'enableParamLogging' => true
),
?然后我们 就可以直接 运用yii模块 创建后台框架了,方法如下:
?
①首先打开主配置main.php中的gii模块
?
//初始状态
'modules'=>array(
		// uncomment the following to enable the Gii tool

		// 'gii'=>array(
		// 	'class'=>'system.gii.GiiModule',
		// 	'password'=>'123',
		// 	// If removed, Gii defaults to localhost only. Edit carefully to taste.
		// 	'ipFilters'=>array('127.0.0.1','::1'),
		// ),
	),


//创建过后状态
'modules'=>array(
		// uncomment the following to enable the Gii tool

		// 'gii'=>array(
		// 	'class'=>'system.gii.GiiModule',
		// 	'password'=>'123',
		// 	// If removed, Gii defaults to localhost only. Edit carefully to taste.
		// 	'ipFilters'=>array('127.0.0.1','::1'),
		// ),
		'admin'

	),
?首先在 初始状态下,我们取消注释,设置password,登录 gii模块的时候需要使用,但是这个gii模块是不安全的,所以我们 创建过后 要关闭它;取消注释后,登录在自己的默认主页路径下+?r=gii,例如http://localhost/yii/blog/index.php?r=gii;这时候输入 自己定义的密码,然后进入首页选择最下面的模块,一路默认,最后要输入自己的ID,我输入的 ID名字为admin,而admin是 一个模块,所以要在 主配置文件中配置一下,就有了我创建 过后的那个代码状态;
?
再然后 我们就可以愉快的 写代码了;
二、登录实现
? ? ? ?进入 刚才我们创建的后台模块;老规矩首先创建我们的LoginController及所对应前端页面,把登录页面的样式写好:
?
<div id="divBox">
    <?php $form = $this->beginWidget('CActiveForm') ?>
    <?php echo $form->textField($loginForm, 'username', array('id'=>'userName')) ?>
    <?php echo $form->passwordField($loginForm, 'password', array('id'=>'psd')) ?>
    <?php echo $form->textField($loginForm, 'captcha', array('id'=>'verify')) ?>
    <input type="submit" id="sub" value="login"/>
    <!-- 验证码 -->
    <div class="captcha">
        <?php $this->widget('CCaptcha',array('showRefreshButton'=>false,
            'clickableImage'=>true, 'imageOptions'=>array('alt'=>'点击换图',
                'title'=>'点击换图', 'style'=>'cursor:pointer'))); ?>
    </div>
    <?php $this->endWidget() ?>
    <div class="four_bj">

        <p class="f_lt"></p>
        <p class="f_rt"></p>
        <p class="f_lb"></p>
        <p class="f_rb"></p>
    </div>
//验证,提示信息部分
    <ul id="peo">
        <li class="error"><?php echo $form->error($loginForm,'username') ?></li>
    </ul>
    <ul id="psd">
        <li class="error"><?php echo $form->error($loginForm,'password') ?></li>
    </ul>
    <ul id="ver">
        <li class="error"><?php echo $form->error($loginForm,'captcha') ?></li>
    </ul>
</div>
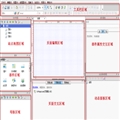
?这块我们首先先不讲代码,先讲一下 页面布局的问题,大家可能都很好奇我的这个页面 怎么只有 一个div,这就要谈到这个框架自带的定义页面公共部分的人性化功能,只需要在components/Controller.php中定义一下,公共部分的页面为//layouts/column1,定义代码如下:
?
?
class Controller extends CController
{
	/**
	 * @var string the default layout for
         * the controller view.
         * Defaults to '//layouts/column1',
	 * meaning using a single column layout.
         * See 'protected/views/layouts/column1.php'.
	 */
	public $layout='//layouts/column1';
?后端的公共页面在自己创建的那个模块里面定义,原理一样;
LoginController.php代码如下
<?php
/**
 * 后台登陆控制器
 */
class LoginController extends Controller{
	/**
	 * 后台登陆模板
	 */
	public function actionIndex(){
		$loginForm = new LoginForm();
		if(isset($_POST['LoginForm'])){
			$loginForm->attributes = $_POST['LoginForm'];
			if($loginForm->validate()&& $loginForm->login()){
				Yii::app()->session['logintime'] = time();
				$this->redirect(array('default/index'));
			}
		}
		$this->render('index',array('loginForm'=>$loginForm));
	}
	public function actions(){
		return array(
			'captcha'	=> array(
				'class'	=> 'system.web.widgets.captcha.CCaptchaAction',
				'height' => 25,
				'width'	 => 80,
				'minLength'=> 4,
				'maxLength'=> 4
				),
			);
	}
	public function actionOut(){
		Yii::app()->user->logout();
		$this->redirect(array('index'));
	}
}
?这里面的LoginForm是框架自动生成的,我们需要做的就是,调整为我们自己需要的样子;
LoginForm.php代码 如下:
<?php
/**
 * LoginForm class.
 * LoginForm is the data structure for keeping
 * user login form data. It is used by the 'login' action of 'SiteController'.
 */
class LoginForm extends CFormModel
{
	public $username;
	public $password;
	public $rememberMe;
        public $captcha;
	private $_identity;

	/**
	 * Declares the validation rules.
	 * The rules state that username and password are required,
	 * and password needs to be authenticated.
	 */
	public function rules()
	{
	return array(
            array('username', 'required', 'message'=>'用户名必须填写'),
            array('password', 'required', 'message'=>'密码必须填写'),
            // rememberMe needs to be a boolean
            array('rememberMe', 'boolean'),
            // password needs to be authenticated
            array('password', 'authenticate'),
            array('captcha', 'captcha', 'message'=>'验证码错误')
		);
	}

	/**
	 * Declares attribute labels.
	 */
	public function attributeLabels()
	{
		return array(
		    'username'=>'用户名',
			'password'=>'密码',
			'rememberMe'=>'Remember me next time',
		);
	}

	/**
	 * Authenticates the password.
	 * This is the 'authenticate' validator as declared in rules().
	 * @param string $attribute the name of the attribute to be validated.
	 * @param array $params additional parameters passed with rule when being executed.
	 */
	public function authenticate($attribute,$params)
	{
		if(!$this->hasErrors())
		{
			$this->_identity=new UserIdentity($this->username,$this->password);
			if(!$this->_identity->authenticate())
				$this->addError('password','用户性名或者密码错误');
		}
	}

	/**
	 * Logs in the user using the given username and password in the model.
	 * @return boolean whether login is successful
	 */
	public function login()
	{
		if($this->_identity===null)
		{
			$this->_identity=new UserIdentity($this->username,$this->password);
			$this->_identity->authenticate();
		}
		if($this->_identity->errorCode===UserIdentity::ERROR_NONE)
		{
			$duration=$this->rememberMe ? 3600*24*30 : 0; // 30 days
			Yii::app()->user->login($this->_identity,$duration);
			return true;
		}
		else
			return false;
	}
}
?首先加上我们页面的验证码 的元素,框架自带的有这个js插件,我们就是机械性的使用一下就行了,然后就是设置我们的规则rules属性 ,这些规则 的具体意思可以看我的上一篇博客;
UserIdentity这个方法也是框架自带的(路径components/UserIdebtity),我们需要做的就是改成我们自己需要的样子;代码如下
public function authenticate()
	{
        $userInfo = User::model()->find('username=:name', array(':name'=>$this->username));
        if($userInfo == NULL){
            $this->errorCode=self::ERROR_USERNAME_INVALID;
            return false;
        }
        if($userInfo->password !== $this->password){
            $this->errorCode=self::ERROR_PASSWORD_INVALID;
            return false;
        }
        $this->errorCode=self::ERROR_NONE;
        return true;

	}
?这样我们的登陆就完成了,具体逻辑不再讲;
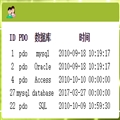
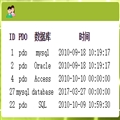
三、用户的增删改查
?
?