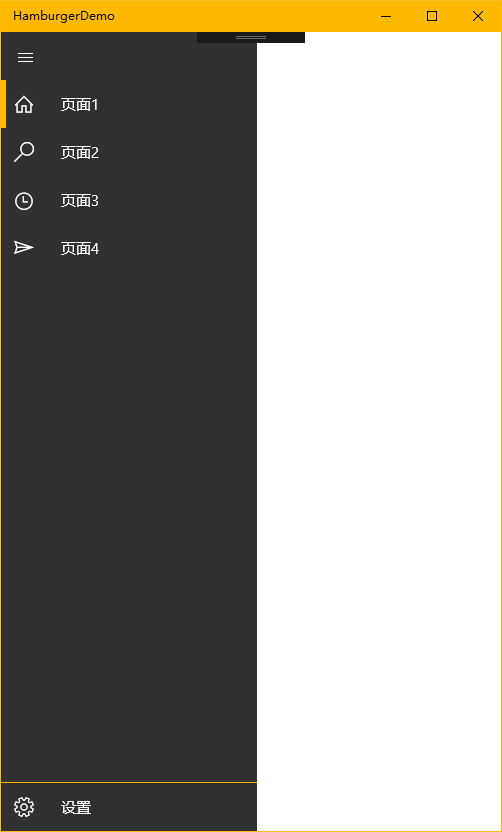
不同于Windows 8应用,Windows 10引入了“汉堡菜单”这一导航模式。说具体点,就拿官方的天气应用来说,左上角三条横杠的图标外加一个SplitView控件组成的这一导航模式就叫“汉堡菜单”。
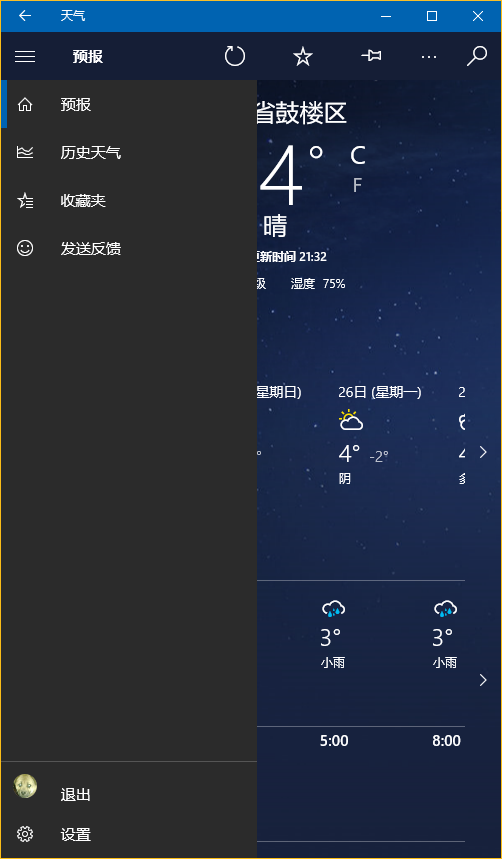
本文讨论的是如何实现官方的这一样式(点击后左侧出现一个填充矩形),普通实现网上到处都是,有需要的朋友自己百度下吧。
下面将介绍两种不同的实现方法,第一种最简单的方法是直接使用 Template 10 模板,第二种就是纯手写了。
若有什么不正确的地方望指正,大家共同讨论。
1. Template 10 模板
使用 Template 10 模板可以快速建立出应用的框架,简单快捷。(帮助文档 https://github.com/Windows-XAML/Template10/wiki )
要使用 Template 10 首先点击 Visual Studio “工具”菜单中的“扩展与更新”,搜索并安装 Template 10(简化搜索可以直接输入t10)
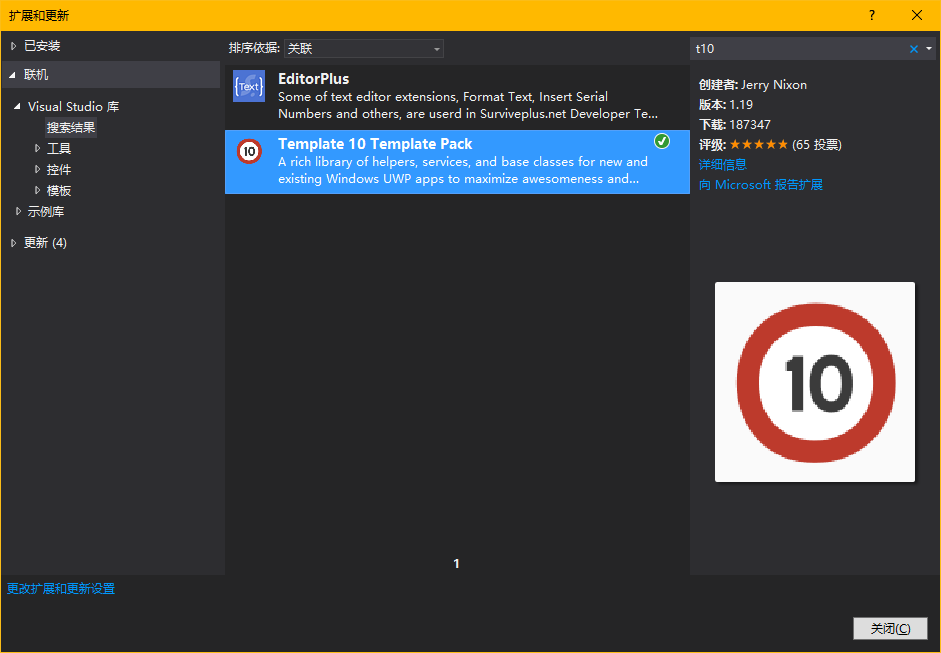
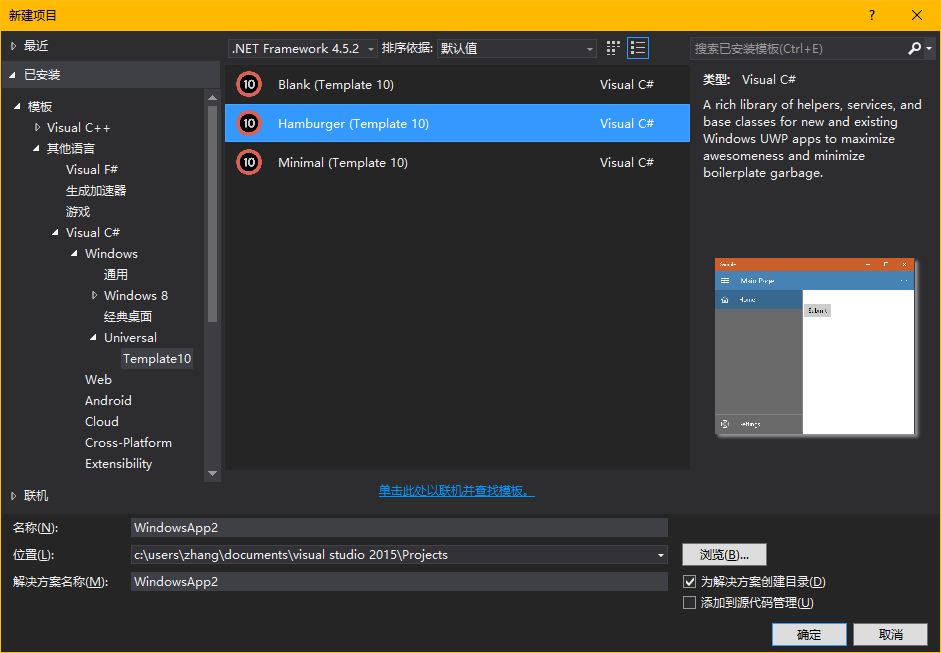
安装完成需要重启,重启后按下图找到项目模板新建即可,使用很简单,帮助文档连接也在上方给出。
2. 手写
先分析一下界面的构成,暂时不看标题栏,由一个设置了 Canvas.ZIndex 的 Button 和一个 SplitView 构成。SplitView.Pane 中又包含了两个ListView(一级菜单和二级菜单)。ListView 里的每个 Item 又由 Rectangle,FontIcon,TextBlock 组成。见下图
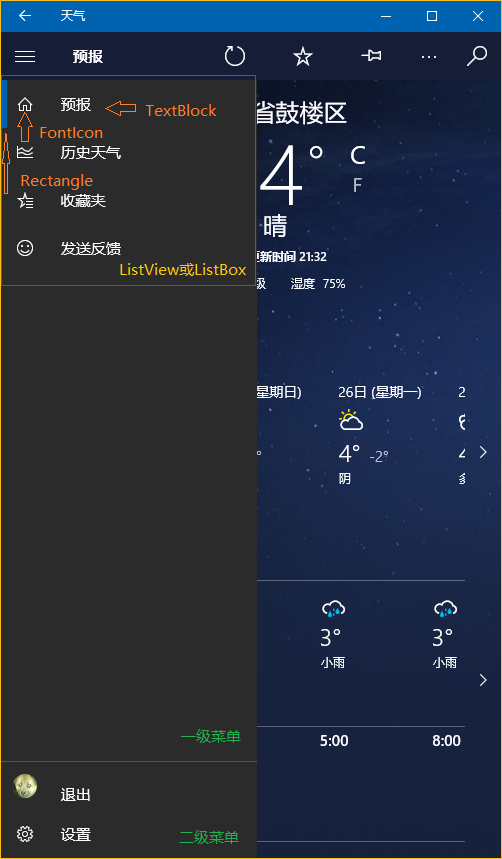
构成清晰之后实现的思路大概也就清晰了。下面给一个简单的Demo,解决方案结构如下。(相应的注释在程序中给出)

先创建一个NavMenuItem类
using System;
using System.ComponentModel;
using Windows.UI.Xaml;
using Windows.UI.Xaml.Media;

namespace HamburgerDemo
{
    class NavMenuItem : INotifyPropertyChanged
    {
        // 记录图标字体
        public FontFamily FontFamily { get; set; }
        // 图标的C#转义代码
        public string Icon { get; set; }
        // 标题
        public string Label { get; set; }
        // 导航页
        public Type DestPage { get; set; }
        // 用于左侧矩形的显示
        private Visibility selected = Visibility.Collapsed;
        public Visibility Selected
        {
            get { return selected; }
            set
            {
                selected = value;
                this.OnPropertyChanged("Selected");
            }
        }
        // 双向绑定,用于更新矩形是否显示
        public event PropertyChangedEventHandler PropertyChanged;

        public void OnPropertyChanged(string propertyName)
        {
            PropertyChanged?.Invoke(this, new PropertyChangedEventArgs(propertyName));
        }
    }
}
主页面框架代码
<Page x:Class="HamburgerDemo.MainPage" xmlns="http://schemas.microsoft.com/winfx/2006/xaml/presentation" xmlns:x="http://schemas.microsoft.com/winfx/2006/xaml" xmlns:local="using:HamburgerDemo" xmlns:d="http://schemas.microsoft.com/expression/blend/2008" xmlns:mc="http://schemas.openxmlformats.org/markup-compatibility/2006" mc:Ignorable="d"> <Page.Resources> <!--菜单的数据模板--> <DataTemplate x:Key="DataTemplate"> <Grid> <Grid.ColumnDefinitions> <ColumnDefinition Width="48" /> <ColumnDefinition Width="*" /> </Grid.ColumnDefinitions> <Rectangle Fill="{ThemeResource SystemControlBackgroundAccentBrush}" Visibility="{Binding Selected, Mode=TwoWay}" HorizontalAlignment="Left" Width="5" Height="48" /> <FontIcon FontFamily="{Binding FontFamily}" Glyph="{Binding Icon}" Foreground="White" VerticalAlignment="Center" Margin="-2,0,0,0" Width="48" Height="48" /> <TextBlock Grid.Column="1" Text="{Binding Label}" Foreground="White" Margin="12,0,0,0" VerticalAlignment="Center" /> </Grid> </DataTemplate> <!--ListViewItem样式定制--> <Style x:Key="NavMenuItemContainerStyle" TargetType="ListViewItem"> <Setter Property="MinWidth" Value="{StaticResource SplitViewCompactPaneThemeLength}"/> <Setter Property="Height" Value="48"/> <Setter Property="Padding" Value="0"/> <Setter Property="UseSystemFocusVisuals" Value="True" /> <Setter Property="Template"> <Setter.Value> <ControlTemplate TargetType="ListViewItem"> <ListViewItemPresenter ContentTransitions="{TemplateBinding ContentTransitions}" Control.IsTemplateFocusTarget="True" SelectionCheckMarkVisualEnabled="False" PointerOverBackground="{ThemeResource SystemControlHighlightListLowBrush}" PointerOverForeground="{ThemeResource ListViewItemForegroundPointerOver}" SelectedBackground="Transparent" SelectedForeground="{ThemeResource SystemControlForegroundAccentBrush}" SelectedPointerOverBackground="{ThemeResource SystemControlHighlightListLowBrush}" PressedBackground="{ThemeResource SystemControlHighlightListMediumBrush}" SelectedPressedBackground="{ThemeResource SystemControlHighlightListMediumBrush}" DisabledOpacity="{ThemeResource ListViewItemDisabledThemeOpacity}" HorizontalContentAlignment="{TemplateBinding HorizontalContentAlignment}" VerticalContentAlignment="{TemplateBinding VerticalContentAlignment}" ContentMargin="{TemplateBinding Padding}"/> </ControlTemplate> </Setter.Value> </Setter> </Style> </Page.Resources> <Grid Background="{ThemeResource ApplicationPageBackgroundThemeBrush}"> <!--汉堡菜单开关--> <Button Name="PaneOpenButton" FontFamily="Segoe MDL2 Assets" Content="" Foreground="White" Background="{Binding BackgroundColor}" Width="48" Height="48" VerticalAlignment="Top" Canvas.ZIndex="100" /> <SplitView Name="RootSplitView" DisplayMode="CompactOverlay" CompactPaneLength="48" OpenPaneLength="256" IsPaneOpen="True"> <SplitView.Pane> <Grid Background="#CC000000"> <Grid.RowDefinitions> <!--空出Button的高度--> <RowDefinition Height="48" /> <RowDefinition Height="*" /> <RowDefinition Height="Auto" /> </Grid.RowDefinitions> <!--一级菜单--> <ListView Name="NavMenuPrimaryListView" Grid.Row="1" VerticalAlignment="Top" SelectionMode="None" IsItemClickEnabled="True" ItemTemplate="{StaticResource DataTemplate}" ItemContainerStyle="{StaticResource NavMenuItemContainerStyle}"/> <!--二级菜单--> <ListView Name="NavMenuSecondaryListView" Grid.Row="2" VerticalAlignment="Bottom" SelectionMode="None" IsItemClickEnabled="True" ItemTemplate="{StaticResource DataTemplate}" ItemContainerStyle="{StaticResource NavMenuItemContainerStyle}" BorderBrush="{ThemeResource SystemControlBackgroundAccentBrush}" BorderThickness="0,1,0,0" /> </Grid> </SplitView.Pane> <SplitView.Content> <Frame Name="RootFrame" /> </SplitView.Content> </SplitView> </Grid> </Page>
主页面的后台代码
using HamburgerDemo.Views;
using System.Collections.Generic;
using Windows.UI.Xaml;
using Windows.UI.Xaml.Controls;
using Windows.UI.Xaml.Media;

namespace HamburgerDemo
{
    public sealed partial class MainPage : Page
    {
        // 为不同的菜单创建不同的List类型
        private List<NavMenuItem> navMenuPrimaryItem = new List<NavMenuItem>(
            new[]
            {
                new NavMenuItem()
                {
                    FontFamily = new FontFamily("Segoe MDL2 Assets"),
                    Icon = "\xE10F",
                    Label = "页面1",
                    Selected = Visibility.Visible,
                    DestPage = typeof(Page1)
                },

                new NavMenuItem()
                {
                    FontFamily = new FontFamily("Segoe MDL2 Assets"),
                    Icon = "\xE11A",
                    Label = "页面2",
                    Selected = Visibility.Collapsed,
                    DestPage = typeof(Page1)
                },

                new NavMenuItem()
                {
                    FontFamily = new FontFamily("Segoe MDL2 Assets"),
                    Icon = "\xE121",
                    Label = "页面3",
                    Selected = Visibility.Collapsed,
                    DestPage = typeof(Page1)
                },

                new NavMenuItem()
                {
                    FontFamily = new FontFamily("Segoe MDL2 Assets"),
                    Icon = "\xE122",
                    Label = "页面4",
                    Selected = Visibility.Collapsed,
                    DestPage = typeof(Page1)
                }

            });

        private List<NavMenuItem> navMenuSecondaryItem = new List<NavMenuItem>(
            new[]
            {
                new NavMenuItem()
                {
                    FontFamily = new FontFamily("Segoe MDL2 Assets"),
                    Icon = "\xE713",
                    Label = "设置",
                    Selected = Visibility.Collapsed,
                    DestPage = typeof(Page1)
                }
            });

        public MainPage()
        {
            this.InitializeComponent();
            // 绑定导航菜单
            NavMenuPrimaryListView.ItemsSource = navMenuPrimaryItem;
            NavMenuSecondaryListView.ItemsSource = navMenuSecondaryItem;
            // SplitView 开关
            PaneOpenButton.Click += (sender, args) =>
            {
                RootSplitView.IsPaneOpen = !RootSplitView.IsPaneOpen;
            };
            // 导航事件
            NavMenuPrimaryListView.ItemClick += NavMenuListView_ItemClick;
            NavMenuSecondaryListView.ItemClick += NavMenuListView_ItemClick;
            // 默认页
            RootFrame.SourcePageType = typeof(Page1);
        }

        private void NavMenuListView_ItemClick(object sender, ItemClickEventArgs e)
        {
            // 遍历,将选中Rectangle隐藏
            foreach (var np in navMenuPrimaryItem)
            {
                np.Selected = Visibility.Collapsed;
            }
            foreach (var ns in navMenuSecondaryItem)
            {
                ns.Selected = Visibility.Collapsed;
            }

            NavMenuItem item = e.ClickedItem as NavMenuItem;
            // Rectangle显示并导航
            item.Selected = Visibility.Visible;
            if (item.DestPage != null)
            {
                RootFrame.Navigate(item.DestPage);
            }

            RootSplitView.IsPaneOpen = false;
        }
    }
}
运行效果图如下
