个人理解,开发应用程序的目的,不论是B/S或是C/S结构类型,无非就是实现可供用户进行查、增、改、删,其中查询用到最多,开发设计的场景也最为复杂,包括但不限于:表格记录查询、报表查询、导出文件查询等等,其次就是增加、更改、删除,我这里统称为编辑,而编辑在开发设计中的场景就显得较为通用,大多都采用编辑组件(文本框、下拉框、选择框、数字框等)来供用户进行编辑操作,由于查询的开发设计场景需与实际的数据及客户要求来进行的,所以在此不作讨论,本文主要讲述的是如何利用FlowLayoutPanel及我(梦在旅途)自定义的编辑控件来实现快速构建C/S版的编辑表单页面。
有经历过开发ASP.NET MVC网站的人都知道,在构建编辑页面时,我们可以通过HtmlHelper扩展类相关方法来快速生成相应的编辑控件,如:Html.LabelFor,Html.TextBoxFor等等,而在Winform 项目中却并没有类似的方法可以让我们快速构建编辑表单页面,所以为了减轻我们经常遇到,又比较耗时,且没有任何技术含量的开发工作量,我开发了类似的编辑控件系列,包括:CTextBox【文本框】、CPictureBox【图片框】、CNumberBox【数字框】、CDropDownBox【下拉框】、CDisplayBox【显示框】、CCheckBox【勾选框】,这些控件都一些共有特性,如:Label:显示编辑项目名称,Value:控件的值,ValueFor<TEntity>:快速设置控件相关属性的方法,这些共有特性是实现快速构造编辑控件的关键,当然每种编辑控件还有自己独特的属性,如:CTextBox可以设置是否显示按钮,是否只读,是否多行等,CNumberBox可以设置小数位、最大值与最小值等,由于这些控件的代码加起来可能比较多,我这里仅以CTextBox为例来进行分析与说明,CTextBox是属性最多的控件。
首先还是看一下CTextBox控件的界面设计,如下图:
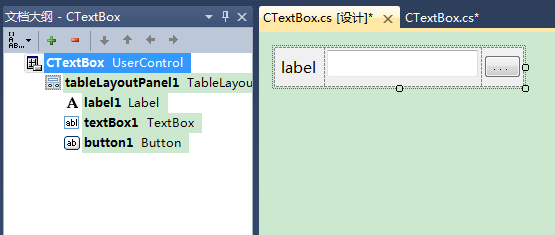
从图中可以看出,CTextBox控件由一个TableLayouPanel、一个Label、一个TextBox、一个Button共同组成:
TableLayouPanel作为控件的顶层容器,其DOCK属性设置为Fill,实现占据整个控件,另外分别设有一行三列,第一列宽度设为自动调整,第二列宽度设为100%,第三列宽度设为自动调整,如下图:
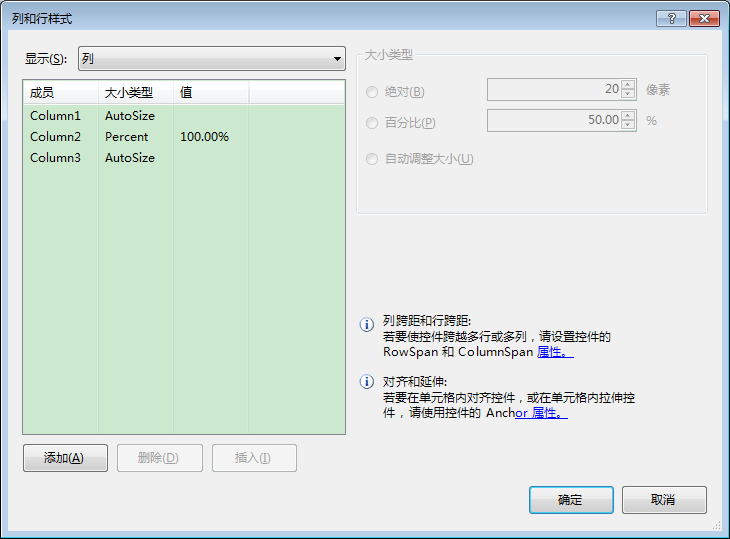
TableLayouPanel这样设计的目的是:实现第一列的宽度依据LABEL的内容自动调整,第二列的宽度为TextBox的宽度,第三列的宽度为Button的宽度,这样一来,我们在改变CTextBox的整个大小时,确保布局一致性(即:在CTextBox总宽度内,TextBox的宽度是CTextBox总宽度-LABEL与Button的实际宽度)
Label控件作为显示编辑项目名称部份,它的属性AutoSize设为True,Anchor设为Left,设计目的:实现在第一列中向左居中,且宽度依据实际内容而改变
TextBox控件作为可供编辑内容部份,它的属性设Anchor设为Top, Bottom, Left, Right,设计目的:实现 TextBox控件占据整个第二列,即若控件的宽度与高度改变,TextBox控件也会跟着改变,这个很重要哦!
Button控件为可选部份,若需要用到控件的值来源于其它选项(如:浏览文件、保存文件等),则可将其CTextBox.DispalyOpenButton设为True即可,同样,它的属性Anchor设为Left,并调整好固定的宽度与高度,设计目的:实现在第三列中向左居中,且宽度不变
实现的整体效果如下图示:

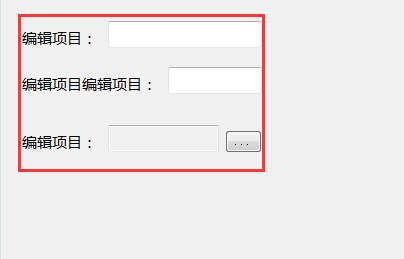
我这里用红线框出来了,大家看出效果来了吗?也就是我直接拖放了三个CTextBox控件,然后分别将LABEL的内容设置为不相同,除非手动改变控件宽度,否则每个控件宽度均相同,这样再结合FlowLayoutPanel控件的流式布局(即:每个控件按照顺序依次排列,若宽度与高度发生变化,控件的排列就会改变),就能很好的快速构建编辑页面,看看最终用在我的项目中的效果吧,有没有觉得不错呢:
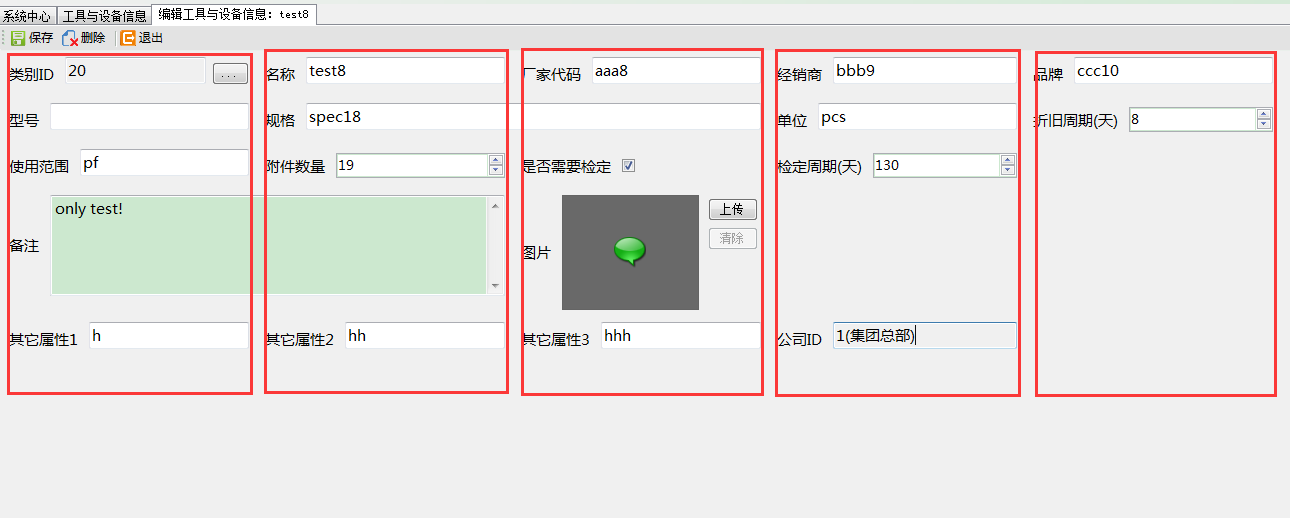
这是改变宽度前的布局,有5列,我有红框标出来了,都是对齐的
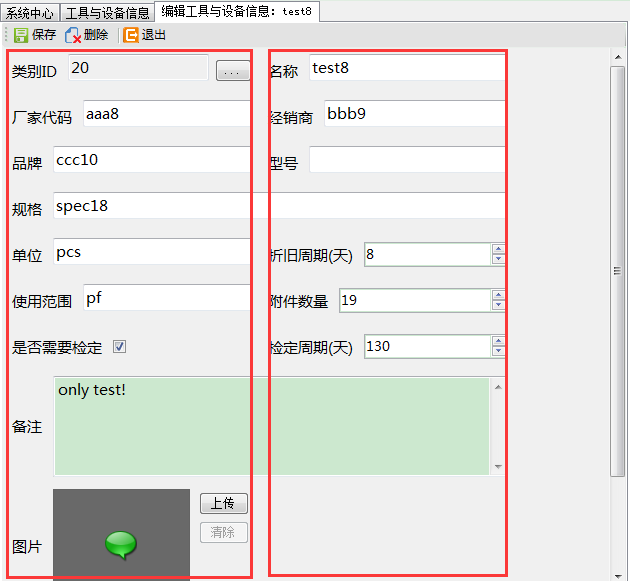
这是我缩小宽度后的布局,有2列,我有红框标出来了,仍然都是对齐的
以上布局效果是不需要编写任何代码的,代码部份仅是设置相应的属性与方法,如下:
CTextBox控件源码:
class="brush:csharp;gutter:true;">using System;
using System.Collections.Generic;
using System.ComponentModel;
using System.Drawing;
using System.Data;
using System.Linq;
using System.Text;
using System.Windows.Forms;
using System.Linq.Expressions;
using Zwj.TEMS.Common;


namespace TEMS.Controls
{
    public partial class CTextBox : UserControl,IZwjDefControl
    {
        [Description("当点击按钮时触发该事件")]
        public event EventHandler OnOpen;

        public CTextBox()
        {
            InitializeComponent();
            this.DispalyOpenButton = false;
        }

        [Browsable(true)]
        [Description("设置文本框的值")]
        public string Value
        {
            get
            {
                return textBox1.Text;
            }
            set
            {
                textBox1.Text = value;
            }
        }

        [Browsable(true)]
        [Description("设置标签的值")]
        public string Label
        {
            get
            {
                return label1.Text;
            }
            set
            {
                label1.Text = value;
            }
        }

        [Browsable(true)]
        [Description("设置是否显示打开按钮")]
        public bool DispalyOpenButton
        {
            get
            {
                return button1.Visible;
            }
            set
            {
                button1.Visible = value;
                textBox1.ReadOnly = button1.Visible;
            }
        }

        [Browsable(true)]
        [Description("设置是否允许多行")]
        public bool AllowMultiline
        {
            get
            {
               return textBox1.Multiline;
            }
            set
            {
                textBox1.Multiline = value;
                if (textBox1.Multiline)
                {
                    textBox1.ScrollBars = ScrollBars.Vertical;
                }
            }
        }

        public void ValueFor<TEntity>(Expression<Func<TEntity, dynamic>> selectField, string fieldValue, bool displayBtn = false, bool allowMultiline=false) where TEntity : class
        {
            var fieldInfo = General.GetPropertyInfo(selectField);
            this.Label = General.GetDisplayName(fieldInfo);
            this.Value = fieldValue;
            this.DispalyOpenButton = displayBtn;
            this.AllowMultiline = allowMultiline;
        }

        private void button1_Click(object sender, EventArgs e)
        {
            if (this.OnOpen != null)
            {
                this.OnOpen(this, null);
            }
        }
    }
}
以下是系统自动生成的源码:
namespace TEMS.Controls
{
    partial class CTextBox
    {
        /// <summary>
        /// 必需的设计器变量。
        /// </summary>
        private System.ComponentModel.IContainer components = null;

        /// <summary>
        /// 清理所有正在使用的资源。
        /// </summary>
        /// <param name="disposing">如果应释放托管资源,为 true;否则为 false。</param>
        protected override void Dispose(bool disposing)
        {
            if (disposing && (components != null))
            {
                components.Dispose();
            }
            base.Dispose(disposing);
        }

        #region 组件设计器生成的代码

        /// <summary>
        /// 设计器支持所需的方法 - 不要
        /// 使用代码编辑器修改此方法的内容。
        /// </summary>
        private void InitializeComponent()
        {
            this.tableLayoutPanel1 = new System.Windows.Forms.TableLayoutPanel();
            this.label1 = new System.Windows.Forms.Label();
            this.textBox1 = new System.Windows.Forms.TextBox();
            this.button1 = new System.Windows.Forms.Button();
            this.tableLayoutPanel1.SuspendLayout();
            this.SuspendLayout();
            //
            // tableLayoutPanel1
            //
            this.tableLayoutPanel1.ColumnCount = 3;
            this.tableLayoutPanel1.ColumnStyles.Add(new System.Windows.Forms.ColumnStyle());
            this.tableLayoutPanel1.ColumnStyles.Add(new System.Windows.Forms.ColumnStyle(System.Windows.Forms.SizeType.Percent, 100F));
            this.tableLayoutPanel1.ColumnStyles.Add(new System.Windows.Forms.ColumnStyle());
            this.tableLayoutPanel1.Controls.Add(this.label1, 0, 0);
            this.tableLayoutPanel1.Controls.Add(this.textBox1, 1, 0);
            this.tableLayoutPanel1.Controls.Add(this.button1, 2, 0);
            this.tableLayoutPanel1.Dock = System.Windows.Forms.DockStyle.Fill;
            this.tableLayoutPanel1.Location = new System.Drawing.Point(0, 0);
            this.tableLayoutPanel1.Name = "tableLayoutPanel1";
            this.tableLayoutPanel1.RowCount = 1;
            this.tableLayoutPanel1.RowStyles.Add(new System.Windows.Forms.RowStyle(System.Windows.Forms.SizeType.Percent, 100F));
            this.tableLayoutPanel1.Size = new System.Drawing.Size(250, 40);
            this.tableLayoutPanel1.TabIndex = 0;
            //
            // label1
            //
            this.label1.Anchor = System.Windows.Forms.AnchorStyles.Left;
            this.label1.AutoSize = true;
            this.label1.Font = new System.Drawing.Font("微软雅黑", 11.25F, System.Drawing.FontStyle.Regular, System.Drawing.GraphicsUnit.Point, ((byte)(134)));
            this.label1.Location = new System.Drawing.Point(3, 10);
            this.label1.Name = "label1";
            this.label1.Size = new System.Drawing.Size(44, 20);
            this.label1.TabIndex = 0;
            this.label1.Text = "label";
            this.label1.TextAlign = System.Drawing.ContentAlignment.MiddleLeft;
            //
            // textBox1
            //
            this.textBox1.Anchor = ((System.Windows.Forms.AnchorStyles)((((System.Windows.Forms.AnchorStyles.Top | System.Windows.Forms.AnchorStyles.Bottom)
                        | System.Windows.Forms.AnchorStyles.Left)
                        | System.Windows.Forms.AnchorStyles.Right)));
            this.textBox1.Font = new System.Drawing.Font("微软雅黑", 11.25F, System.Drawing.FontStyle.Regular, System.Drawing.GraphicsUnit.Point, ((byte)(134)));
            this.textBox1.Location = new System.Drawing.Point(53, 3);
            this.textBox1.Name = "textBox1";
            this.textBox1.Size = new System.Drawing.Size(151, 27);
            this.textBox1.TabIndex = 1;
            //
            // button1
            //
            this.button1.Anchor = System.Windows.Forms.AnchorStyles.None;
            this.button1.Location = new System.Drawing.Point(210, 8);
            this.button1.Name = "button1";
            this.button1.Size = new System.Drawing.Size(37, 23);
            this.button1.TabIndex = 2;
            this.button1.Text = "...";
            this.button1.UseVisualStyleBackColor = true;
            this.button1.Click += new System.EventHandler(this.button1_Click);
            //
            // CTextBox
            //
            this.AutoScaleDimensions = new System.Drawing.SizeF(6F, 12F);
            this.AutoScaleMode = System.Windows.Forms.AutoScaleMode.Font;
            this.Controls.Add(this.tableLayoutPanel1);
            this.Name = "CTextBox";
            this.Size = new System.Drawing.Size(250, 40);
            this.tableLayoutPanel1.ResumeLayout(false);
            this.tableLayoutPanel1.PerformLayout();
            this.ResumeLayout(false);

        }

        #endregion

        private System.Windows.Forms.TableLayoutPanel tableLayoutPanel1;
        private System.Windows.Forms.Label label1;
        private System.Windows.Forms.TextBox textBox1;
        private System.Windows.Forms.Button button1;
    }
}
代码就比较简单了,在此就不再详细说明了,只是其中用到了两个我自定义的方法:
General.GetPropertyInfo ---根据LINQ表达式获取属性信息;
General.GetDisplayName ---根据属性信息获取显示的名称;
方法定义代码如下(我以前的博文及个人网站www.zuowenjun.cn中也有说明):
        /// <summary>
        /// 获取属性需要显示的名称
        /// </summary>
        /// <param name="p"></param>
        /// <returns></returns>
        public static string GetDisplayName(PropertyInfo p)
        {
            string displayName = null;
            DisplayAttribute attr = p.GetAttribute<DisplayAttribute>();
            if (attr != null)
            {
                displayName = attr.Name;
            }
            else
            {
                displayName = p.Name;
            }
            return displayName;
        }

        /// <summary>
        /// 获取指定属性信息(非String类型存在装箱与拆箱)
        /// </summary>
        /// <typeparam name="T"></typeparam>
        /// <param name="select"></param>
        /// <returns></returns>
        public static PropertyInfo GetPropertyInfo<T>(Expression<Func<T, dynamic>> select)
        {
            var body = select.Body;
            if (body.NodeType == ExpressionType.Convert)
            {
                var o = (body as UnaryExpression).Operand;
                return (o as MemberExpression).Member as PropertyInfo;
            }
            else if (body.NodeType == ExpressionType.MemberAccess)
            {
                return (body as MemberExpression).Member as PropertyInfo;
            }
            return null;
        }
如果觉得可以给个推荐吧,如果觉得有不足的地方,欢迎指出,谢谢!
另外为了方便大家学习与使用系列控件,我已将源码打包上传,大家可以点以下链接下载:
Zwj-Controls.rar