1. Android UI 几个基本概念
这种封装使得Fragment特别适合针对不同的屏幕尺寸优化UI布局以及创建可重用的UI元素。
每个Fragment都包含自己的UI布局,并接受相关的输入事件,但是必须与包含它们的Acitivity紧密绑定在一起,也就是说Fragment必须签入到Activity。
protected void onCreate(Bundle savedInstanceState) {
super.onCreate(savedInstanceState);
// resource
// setContentView(R.layout.activity_main);
// code
TextView myTextView = new TextView(this);
setContentView(myTextView);
myTextView.setText("Hello, Android!");
}
2. 布局
布局管理器(也叫布局)是对ViewGroup的扩展,它用来在控制子控件在UI中位置的。可以嵌套。构建复杂界面。
最常用的布局类:
--------------------------------Resource--------------------------------------
<LinearLayout xmlns:android="http://schemas.android.com/apk/res/android"
android:orientation="vertical"
android:layout_width="match_parent"
android:layout_height="match_parent">
<TextView
android:layout_width="match_parent"
android:layout_height="wrap_content"
android:text="Enter Text Bellow"/>
<EditText
android:layout_width="match_parent"
android:layout_height="wrap_content"
android:text="Text Goes Here!"/>
</LinearLayout>
android:layout_width="match_parent":用来扩展视图,使其填满父视图、Fragment和Activity内的可用空间。
android:layout_height="match_parent":设定包含它显示内容所需的最小尺寸(比如:显示换行文字字符串所需高度)。
-------------------------------Code-------------------------------------------
LinearLayout ll = new LinearLayout(this);
ll.setOrientation(LinearLayout.VERTICAL);
TextView myTextView = new TextView(this);
EditText myEditText = new EditText(this);
myTextView.setText("Enter Text Below");
myEditText.setText("Text Goes Here!");
int lHeight = LinearLayout.LayoutParams.MATCH_PARENT;
int lWidth = LinearLayout.LayoutParams.WRAP_CONTENT;
ll.addView(myTextView, new LinearLayout.LayoutParams(lWidth, lHeight));
ll.addView(myEditText, new LinearLayout.LayoutParams(lWidth, lHeight));
setContentView(ll);
3. 使用布局
布局的关键特征是能够适应各种各样的屏幕尺寸、分辨率和屏幕方向。
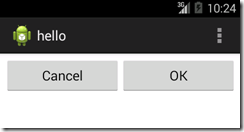
(1)LinearLayout:
大多数时候,你会用线性布局来构建一些UI元素,然后把这些UI元素嵌套到其他布局中,比如相对布局。
<LinearLayout xmlns:android="http://schemas.android.com/apk/res/android"
android:orientation="vertical"
android:layout_width="match_parent"
android:layout_height="match_parent">
<LinearLayout
android:layout_width="fill_parent"
android:layout_height="wrap_content"
android:orientation="horizontal"
android:padding="5dp">
<Button
android:text="@string/cancel_button_text"
android:layout_width="fill_parent"
android:layout_height="wrap_content"
android:layout_weight="1"/>
<Button
android:text="@string/ok_button_text"
android:layout_width="fill_parent"
android:layout_height="wrap_content"
android:layout_weight="1"/>
</LinearLayout>
<ListView
android:layout_width="match_parent"
android:layout_height="fill_parent"></ListView>
</LinearLayout>
运行效果:
(2)RelativeLayout:
非常灵活的布局方式,允许根据父元素或其他视图的位置定义每个元素在布局中的位置。
<RelativeLayout xmlns:android="http://schemas.android.com/apk/res/android"
android:orientation="vertical"
android:layout_width="match_parent"
android:layout_height="match_parent">
<LinearLayout
android:id="@+id/button_bar"
android:layout_alignParentBottom="true"
android:layout_width="fill_parent"
android:layout_height="wrap_content"
android:orientation="horizontal"
android:padding="5dp">
<Button
android:text="@string/cancel_button_text"
android:layout_width="fill_parent"
android:layout_height="wrap_content"
android:layout_weight="1"/>
<Button
android:text="@string/ok_button_text"
android:layout_width="fill_parent"
android:layout_height="wrap_content"
android:layout_weight="1"/>
</LinearLayout>
<ListView
android:id="@+id/listview_bar"
android:layout_alignParentLeft="true"
android:layout_width="match_parent"
android:layout_height="fill_parent"></ListView>
</RelativeLayout>
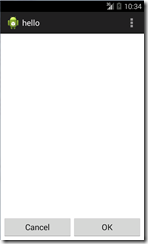
(3)GridLayout:
所有布局管理器中最为灵活的一种。
GridLayout使用一个随意选择的网格来放置视图。通过使用行和列延伸、Space View和Gravity属性,可以创建复杂的UI。
对于构建需要在两个方向上进行对齐的布局,网格布局特别有用。
出于性能考虑,优先考虑网格布局,而不是嵌套布局。
<GridLayout xmlns:android="http://schemas.android.com/apk/res/android"
android:orientation="vertical"
android:layout_width="match_parent"
android:layout_height="match_parent">
<ListView
android:background="#FF444444"
android:layout_gravity="fill"></ListView>
<LinearLayout
android:id="@+id/button_bar"
android:layout_gravity="fill_horizontal"
android:orientation="horizontal"
android:padding="5dp">
<Button
android:text="@string/cancel_button_text"
android:layout_width="fill_parent"
android:layout_height="wrap_content"
android:layout_weight="1"/>
<Button
android:text="@string/ok_button_text"
android:layout_width="fill_parent"
android:layout_height="wrap_content"
android:layout_weight="1"/>
</LinearLayout>
<ListView
android:id="@+id/listview_bar"
android:layout_alignParentLeft="true"
android:layout_width="match_parent"
android:layout_height="fill_parent"></ListView>
</GridLayout>
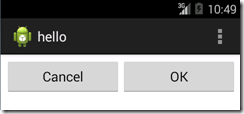
使用网格布局时,不需要指定宽度和高度。这是因为每个元素默认都会包围其元素,而且layout_gravity属性被用来确定每个元素应该在那个方向上延伸。
4. 优化布局
(1)避免布局冗余:
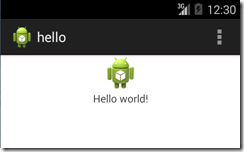
merge的使用:当包含有merge标签的布局添加到另一布局时,该布局的merge节点会被删除,而该布局的子View会被直接添加到新的父布局中。
<merge xmlns:android="http://schemas.android.com/apk/res/android">
<ImageView
android:id="@+id/myImageView"
android:layout_width="match_parent"
android:layout_height="match_parent"
android:src="@drawable/myimage"/>
<TextView
android:id="@+id/myTextView"
android:layout_width="match_parent"
android:layout_height="wrap_content"
android:text="@string/hello_world"
android:layout_gravity="center_horizontal"
android:gravity="center_horizontal"/>
</merge>
merge标签结合 include标签一起使用尤其有用,include标签是用来把一个布局的内容插入到另一个布局中。
image_text_layout.xml ---------
<?xml version="1.0" encoding="utf-8"?>
<merge xmlns:android="http://schemas.android.com/apk/res/android"
android:layout_width="match_parent"
android:layout_height="match_parent" >
<ImageView
android:id="@+id/myImageView"
android:layout_width="match_parent"
android:layout_height="match_parent"
android:src="@drawable/myimage"/>
<TextView
android:id="@+id/myTextView"
android:layout_width="match_parent"
android:layout_height="wrap_content"
android:text="@string/hello_world"
android:layout_gravity="center_horizontal"
android:gravity="center_horizontal"/>
</merge>
activity_main.xml ---------
<?xml version="1.0" encoding="utf-8"?>
<LinearLayout xmlns:android="http://schemas.android.com/apk/res/android"
android:orientation="vertical"
android:layout_width="match_parent"
android:layout_height="wrap_content">
<include
android:id="@+id/my_image_text_layout"
layout="@layout/image_text_layout"/>
</LinearLayout>
(2)避免使用过多的View
布局的View数不能超过80,想要在复杂的UI填充View数量变少,可以使用ViewStub。
ViewStub 就像延迟填充的include标签 ----- 一个stub代表了在父布局中指定多个子View ---- 但只有在显示的调用inflate()方法或被置为可见的时候,这个stub才会被填充。
<ViewStub
android:id="@+id/my_hello_stub"
android:layout="@layout/image_text_layout"
android:inflatedId="@+id/image_text_layout_hello"
android:layout_width="match_parent"
android:layout_height="wrap_content"
android:layout_gravity="bottom"/>
当分别使用id 和 inflatedId 属性填充View时,一个ID已经被分配给StubView和它将成为的ViewGroup了。
当ViewStub被填充,它就会从视图层中删除掉且被它导入的View根节点所替换。如果要修改View的可见性,必须使用他们根节点的引用(通过inflate调用返回)或者通过findViewById方法找到那个View,该方法使用在相应的ViewStub节点中分配给该View的布局ID。
(3)使用Lint工具来分析布局:LInt工具能够分析布局的性能问题。
Lint可以检测UI布局性能,缺少的翻译,未使用的资源、不一致的数组大小、可访问性和国际化问题、丢失或重复的图像资源,可用性问题和manifest错误。
5. 实践:To-Do List
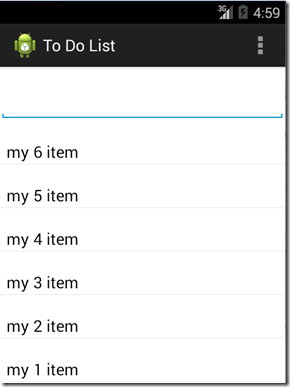
一个待办事项列表;一个添加新待办事项的文本框。
Resource :
--------- activity_main.xml
<?xml version="1.0" encoding="utf-8"?>
<LinearLayout xmlns:android="http://schemas.android.com/apk/res/android"
android:orientation="vertical"
android:layout_width="match_parent"
android:layout_height="wrap_content">
<EditText
android:id="@+id/myEditText"
android:layout_width="match_parent"
android:layout_height="wrap_content"
android:hint="@string/addItemHint"
android:contentDescription="@string/addItemDescription"/>
<ListView
android:id="@+id/myListView"
android:layout_width="match_parent"
android:layout_height="wrap_content"/>
</LinearLayout>
------- strings.xml
<?xml version="1.0" encoding="utf-8"?>
<resources>
<string name="app_name">To Do List</string>
<string name="hello_world">Hello world!</string>
<string name="action_settings">Settings</string>
<string name="cancel_button_text">Cancel</string>
<string name="ok_button_text">OK</string>
<string name="addItemHint">New To Do Item</string>
<string name="addItemDescription">New To Do Item</string>
</resources>
Code:
setContentView(R.layout.activity_main);
//Get Reference of UI widget
ListView myListView = (ListView)findViewById(R.id.myListView);
final EditText myEditText = (EditText)findViewById(R.id.myEditText);
final ArrayList<String> todoItems = new ArrayList<String>();
//Create ArrayAdapter to bind to ListView
final ArrayAdapter<String> aa;
aa = new ArrayAdapter<String>(this,
android.R.layout.simple_list_item_1,
todoItems);
//Bind ArrayAdapter to ListView
myListView.setAdapter(aa);
myEditText.setOnKeyListener(new View.OnKeyListener() {
@Override
public boolean onKey(View v, int keyCode, KeyEvent event) {
if(event.getAction() == KeyEvent.ACTION_DOWN){
if(keyCode == KeyEvent.KEYCODE_DPAD_CENTER
|| keyCode == KeyEvent.KEYCODE_ENTER){
todoItems.add(0, myEditText.getText().toString());
aa.notifyDataSetChanged();
myEditText.setText("");
}
}
return false;
}
});
运行效果:
1. Fragment 介绍
Fragment(碎片)允许将Activity拆分成多个完全独立封装的可重用的组件,每个组件有它自己的生命周期和UI布局。
Fragment最大的优势是你可以为不同大小屏幕的设备创建动态灵活的UI。
要通过Android支持包来使用Fragment,必须要保证Activity是继承自FragmentActivity类:
Public class MyActivity extends FragmentActivity
创建Fragment
Resource -----
<FrameLayout xmlns:android="http://schemas.android.com/apk/res/android"
xmlns:tools="http://schemas.android.com/tools"
android:layout_width="match_parent"
android:layout_height="match_parent"
tools:context="com.example.hello.MySkeletonFragment" >
<!-- TODO: Update blank fragment layout -->
<TextView
android:layout_width="match_parent"
android:layout_height="match_parent"
android:text="@string/hello_blank_fragment" />
</FrameLayout>
Code ------
public class MySkeletonFragment extends Fragment {
@Override
public View onCreateView(LayoutInflater inflater, ViewGroup container,
Bundle savedInstanceState) {
// Inflate the layout for this fragment
return inflater
.inflate(R.layout.fragment_my_skeleton, container, false);
}
}
和Activity 不同,Fragment 不需要在manifest.xml 进行注册。这是因为Fragment只有嵌入到一个Activity时,它才能够存在,它的生命周期依赖于Activity。
Fragment 的生命周期
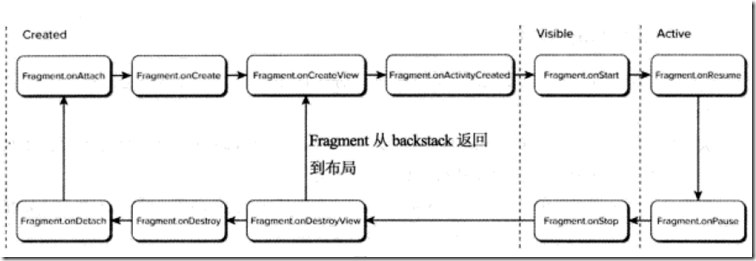
Fragment 特有的生命周期事件
1.从父Activity中绑定和分离Fragment。
2.创建和销毁Fragment。与Activity不同,Fragment的UI不在Onreate中初始化。
3.创建和销毁用户界面。OnCreateView与OnDestroyView。
使用OnCreateView方法来初始化Fragment:填充UI,获取它所包含的View的引用(绑定到该View的数据),然后创建所需的任何Service和Timer。一旦填充好了View Layout,该View应该从这个处理程序返回:
return Inflater.inflate(R.layout.my_fragment, container, false);
如果Fragment 和 父Activity的UI交互需要一直等到onActivityCreated事件被触发。
Fragment 状态
Fragment的命运与它所属的Activity息息相关。
Fragment Manager 介绍
每一个Activity都包含一个Fragment Manager来管理它所包含的Fragment。通过getFragementManager方法获得FragmentManager。
向Activity中添加Fragment
<?xml version="1.0" encoding="utf-8"?>
<LinearLayout xmlns:android="http://schemas.android.com/apk/res/android"
android:orientation="vertical"
android:layout_width="match_parent"
android:layout_height="wrap_content">
<EditText
android:id="@+id/myEditText"
android:layout_width="match_parent"
android:layout_height="wrap_content"
android:hint="@string/addItemHint"
android:contentDescription="@string/addItemDescription"/>
<ListView
android:id="@+id/myListView"
android:layout_width="match_parent"
android:layout_height="wrap_content"/>
<fragment android:name="com.example.hello.MyListFragment"
android:id="@+id/my_list_fragment"
android:layout_width="match_parent"
android:layout_height="wrap_content"
android:layout_weight="1"/>
<fragment android:name="com.example.hello.DetailsFragment"
android:id="@+id/details_fragment"
android:layout_width="match_parent"
android:layout_height="wrap_content"
android:layout_weight="3"/>
</LinearLayout>
一旦一个Fragment填充后,他就变成一个ViewGroup,会在Activity内显示和管理它所包含UI。
使用FragmentTransaction
在运行时,用来在一个Activity内添加、删除和替换Fragment,使得布局变成动态的。
添加、删除和替换Fragment
FragmentTransaction fragmentTransaction = getFragmentManager().beginTransaction();
fragmentTransaction.add(R.id.ui_Container, new MyListFragment());
fragmentTransaction.commit();
FragmentTransaction fragmentTransaction = getFragmentManager().beginTransaction();
fragmentTransaction.beginTransaction()
.remove(getFragmentManager().findFragmentById(R.id.details_fragment));
fragmentTransaction.commit();
FragmentTransaction fragmentTransaction = getFragmentManager().beginTransaction();
fragmentTransaction.replace(R.id.details_fragment, new DetailFragment(selected_index));
fragmentTransaction.commit();
使用FragmentManager 查找Fragment
如果是通过XML布局的方式把Fragment加入到Activity中的,可以使用资源标识符。
getFragmentManager().findFragmentById(R.id.details_fragment);
如果通过FragmentTransaction添加了一个Fragment,应该把容器View的资源标识符指定给想要查找的Fragment;另外,还可以通过使用findFragmentByTag来查找在FragmentTransaction中指定了Tab标识符的Fragment。
getFragmentManager().findFragmentByTag(arg0);
这种方式在没有UI的Fragment的Activity中特别有用。因为这样Fragment并不是Acitvity View Layout的一部分,它没有一个标识符或者一个容器资源标识符,所以它无法使用findFragmentById()方法找到它。
使用Fragment填充动态的Activity布局
FragmentManager fm = getFragmentManager();
DetailsFragment detailsFragment = (DetailsFragment)fm.findFragmentById(R.id.details_container);
if(detailsFragment == null){
FragmentTransaction ft = fm.beginTransaction();
ft.add(R.id.details_container, new DetailsFragment());
ft.commit();
}
首先检查这个UI是否提供之前的状态已经被提供过了。为了确保用户体验的一致性,当Activity因配置改变而重新启动时,Android会保存Fragment布局和back栈。
因为同样的原因,当运行时配置改变而创建可替代的布局时,最好考虑在所有的布局变化中,包含所有事务所包含的所有的View容器。这样做的坏处就是FragmentManager把Fragment还原到已不在新布局中的容器。
在一个给定方向的布局中删除一个Fragment容器,只需要将Fragment容器的Visibility属性设置为gone即可。
Fragment和Back栈
FragmentManager fm = getFragmentManager();
DetailsFragment detailsFragment = (DetailsFragment)fm.findFragmentById(R.id.details_container);
if(detailsFragment == null){
FragmentTransaction ft = fm.beginTransaction();
ft.add(R.id.details_container, new DetailsFragment());
Fragment fragment = getFragmentManager().findFragmentById(R.id.my_list_fragment);
ft.remove(fragment);
String tag = null;
ft.addToBackStack(tag);
ft.commit();
}
使FragmentTransaction动起来
想要应用众多默认过度动画中一个,可以对任何FragmentTransaction使用setTransition方法,并传入一个FragmentTransaction.TRASITION_FRAGMENT_*常量:
ft.setTransition(FragmentTransaction.TRANSIT_FRAGMENT_OPEN);
也可以使用setCustomAnimations方法对FragmentTransaction应用自定义动画。
ft.setCustomAnimations(R.animator.slide_in_left, R.animator.slide_in_right);
Fragment和Activity之间的接口
尽管Fragment可以直接使用主Activity的FragmentManager进行通信,但通常考虑最好使用Activity做媒介,这样尽可能的让Fragment独立和松耦合。
@Override
public void onAttach(Activity activity) {
super.onAttach(activity);
try {
mListener = (OnFragmentInteractionListener) activity;
} catch (ClassCastException e) {
throw new ClassCastException(activity.toString()
+ " must implement OnFragmentInteractionListener");
}
}
public interface OnFragmentInteractionListener {
// TODO: Update argument type and name
public void onFragmentInteraction(Uri uri);
}
没有用户界面的Fragment
大部分情况下Fragment是封装了UI的模块化组件,但是也可以构建没有UI的Fragment,该行为可以一直持续到Activity的重新启动。
这特别适合于:定期和UI交互的后台任务;因配置改变而导致的Activity重新启动时,保存状态变得特别重要的场合。
当Activity重新启动时,同一个Fragment的实例会被保留下来,而不是和它的父Activity一起被销毁和重新创建。虽然可以对存在UI的Fragment使用这项技术,但是并不建议这样做,更好的选择是把关联的后台任务和必要的状态移入到新的没有UI的Fragment中,根据需要让两个Fragment交互。
FragmentManager fm = getFragmentManager();
FragmentTransaction ft = fm.beginTransaction();
ft.add(R.id.ui_container, new MyFirstFragment());
ft.add(new MyNoUIFragment(), My_No_UI_Fragment);
MyNoUIFragment mn = (MyNoUIFragment)fm.findFragmentByTag(My_No_UI_Fragment);
ft.commit();
Android Fragment 类
DialogFragment ---
ListFragment ---
WebViewFragment ---
对To-Do-List 示例使用Fragment
(1)首先,在res/layout文件夹中创建一个新的布局文件new_item_fragment.xml
<?xml version="1.0" encoding="utf-8"?>
<EditText xmlns:android="http://schemas.android.com/apk/res/android"
android:id="@+id/myEditText"
android:layout_width="match_parent"
android:layout_height="wrap_content"
android:hint="@string/addItemHint"
android:contentDescription="@string/addItemHint" />
(2)为fragment UI创建新的Fragment:NewItemFragment
@Override
public View onCreateView(LayoutInflater inflater, ViewGroup container,
Bundle savedInstanceState) {
View view = inflater.inflate(R.layout.new_item_fragment, container, false);
return view;
}
(3)定义接口监听新事项的添加
public interface OnNewItemAddedListner{
public void onNewItemAdded(String newItem);
}
(4)创建一个变量来保存实现了接口OnNewItemAddedListner的类的引用
private OnNewItemAddedListner onNewItemAddedListner;
@Override
public void onAttach(Activity activity){
super.onAttach(activity);
try{
onNewItemAddedListner = (OnNewItemAddedListner)activity;
} catch(ClassCastException e){
throw new ClassCastException(activity.toString() + "must implement OnNewItemAddedListner");
}
}
(5)在NewItemFragment中添加onClickListner事件。当用户添加新项,不是直接向数组中添加文本,而是把它传递到父Activity的OnNewItemAddedListner.onNewItemAdded实现中。
@Override
public View onCreateView(LayoutInflater inflater, ViewGroup container,
Bundle savedInstanceState) {
View view = inflater.inflate(R.layout.new_item_fragment, container, false);
final EditText myEditText = (EditText)view.findViewById(R.id.myEditText);
myEditText.setOnKeyListener(new View.OnKeyListener() {
@Override
public boolean onKey(View v, int keyCode, KeyEvent event) {
if(event.getAction() == KeyEvent.ACTION_DOWN){
if(keyCode == KeyEvent.KEYCODE_DPAD_CENTER || keyCode == KeyEvent.KEYCODE_ENTER){
onNewItemAddedListner.onNewItemAdded(myEditText.getText().toString());
myEditText.setText("");
return true;
}
}
return false;
}
});
return view;
}
(6)创建to-do事项列表Fragment
package com.example.todolist;
import android.app.Fragment;
import android.app.ListFragment;
/**
* A simple {@link Fragment} subclass.
*
*/
public class ToDoListFragment extends ListFragment {
}
(7)重新设计MainActivity的XML布局
<LinearLayout xmlns:android="http://schemas.android.com/apk/res/android"
xmlns:tools="http://schemas.android.com/tools"
android:orientation="vertical"
android:layout_width="match_parent"
android:layout_height="match_parent"
android:paddingBottom="@dimen/activity_vertical_margin"
android:paddingLeft="@dimen/activity_horizontal_margin"
android:paddingRight="@dimen/activity_horizontal_margin"
android:paddingTop="@dimen/activity_vertical_margin"
tools:context="com.example.todolist.MainActivity" >
<fragment android:name="com.example.todolist.NewItemFragment"
android:id="@+id/newItemFragment"
android:layout_width="match_parent"
android:layout_height="wrap_content"
android:hint="@string/addItemHint"
android:contentDescription="@string/addItemHint" />
<fragment android:name="com.example.todolist.ToDoListFragment"
android:id="@+id/toDoListFragment"
android:layout_width="match_parent"
android:layout_height="wrap_content" />
</LinearLayout>
(8)修改MainActivity.java
public class MainActivity extends Activity implements NewItemFragment.OnNewItemAddedListner {
private ArrayList<String> todoItems;
private ArrayAdapter<String> aa;
@Override
protected void onCreate(Bundle savedInstanceState) {
super.onCreate(savedInstanceState);
setContentView(R.layout.activity_main);
//获取Fragment的引用
FragmentManager fm = getFragmentManager();
ToDoListFragment todoListFragment = (ToDoListFragment)fm.findFragmentById(R.id.toDoListFragment);
todoItems = new ArrayList<String>();
aa = new ArrayAdapter<String>(this, android.R.layout.simple_list_item_1, todoItems);
todoListFragment.setListAdapter(aa);
}
//前面定义接口的具体实现
@Override
public void onNewItemAdded(String newItem) {
todoItems.add(newItem);
aa.notifyDataSetChanged();
}
}
Android widget 工具箱
修改现有的视图
修改to-do-list,先看效果图
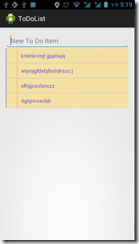
下面我们一步一步来做:
(1)因为ListView 每一个条目其实是TextView,那么只需要改变每一个条目就能影响ListView。
创建一个新的扩展了TextView类ToDoListItem类。重写onDraw方法。
public class ToDoListItemView extends TextView {
private Paint marginPaint;
private Paint linePaint;
private int pagerColor;
private float margin;
public ToDoListItemView(Context context, AttributeSet attrs, int defStyle) {
super(context, attrs, defStyle);
init();
}
public ToDoListItemView(Context context, AttributeSet attrs) {
super(context, attrs);
init();
}
public ToDoListItemView(Context context) {
super(context);
init();
}
private void init() {
}
@Override
public void onDraw(Canvas canvas){
}
}
(2)创建资源文件:res/values/colors.xml
<?xml version="1.0" encoding="utf-8"?>
<resources>
<color name="notepad_paper">#EEF8E0A0</color>
<color name="notepad_lines">#FF0000FF</color>
<color name="notepad_margin">#90FF0000</color>
<color name="notepad_text">#AA0000FF</color>
</resources>
(3) 创建dimens.xml文件,为边缘和宽度添加新值
<dimen name="notepad_margin">30dp</dimen>
(4)通过上面的资源文件就可以绘制新的控件,首先创建相关Paint对象的初始化
private Paint marginPaint;
private Paint linePaint;
private int pagerColor;
private float margin;
private void init() {
Resources myResources = getResources();
//创建onDraw中使用的画刷
marginPaint = new Paint(Paint.ANTI_ALIAS_FLAG);
marginPaint.setColor(myResources.getColor(R.color.notepad_margin));
linePaint = new Paint(Paint.ANTI_ALIAS_FLAG);
linePaint.setColor(myResources.getColor(R.color.notepad_lines));
//获得页面背景和边缘宽度
pagerColor = myResources.getColor(R.color.notepad_paper);
margin = myResources.getDimension(R.dimen.notepad_margin);
}
(5)重写onDraw方法
@Override
public void onDraw(Canvas canvas){
//绘制页面的颜色
canvas.drawColor(pagerColor);
//绘制边缘
canvas.drawLine(0, 0, 0, getMeasuredHeight(), linePaint);
canvas.drawLine(0, getMeasuredHeight(), getMeasuredWidth(), getMeasuredHeight(), linePaint);
//绘制margin
canvas.drawLine(margin, 0, margin, getMeasuredHeight(), marginPaint);
//移动文本,让它跨越边缘
canvas.save();
canvas.translate(margin, 0);
super.onDraw(canvas);
canvas.restore();
}
(6)创建一个新的资源res/layout/todolist_item.xml资源来指定每一个To-Do List条目
<?xml version="1.0" encoding="utf-8"?>
<com.example.todolist.ToDoListItemView
xmlns:android="http://schemas.android.com/apk/res/android"
android:layout_width="match_parent"
android:layout_height="match_parent"
android:padding="10dp"
android:scrollbars="vertical"
android:textColor="@color/notepad_text"
android:fadingEdge="vertical" />
(7) 最后一步在OnCreate中改变ArrayAdapter传入的参数。使用R.Layout.todolist_item
@Override
protected void onCreate(Bundle savedInstanceState) {
super.onCreate(savedInstanceState);
setContentView(R.layout.activity_main);
//获取Fragment的引用
FragmentManager fm = getFragmentManager();
ToDoListFragment todoListFragment = (ToDoListFragment)fm.findFragmentById(R.id.toDoListFragment);
todoItems = new ArrayList<String>();
aa = new ArrayAdapter<String>(this, R.layout.todolist_item, todoItems);
todoListFragment.setListAdapter(aa);
}
创建复合控件
当创建复合控件时,必须对他包含的视图的布局、外观、交互的定义。复合控件是通过扩展一个ViewGroup(通常是一个布局)来创建的。因此,要创建一个新的复合控件,首先需要选择一个最适合放置子控件的布局类,然后扩展该类。
package com.example.hello;
import android.content.Context;
import android.util.AttributeSet;
import android.widget.LinearLayout;
public class MycompoudView extends LinearLayout {
public MycompoudView(Context context, AttributeSet attrs, int defStyle) {
super(context, attrs, defStyle);
}
public MycompoudView(Context context){
super(context);
}
}
设计复合视图的UI布局的首选方法是使用外部资源。
<?xml version="1.0" encoding="utf-8"?>
<LinearLayout xmlns:android="http://schemas.android.com/apk/res/android"
android:layout_width="match_parent"
android:layout_height="wrap_content"
android:orientation="vertical" >
<EditText
android:id="@+id/editText"
android:layout_width="match_parent"
android:layout_height="wrap_content" />
<Button
android:id="@+id/clearButton"
android:layout_width="match_parent"
android:layout_height="wrap_content"
android:text="Clear" />
</LinearLayout>
填充布局资源,获得控件的引用,挂钩功能(还未实现)
private EditText editText;
private Button button;
public MycompoudView(Context context, AttributeSet attrs, int defStyle) {
super(context, attrs, defStyle);
//使用布局资源填充视图
String infService = Context.LAYOUT_INFLATER_SERVICE;
LayoutInflater li;
li = (LayoutInflater)getContext().getSystemService(infService);
li.inflate(R.layout.clearable_edit_text, this, true);
//获得对子控件的引用
editText = (EditText)findViewById(R.id.editText);
button = (Button)findViewById(R.id.clearButton);
//挂钩这个功能
hookupButton();
}
使用布局创建简单的复合控件
通过创建一个XML资源来封装要重用的UI模式,以后在创建Activity或Fragment的UI时,可以把他们的布局资源定义使用include标签导入。使用include标签还能够重写所包含布局的根节点的id和layout参数:
<include layout="@layout/clearable_edit_text"
android:id="@+id/add_new_entry_input"
android:layout_width="wrap_content"
android:layout_height="fill_parent"
android:layout_gravity="top" />
创建定制的视图
对View 或者 SurfaceView扩展。
(1)创建新的可视界面
(2)定制可访问性事件
(3)创建一个罗盘视图的Demo
效果图:
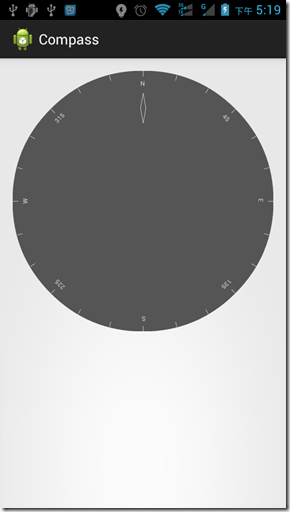
制作步骤:
(1)创建新的项目Compass,新增类CompassView扩展自View
public class CompassView extends View {
public CompassView(Context context) {
super(context);
initCompassView();
}
public CompassView(Context context, AttributeSet attrs) {
super(context, attrs);
initCompassView();
}
public CompassView(Context context, AttributeSet attrs, int defStyleAttr) {
super(context, attrs, defStyleAttr);
initCompassView();
}
}
(2)罗盘应该是一个正圆,而且应该占据画布允许的尽可能大的空间。因此重写onMeasure方法来计算最短边的长度,然后使用这个值并通过setMeasuredDimension来设置高度和宽度。
@Override
protected void onMeasure(int widthMeasureSpec, int heightMeasureSpec){
//罗盘是一个填充尽可能多的空间的圆,通过设置最短的边界,高度和宽度来设置测量的尺寸
int measuredWidth = measure(widthMeasureSpec);
int measureHeight = measure(heightMeasureSpec);
int d = Math.min(measuredWidth, measureHeight);
setMeasuredDimension(d, d);
}
private int measure(int measureSpec) {
int result = 0;
// 对测量说明进行编码
int specMode = MeasureSpec.getMode(measureSpec);
int specSize = MeasureSpec.getSize(measureSpec);
if(specMode == MeasureSpec.UNSPECIFIED){
//如果没有指定边界,则返回默认大小200
result = 200;
}
else {
//由于希望填充可用的空间,所以要返回整个可用的空间的边界
result = specSize;
}
return result;
}
(3)修改main_acitivity.xml,使用新的视图
<RelativeLayout xmlns:android="http://schemas.android.com/apk/res/android"
xmlns:tools="http://schemas.android.com/tools"
android:layout_width="match_parent"
android:layout_height="match_parent"
android:paddingBottom="@dimen/activity_vertical_margin"
android:paddingLeft="@dimen/activity_horizontal_margin"
android:paddingRight="@dimen/activity_horizontal_margin"
android:paddingTop="@dimen/activity_vertical_margin"
tools:context="com.example.compass.MainActivity" >
<com.example.compass.CompassView
android:id="@+id/compassView"
android:layout_width="match_parent"
android:layout_height="match_parent" />
</RelativeLayout>
(4)修改资源res/values/strings.xml 与 res/values/colors.xml
<?xml version="1.0" encoding="utf-8"?>
<resources>
<string name="app_name">Compass</string>
<string name="action_settings">Settings</string>
<string name="cardinal_north">N</string>
<string name="cardinal_east">E</string>
<string name="cardinal_south">S</string>
<string name="cardinal_west">W</string>
</resources>
<?xml version="1.0" encoding="utf-8"?>
<resources xmlns:android="http://schemas.android.com/apk/res/android">
<color name="background_color">#F555</color>
<color name="marker_color">#AFFF</color>
<color name="text_color">#AFFF</color>
</resources>
(5)CompassView类中添加新的属性
private float bearing;
public void setBearing(float _bearing){
bearing = _bearing;
}
public float getBearing(){
return bearing;
}
(6)完成initCompassView方法,准备绘制罗盘所需的Paint等相关对象
private Paint markerPaint;
private Paint textPaint;
private Paint circlePaint;
private String northString;
private String eastString;
private String southString;
private String westString;
private int textHeight;
private void initCompassView() {
setFocusable(true);
Resources r = getResources();
circlePaint = new Paint(Paint.ANTI_ALIAS_FLAG);
circlePaint.setColor(r.getColor(R.color.background_color));
circlePaint.setStrokeWidth(1);
circlePaint.setStyle(Paint.Style.FILL_AND_STROKE);
northString = r.getString(R.string.cardinal_north);
eastString = r.getString(R.string.cardinal_east);
southString = r.getString(R.string.cardinal_south);
westString = r.getString(R.string.cardinal_west);
textPaint = new Paint(Paint.ANTI_ALIAS_FLAG);
textPaint.setColor(r.getColor(R.color.text_color));
textHeight = (int)textPaint.measureText("yY");
markerPaint = new Paint(Paint.ANTI_ALIAS_FLAG);
markerPaint.setColor(r.getColor(R.color.marker_color));
}
(7)开始绘制,见注解
@Override
protected void onDraw(Canvas canvas){
//找到控制中心,并将最小边的长度作为罗盘的半径存起来
int mMeasuredWidth = getMeasuredWidth();
int mMeasureHeight = getMeasuredHeight();
int cx = mMeasuredWidth / 2;
int cy = mMeasureHeight / 2;
int radius = Math.min(cx, cy);
//使用drawCircle方法画出罗盘字盘的边界,并为其背景着色
canvas.drawCircle(cx, cy, radius, circlePaint);
//这个罗盘是通过旋转它的字盘来显示当前的方向的,所以当前的方向总是指向设备的顶部。
//要实现这一个功能,需要把画布向与当前方向相反的方向旋转
canvas.save();
canvas.rotate(-bearing, cx, cy);
//绘制标记了,把画布旋转一圈,并且每15度画一个标记,每45度画一个方向缩写
int textWidth = (int)textPaint.measureText("W");
int cardinalX = cx - textWidth / 2;
int cardinalY = cy - radius + textHeight;
//每15度绘制一个标记,每45度绘制一个文本
for(int i = 0; i < 24; i++){
//绘制一个标记
canvas.drawLine(cx, cy-radius, cx, cy-radius+10, markerPaint);
canvas.save();
canvas.translate(0, textHeight);
//绘制基本方位
if(i % 6 == 0){
String dirString = "";
switch(i){
case(0):{
dirString = northString;
int arrowY = 2*textHeight;
canvas.drawLine(cx, arrowY, cx-5, 4*textHeight, markerPaint);
canvas.drawLine(cx, arrowY, cx+5, 4*textHeight, markerPaint);
canvas.drawLine(cx-5, 4*textHeight, cx, 6*textHeight, markerPaint);
canvas.drawLine(cx+5, 4*textHeight, cx, 6*textHeight, markerPaint);
break;
}
case(6):dirString = eastString; break;
case(12):dirString = southString; break;
case(18):dirString = westString; break;
}
canvas.drawText(dirString, cardinalX, cardinalY, textPaint);
}
else if(i % 3 == 0){
//每45度绘制文本
String angle = String.valueOf(i*15);
float angleTextWidth = textPaint.measureText(angle);
int angleTextX = (int)(cx-angleTextWidth/2);
int angleTextY = cy-radius+textHeight;
canvas.drawText(angle, angleTextX, angleTextY, textPaint);
}
canvas.restore();
canvas.rotate(15, cx, cy);
}
canvas.restore();
}
(8)添加可访问性支持。罗盘视图以可视方式显示方向,所以为了提高可访问性,当方向变化时,需要广播一个可访问性事件,说明文本发生了变化。
public void setBearing(float _bearing){
bearing = _bearing;
sendAccessibilityEvent(AccessibilityEvent.TYPE_VIEW_TEXT_CHANGED);
}
(9)重写dispatchPopulateAccessibilityEvent,将当前方向用作可访问性事件使用的內容值
@SuppressWarnings("deprecation")
@Override
public boolean dispatchPopulateAccessibilityEvent(final AccessibilityEvent event){
super.dispatchPopulateAccessibilityEvent(event);
if(isShown()){
String bearingStr = String.valueOf(bearing);
if(bearingStr.length() > AccessibilityEvent.MAX_TEXT_LENGTH){
bearingStr = bearingStr.substring(0, AccessibilityEvent.MAX_TEXT_LENGTH);
event.getText().add(bearingStr);
return true;
}
}
return false;
}
Demo到此结束,见开始运行效果。
Adapter用来把数据绑定到AdapterView扩展类的视图组(如ListView、Gallery)。Adapter负责创建代表所绑定父视图中的底层数据的子视图。
可以创建自己的Adapter类,构建自己的由AdapterView派生的控件。
部分原生的Adapter
1. 定制To-Do List ArrayAdapter
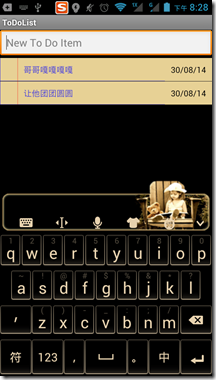
(1) 大多数情况下使用ArrayAdapter,需要对其进行扩展,并重写getView方法来布局视图分配对象属性。
创建一个新的ToDoItem类,定义Task和Date属性,重写toString
package com.paad.todolist;
import java.text.SimpleDateFormat;
import java.util.Date;
public class ToDoItem {
String task;
Date created;
public String getTask() {
return task;
}
public Date getCreated() {
return created;
}
public ToDoItem(String _task) {
this(_task, new Date(java.lang.System.currentTimeMillis()));
}
public ToDoItem(String _task, Date _created) {
task = _task;
created = _created;
}
@Override
public String toString() {
SimpleDateFormat sdf = new SimpleDateFormat("dd/MM/yy");
String dateString = sdf.format(created);
return "(" + dateString + ") " + task;
}
}
(2)在ToDoListActivity,修改ArrayList和ArrayAdapter变量类型来存储ToDoItem对象,而不是字符串。然后需要修改onCreate更新变量的初始化(initialization)
private ArrayList<ToDoItem> todoItems;
private ToDoItemAdapter aa;
public void onCreate(Bundle savedInstanceState) {
super.onCreate(savedInstanceState);
// Inflate your view
setContentView(R.layout.main);
// Get references to the Fragments
FragmentManager fm = getFragmentManager();
ToDoListFragment todoListFragment =
(ToDoListFragment)fm.findFragmentById(R.id.TodoListFragment);
// Create the array list of to do items
todoItems = new ArrayList<ToDoItem>();
// Create the array adapter to bind the array to the ListView
int resID = R.layout.todolist_item;
aa = new ToDoItemAdapter(this, resID, todoItems);
// Bind the array adapter to the ListView.
todoListFragment.setListAdapter(aa);
}
(3)更新onNewItemAdded处理程序来支持ToDoItem对象
public void onNewItemAdded(String newItem) {
ToDoItem newTodoItem = new ToDoItem(newItem);
todoItems.add(0, newTodoItem);
aa.notifyDataSetChanged();
}
(4)修改todolist_item.xml
<?xml version="1.0" encoding="utf-8"?>
<RelativeLayout xmlns:android="http://schemas.android.com/apk/res/android"
android:layout_width="match_parent"
android:layout_height="match_parent">
<TextView
android:id="@+id/rowDate"
android:background="@color/notepad_paper"
android:layout_width="wrap_content"
android:layout_height="match_parent"
android:padding="10dp"
android:scrollbars="vertical"
android:fadingEdge="vertical"
android:textColor="#F000"
android:layout_alignParentRight="true"
/>
<com.paad.todolist.ToDoListItemView
android:id="@+id/row"
android:layout_width="match_parent"
android:layout_height="match_parent"
android:padding="10dp"
android:scrollbars="vertical"
android:fadingEdge="vertical"
android:textColor="@color/notepad_text"
android:layout_toLeftOf="@+id/rowDate"
/>
</RelativeLayout>
(5)ArrayAdapter 的扩展类ToDoItemAdapter,专门用于ToDoItem
package com.paad.todolist;
import java.text.SimpleDateFormat;
import java.util.Date;
import java.util.List;
import android.content.Context;
import android.view.LayoutInflater;
import android.view.View;
import android.view.ViewGroup;
import android.widget.ArrayAdapter;
import android.widget.LinearLayout;
import android.widget.TextView;
public class ToDoItemAdapter extends ArrayAdapter<ToDoItem> {
int resource;
public ToDoItemAdapter(Context context,
int resource,
List<ToDoItem> items) {
super(context, resource, items);
this.resource = resource;
}
@Override
public View getView(int position, View convertView, ViewGroup parent) {
LinearLayout todoView;
ToDoItem item = getItem(position);
String taskString = item.getTask();
Date createdDate = item.getCreated();
SimpleDateFormat sdf = new SimpleDateFormat("dd/MM/yy");
String dateString = sdf.format(createdDate);
if (convertView == null) {
todoView = new LinearLayout(getContext());
String inflater = Context.LAYOUT_INFLATER_SERVICE;
LayoutInflater li;
li = (LayoutInflater)getContext().getSystemService(inflater);
li.inflate(resource, todoView, true);
} else {
todoView = (LinearLayout) convertView;
}
TextView dateView = (TextView)todoView.findViewById(R.id.rowDate);
TextView taskView = (TextView)todoView.findViewById(R.id.row);
dateView.setText(dateString);
taskView.setText(taskString);
return todoView;
}
}
(6)回到ToDoListActivity,使用ToDoItemAdapter来代替ArrayAdapter声明
private ArrayList<ToDoItem> todoItems;
(7)onCreate内,使用新的ToDoItemAdapter来代替ArrayAdapter<ToDoItem>实例化
aa = new ToDoItemAdapter(this, resID, todoItems);
到此完成。
2. SimpleCursorAdapter 的使用跟Content Provider,游标和游标加载器关系密切,这块只能留到后面学习了。