(接上一篇,今天的目标是把第二章结束~~加油)
2.3 Microposts资源
在生成和探索了Users资源之后,让我们转过来看看另一个相关资源――Microposts。
在这一节中,我建议对比一下2个资源中相似的元素。你会看到2个资源之间会有很多地方都是相同的。Rails程序的RESTful结构是这种重复结构最好的实现方式。的确,
研究这种Users和Microposts资源早期的重复结构也是本章最初的动机。(我们将会明白写一个不是toy programe的健壮程序需要耗费相当多的精力、我将会在第11章再次见到microposts资源――其实我不想隔那么久。。。)。
2.3.1 Microposts初步探索
和Users资源一样,我们先用Rails generate Scaffold创建Microposts资源的基本结构(Scaffold脚手架),如图2.3所示的那样,我们也创建了数据模型。
$ rails generate scaffold Micropost content:string user_id:integer
      invoke  active_record
      create    db/migrate/20100615004429_create_microposts.rb
      create    app/models/micropost.rb
      invoke    test_unit
      create      test/unit/micropost_test.rb
      create      test/fixtures/microposts.yml
       route  resources :microposts
      invoke  scaffold_controller
      create    app/controllers/microposts_controller.rb
      invoke    erb
      create      app/views/microposts
      create      app/views/microposts/index.html.erb
      create      app/views/microposts/edit.html.erb
      create      app/views/microposts/show.html.erb
      create      app/views/microposts/new.html.erb
      create      app/views/microposts/_form.html.erb
      invoke    test_unit
      create      test/functional/microposts_controller_test.rb
      invoke    helper
      create      app/helpers/microposts_helper.rb
      invoke      test_unit
      create        test/unit/helpers/microposts_helper_test.rb
      invoke  stylesheets
   identical    public/stylesheets/scaffold.css
如第2.2节,我们需要运行数据库迁移migration来更新数据库并添加新的数据模型。
$ rake db:migrate
==  CreateMicroposts: migrating ===============================================
-- create_table(:microposts)
   -> 0.0023s
==  CreateMicroposts: migrated (0.0026s) ======================================
我们已经如第2.2.1节创建Users那样创建了Microposts。你或许猜到了,Scaffold 生成器也为Microposts更新了Rails的routes文件。如代码2.7。 和Users一样, 代码:“resources:microposts”的路由规则映射了URL和对应的Microposts控制器方法。如表2.3所示。
代码2.7 新增了Microposts资源的Rails路由
config/routes.rb
DemoApp::Application.routes.draw do
  resources :microposts
  resources :users
  .
  .
  .
end
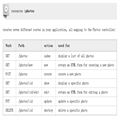
HTTP request URL Action PurposeGET /microposts index page to list all micropostsGET /microposts/1 show page to show micropost with id 1GET /microposts/new new page to make a new micropostPOST /microposts create create a new micropostGET /microposts/1/editedit page to edit micropost with id 1PUT /microposts/1 update update micropost with id 1DELETE /microposts/1 destroy delete micropost with id 1
表2.3 代码2.7中,microposts资源提供的RESTful路由。
Microposts控制器示意代码如代码2.8所示。和代码2.3相比,除了用icropostsController替换掉UsersController之外基本一样,这是RESTful
架构在2者只运用的体现。
代码2.8,Microposts的示意代码
app/controllers/microposts_controller.rb
class MicropostsController < ApplicationController

  def index
    .
    .
    .
  end

  def show
    .
    .
    .
  end

  def new
    .
    .
    .
  end

  def create
    .
    .
    .
  end

  def edit
    .
    .
    .
  end

  def update
    .
    .
    .
  end

  def destroy
    .
    .
    .
  end
end
让我们在“/microposts/new”页面添加一些实际的microposts(微博),如图2.12

图2.12 添加微博的页面(/microposts/new)
就这样子,建立一两条微博,注意user_id为1是为了对应在2.2.1节中建立的第一个用户。结果如2.13图所示
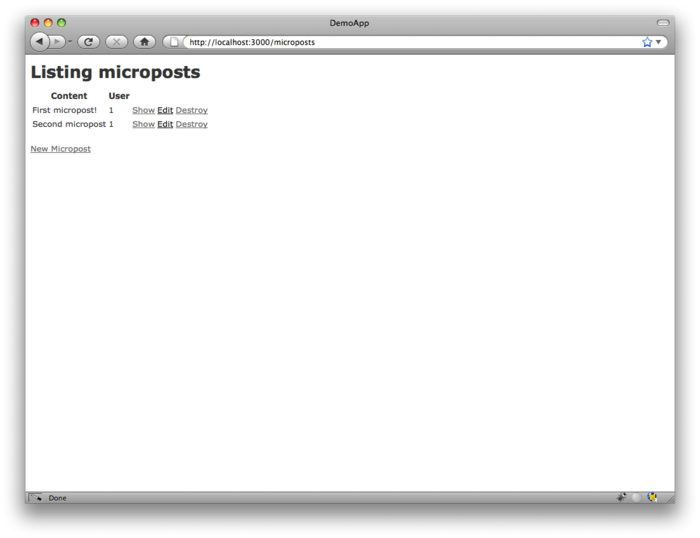
图2.13 Microposts的index页面(/microposts)
2.3.2 给微博真正的“微”
任何敢叫微博的帖子要对得起他的称呼就要意味着要
限制他的长度。要实现这个约束条件在Rails中是非常容易――使用模型验证(validations of rails)。我们可以使用length这个验证条件来限制微博的最大长度为140个字符(学习 Twitter)。
你需要用你的IDE或者文本编辑器打开app/models/micropost.rb填入如代码2.9所示的代码(这个验证的使用是rails3的特性,如果你之前有使用Rails2.3.X
版本,你可以对比一下“validates_length_of”的用法)。
代码2.9 约束微博最大字符长度为140。
app/models/micropost.rb
class Micropost < ActiveRecord::Base
  validates :content, :length => { :maximum => 140 }
end
代码2.9看起来很神秘,不要紧我们将在6.2节中学习更多的验证,但是如果我们回到New页面然后输入超过140个字符的微博就会
发现他的影响已经出来了;Rails会渲染
错误的信息并提示微博的内容过长(我们将在第8.2.3中学习更多的错误。)。

图2.14:创建微博失败的错误信息
2.3.3 一个user可以有多条微博
在两个不同的数据模型中创建关系是Rails最强大的功能之一。这里,用户模型中,每一个用户都可以多条的微博信息,我们可以如代码2.10和2.11那样更新User和Microposts模型的代码;
代码 2.10. 一个user可以有多条微博信息microposts
app/models/user.rb
class User < ActiveRecord::Base
  has_many :microposts
end
代码 2.11 每一条微博信息都是属于某一个用户的
app/models/micropost.rb
class Micropost < ActiveRecord::Base
  belongs_to :user

  validates :content, :length => { :maximum => 140 }
end
我们可以想象以上的关系就如图2.15所示。因为microposts表中有user_id的字段,Rails(使用Active Record)可以猜测出微博信息microposts和用户的关系

图 2.15: 微博信息microposts和用户users之间的关系
在第11,12章中,我们将用这2者间的关系来显示所有用户的microposts信息和构建一个和Twitter类似的微博提要(microposts feed)。现在我们通过Rails的控制台(console)来验证user和microposts之间的关系,控制台是一个非常有用的工,他可以使我们和Rails程序之间进行交互。我们先从命令行输入“rails console”进入控制台,然后使用User.first从数据库检索出第一个user(将 结果赋值给变量first_user);
$ rails console
>> first_user = User.first
=> #<User id: 1, name: "Michael Hartl", email: "michael@example.org",
created_at: "2010-04-03 02:01:31", updated_at: "2010-04-03 02:01:31">
>> first_user.microposts
=> [#<Micropost id: 1, content: "First micropost!", user_id: 1, created_at:
"2010-04-03 02:37:37", updated_at: "2010-04-03 02:37:37">, #<Micropost id: 2,
content: "Second micropost", user_id: 1, created_at: "2010-04-03 02:38:54",
updated_at: "2010-04-03 02:38:54">]
这样我们通过first_name.microposts获得了用户的微博信息:运行这个代码,Active Record 会自动返回所有user_id等于first_name的id(这里是1)。
我们将在11,12章中学习ActiveRecord的更多关联结构。
2.3.4 继承的层次结构
我们结束关于演示程序的讨论,我们花点时间,简短的介绍一下Rails中控制器类和模型类的继承问题。这个介绍只有在你有面向对象
编程经验的时候才会有较多的
意义。如过你还没学习OOP,大可以跳过这一节,特别是,你对类(在第4.4节中讨论)很不了解的时候,我建议在以后的时间跳回来看这一节。
我们先从模型的继承结构开始。对比代码2.12和代码2.13,我们可以看到,User和Micropost两个模型都从ActiveRecord::Base类继承(通过尖括号“<”)。
ActiveRecord::Base类是ActiveRecord提供的模型的基类。图2.16总结了这种关系;正式由于这种继承使我们的模型可以喝数据库交互,也可以将
数据表的字段当成Ruby的属性对待,等等特性。
代码 2.12 继承的User类
app/models/user.rb
class User < ActiveRecord::Base
  .
  .
  .
end
代码 2.13 继承的Micropost类
app/models/micropost.rb
class Micropost < ActiveRecord::Base
  .
  .
  .
end
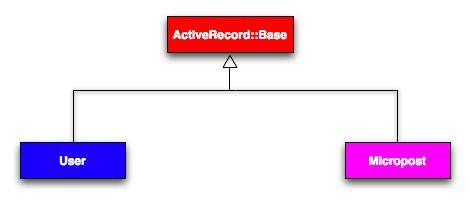
图 2.16: User和Micropost模型的继承层次结构.
控制器继承的层次结构较复杂一点。对比代码2.14和代码2.15,我们可以看到两个控制器都从ApplicationController。从代码2.16中可以看到ApplicationController自己继承自ApplicationController::base;这个是Rails的Acton Pack 库提供给控制器的基类,类之间的关系如图2.17所示。
代码 2.14. UsersController继承自ApplicationController.
app/controllers/users_controller.rb
class UsersController < ApplicationController
  .
  .
  .
end
代码 2.15. MicropostsController 继承自ApplicationController.
app/controllers/microposts_controller.rb
class MicropostsController < ApplicationController
  .
  .
  .
end
代码 2.16. ApplicationController继承自ActionController::Base
app/controllers/application_controller.rb
class ApplicationController < ActionController::Base
  .
  .
  .
end

图 2.17: Users和Microposts控制器的继承结构.
就和模型的继承一样,因为最终都继承自 ActionController::Base ,Users和Microposts的控制都获得大量的功能,比如操作模型对象,过滤收到的请求和渲染HTML页面。因为所有的控制都继承自ApplicationController,所以所有定义在Application Controller 里面的规则都会被自动的运用到所有的方法(action)中去;例如在8.2.4节中我们将看到如何在Application controller中定义一个允许我们从所有的Rails 日志文件中过滤掉密码的规则,这样可以避免一些
安全隐患。
2.3.5 部署演示程序
我们完成了Microposts资源,现在正是我们把他push到GitHub库的时候;
$ git add .
$ git commit -a -m "Done with the demo app"
$ git push
你也可以把演示程序部署到Heroku:
$ heroku create
$ git push heroku master
$ heroku rake db:migrate
(如果上面的没有效果,你可以看看前面代码1.8,或许对你有帮助。)
请注意这里在heroku运行数据库迁移的最后一行代码,这是只是在heroku上创建user/micropost的数据模型。如果你希望吧数据也上传,你可以使用 data up命令。前提是你有taps这个gem:
$ [sudo] gem install taps
$ heroku db:push
2.4 总结
现在我们站在一个Rails 程序30000英尺远的地方观察他,这一章中按这个方法开发的演示程序有一些优势和一些主机缺点(不明白什么意思, a host of weaknesses。)
优势
- High-level overview of Rails
高水平的Rails概述
- Introduction to MVC
介绍了MVC
- First taste of the REST architecture
第一次尝试REST架构
- Beginning data modeling
开始数据建模
- A live, database-backed web application in production
制作了一个在线的数据库支持的Web程序
弱点
- No custom layout or styling
没有布局或者样式
- No static pages (like “Home” or “About”)
没有静态页面,比如首页,关于等
- No user passwords
用户没有密码
- No user images
用户没有图片
- No signing in
没有登录
- No security
不安全
- No automatic user/micropost association
没有自动关联user/micropost
- No notion of “following” or “followed”
没有 “following” or “followed”的概念.
- No micropost feed
没有微博提要
- No test-driven development
没有测试驱动
- No real understanding
还没弄明白
The rest of this tutorial is dedicated to building on the strengths and eliminating the weaknesses.
本教程的剩下部分致力于建立这种优势,和消除这些缺点。
========================++++++++++第二章结束了,下面章节后面一些提示,有兴趣的看看++++++++++++++==================
- I urge you not to look too closely at the generated code; at this stage, it will only serve to confuse you. ↑
- Recall that the rails command generates a default .gitignore file, but depending on your system you may find the augmented file from Listing 1.5 to be more convenient. ↑
- When modeling longer posts, such as those for a normal (non-micro) blog, you should use the text type in place of string. ↑
- The name of the scaffold follows the convention of models, which are singular, rather than resources and controllers, which are plural. Thus, we have User instead Users. ↑
- The user id is needed as the primary key in the database. ↑
- Since the http://localhost:3000 part of the address is implicit whenever we are developing locally, I’ll usually omit it from now on. ↑
- Some references indicate that the view returns the HTML directly to the browser (via a web server such as Apache or Nginx). Regardless of the implementation details, I prefer to think of the controller as a central hub through which all the application’s information flows. ↑
- The strange notation :users is a symbol, which we’ll learn about in Section 4.3.3. ↑
- The scaffold code is ugly and confusing, so I’ve suppressed it. ↑
- Remember, you aren’t supposed to understand this code right now. It is shown only for purposes of illustration. ↑
- As with the User scaffold, the scaffold generator for microposts follows the singular convention of Rails models; thus, we have generate Micropost. ↑
- The scaffold code may have extra newlines compared to Listing 11.21; this is not a cause for concern, as Ruby ignores extra newlines. ↑
- Your console prompt will probably be something like ruby-1.9.2-head >, but I’ll use >> so that the prompt isn’t tied to a specific Ruby version. ↑
- Ordinarily, you should make smaller, more frequent commits, but for the purposes of this chapter a single big commit at the end is just fine. ↑
- If you deployed to Heroku in Section 2.3.5. ↑