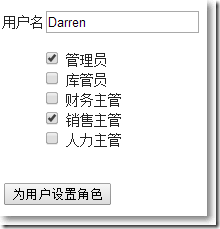
比如,当为一个用户设置角色的时候,角色通常以CheckBoxList的形式呈现。用户和角色是多对多关系:
using System.Collections.Generic;
using System.ComponentModel.DataAnnotations;

namespace MvcApplication2.Models
{
    public class User
    {
        public int Id { get; set; }

        [Display(Name = "用户名")]
        public string Name { get; set; }

        public IList<Role> Roles { get; set; }
    }
}

using System.Collections.Generic;
using System.ComponentModel.DataAnnotations;

namespace MvcApplication2.Models
{
    public class Role
    {
        public int Id { get; set; }

        [Display(Name = "角色名")]
        public string Name { get; set; }

        public IList<User> Users { get; set; }
    }
}
在界面中包括:用户的信息,所有角色,当前选中角色的Id。所以,与为用户设置角色界面对应的View Model大致这样:
using System.Collections.Generic;

namespace MvcApplication2.Models
{
    public class UserVm
    {
        public User User { get; set; }
        public List<Role> AllRoles { get; set; }
        public List<Role> UserRoles { get; set; }
        public int[] SelectedRoleIds { get; set; }
    }
}
HomeController中:
using System.Collections.Generic;
using System.Linq;
using System.Web.Mvc;
using MvcApplication2.Models;

namespace MvcApplication2.Controllers
{
    public class HomeController : Controller
    {
        /// <summary>
        /// 为用户设置初始角色Id
        /// </summary>
        /// <returns></returns>
        public ActionResult Index()
        {
            UserVm userVm = new UserVm();
            userVm.User = new User() {Id = 1, Name = "Darren"};
            userVm.AllRoles = GetAllRoles();
            userVm.SelectedRoleIds = new []{1, 4};

            List<Role> currentUserRoles = new List<Role>();
            foreach (var item in userVm.SelectedRoleIds)
            {
                var temp = GetAllRoles().Where(u => u.Id == item).FirstOrDefault();
                currentUserRoles.Add(temp);
            }
            userVm.UserRoles = currentUserRoles;
            return View(userVm);
        }

        /// <summary>
        /// 根据前端视图选择的角色Id,给UserVm的UserRoles属性重新赋值
        /// </summary>
        /// <param name="userVm"></param>
        /// <returns></returns>
        [HttpPost]
        public ActionResult Index(UserVm userVm)
        {
            userVm.AllRoles = GetAllRoles();

            List<Role> newUserRoles = new List<Role>();
            foreach (var item in userVm.SelectedRoleIds)
            {
                var temp = GetAllRoles().Where(u => u.Id == item).FirstOrDefault();
                newUserRoles.Add(temp);
            }
            userVm.UserRoles = newUserRoles;
            return View(userVm);
        }

        //获取所有的角色
        private List<Role> GetAllRoles()
        {
            return new List<Role>()
            {
                new Role(){Id = 1, Name = "管理员"},
                new Role(){Id = 2, Name = "库管员"},
                new Role(){Id = 3, Name = "财务主管"},
                new Role(){Id = 4, Name = "销售主管"},
                new Role(){Id = 5, Name = "人力主管"}
            };
        }
    }
}
方法一:通过在视图页编码的方式
@using MvcCheckBoxList.Model
@model MvcApplication2.Models.UserVm

@{
    ViewBag.Title = "Index";
    Layout = "~/Views/Shared/_Layout.cshtml";
}

@using (Html.BeginForm())
{
    @Html.HiddenFor(m => m.User.Id)

    <br/>
    @Html.LabelFor(m => m.User.Name)
    @Html.EditorFor(m => m.User.Name)
    @Html.ValidationMessageFor(m => m.User.Name)
    <br/>
    <ul style="list-style:none;">
        @foreach (var a in Model.AllRoles)
        {
            <li>
                @if (Model.SelectedRoleIds.Contains(a.Id))
                {
                    <input type="checkbox" name="SelectedRoleIds" value="@a.Id" id="@a.Id" checked="checked"/>
                    <label for="@a.Id">@a.Name</label>
                }
                else
                {
                    <input type="checkbox" name="SelectedRoleIds" value="@a.Id" id="@a.Id" />
                    <label for="@a.Id">@a.Name</label>
                }
            </li>
        }
    </ul>
    <br/>
    <input type="submit" value="为用户设置角色"/>
}

@section scripts
{
    @Scripts.Render("~/bundles/jqueryval")
}
效果如图:

方法二:通过NuGet的MvcCheckBoxList扩展
→工具--库程序包管理器--程序包管理器控制台
→install-package MvcCheckBoxList
@using MvcCheckBoxList.Model
@model MvcApplication2.Models.UserVm

@{
    ViewBag.Title = "Index";
    Layout = "~/Views/Shared/_Layout.cshtml";
}

@using (Html.BeginForm())
{
    @Html.HiddenFor(m => m.User.Id)

    <br/>
    @Html.LabelFor(m => m.User.Name)
    @Html.EditorFor(m => m.User.Name)
    @Html.ValidationMessageFor(m => m.User.Name)
    <br/>
    @Html.CheckBoxListFor(m => m.SelectedRoleIds,
                            m => m.AllRoles, //所有角色
                            r => r.Id, //value值
                            r => r.Name, //显示值
                            r => r.UserRoles, //用户当前角色
                            Position.Horizontal //CheckboxList排列方向
                          )
    <br/>
    <input type="submit" value="为用户设置角色"/>
}

@section scripts
{
    @Scripts.Render("~/bundles/jqueryval")
}
效果如图:

方法三:通过自定义扩展方法
MVC扩展生成CheckBoxList并水平排列
MVC生成CheckBoxList并对其验证