Windows 8.1 和 WinJS 引入了以下新控件和功能,分别是:AppBarCommand、BackButton、Hub、ItemContainer、NavBar、Repeater、WebView。
本篇我们先来介绍 AppBarCommand、BackButton、Hub、ItemContainer,其余三种放在下一篇中介绍。
1. AppBarCommand
Windows 8.1 加入了AppBarCommand 控件来创建自定义应用栏命令。AppBarCommand可以是这几种类型:button、toggle、flyout、separator 和 content。我们来看一个例子:
<body>
    <div id="exampleFlyout" data-win-control="WinJS.UI.Flyout" aria-label="{Example flyout}">
        <div>This is an example AppBarCommand of type 'flyout'.</div>
    </div>
    <div id="appBar" data-win-control="WinJS.UI.AppBar" data-win-options="{placement:'bottom'}">
        <div data-win-control="WinJS.UI.AppBarCommand"
             data-win-options="{ id: 'list', type: 'content', label:'List', section: 'selection'}">
            <select class="options">
                <option>Option1</option>
                <option>Option2</option>
                <option>Option3</option>
                <option>Option4</option>
            </select>
        </div>
        <div data-win-control="WinJS.UI.AppBarCommand"
             data-win-options="{ id: 'textfield', type: 'content', label:'Text field', section: 'selection' }">
            <input type="text" value="Text" />
        </div>
        <button data-win-control="WinJS.UI.AppBarCommand"
                data-win-options="{id:'flyoutButton', type:'flyout', label:'Flyout', icon:'document', section: 'selection',
                flyout:select('#exampleFlyout')}"/>
        <button data-win-control="WinJS.UI.AppBarCommand"
                data-win-options="{id:'cmdToggle', type:'toggle', label:'Toggle', icon:'video', section:'global', tooltip:'Toggle'}"/>
        <hr data-win-control="WinJS.UI.AppBarCommand"
            data-win-options="{id:'separator', type:'separator', section:'global'}" />
        <button data-win-control="WinJS.UI.AppBarCommand"
                data-win-options="{id:'helpButton', type: 'button', label:'Help', tooltip:'Help', icon:'help', section:'global'}"/>
    </div>
</body>


在这个例子中,我们演示了在页面底部的AppBar中 button、toggle 等五种类型的AppBarCommand。AppBar 中的 AppBarCommand 之间支持键盘操作,比如Tab, Enter, 箭头,Home 和 End 键。
另外应用缩小到半屏宽后,文本标签不会再显示。这个XAML中的特性是相似的。
2. BackButton
顾名思义,BackButton 可以简单的在应用中添加后退导航功能,BackButton 会自动检查导航堆栈,来决定是否让用户后退。如果没有后退导航的内容,按钮会自动禁用。按钮会自动调用WinJS.Navigation.back函数来完成导航动作,无需另写代码。来看看代码写法:
<button data-win-control="WinJS.UI.BackButton" ></button>

3. Hub
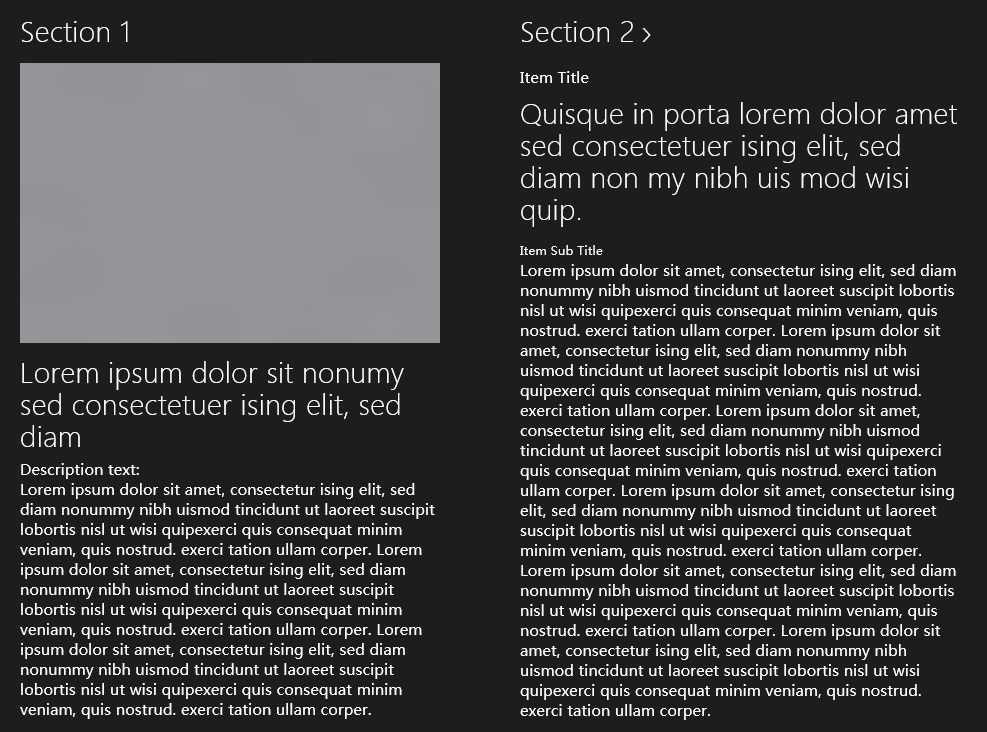
Windows 8.1 在XAML 和WinJS 中加入了Hub,也就是中心控件。它可以帮我们更轻松的创建中心页,例如应用商店的首页就是一个中心页。Hub控件可以包含多个HubSection对象,每个HubSection可以包含内容和标题。标题可以选择是否隐藏 > 图标,显示时,标题可以交互。来看看例子:
    <div class="hub" data-win-control="WinJS.UI.Hub">
        <div class="section1" data-win-control="WinJS.UI.HubSection" data-win-options="{ isHeaderStatic: true }" data-win-res="{ winControl: {'header': 'Section1'} }">
            <img src="/images/gray.png" width="420" height="280" />
            <div class="subtext win-type-x-large" data-win-res="{ textContent: 'Section1Subtext' }"></div>
            <div class="win-type-medium" data-win-res="{ textContent: 'DescriptionText' }"></div>
            <div class="win-type-small">
                <span data-win-res="{ textContent: 'Section1Description' }"></span>
                <span data-win-res="{ textContent: 'Section1Description' }"></span>
                <span data-win-res="{ textContent: 'Section1Description' }"></span>
            </div>
        </div>

        <div class="section2" data-win-control="WinJS.UI.HubSection" data-win-res="{ winControl: {'header': 'Section2'} }">
            <div class="item-title win-type-medium" data-win-res="{ textContent: 'Section2ItemTitle',  }"></div>
            <div class="article-header win-type-x-large" data-win-res="{ textContent: 'Section2Subtext' }"></div>
            <div class="win-type-xx-small" data-win-res="{ textContent: 'Section2ItemSubTitle' }"></div>
            <div class="win-type-small">
                <span data-win-res="{ textContent: 'Section2Description' }"></span>
                <span data-win-res="{ textContent: 'Section2Description' }"></span>
                <span data-win-res="{ textContent: 'Section2Description' }"></span>
                <span data-win-res="{ textContent: 'Section2Description' }"></span>
                <span data-win-res="{ textContent: 'Section2Description' }"></span>
                <span data-win-res="{ textContent: 'Section2Description' }"></span>
            </div>
        </div>
    </div>

4. ItemContainer
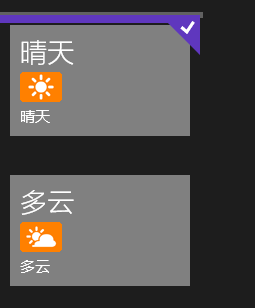
ItemContainer 可以为元素提供pressed,swiped 和 dragged 功能,把我们需要的元素加入到ItemContainer 中即可。例如我们需要显示元素,又不需要用到ListView 中全部功能时,就可以选择ItemContainer控件。其中tapBehavior 属性设置为toggleSelect 时,对象可以被选择。设置为none,并且selectionDisabled 设置为 true 时,元素不能被选择。我们来看一个简单的例子:
<div style="margin: 150px 10px 20px 150px; width: 200px;" id="item1"
            data-win-control="WinJS.UI.ItemContainer"
            data-win-options="{tapBehavior: 'toggleSelect'}">
        <div style="margin: 10px; padding: 10px; background-color: gray">
            <div class="win-type-x-large"
                    style="margin-bottom: 5px;">
                晴天
            </div>
            <img src="/images/d00.gif">
            <div>晴天</div>
        </div>
    </div>
    <div style="margin: 250px 10px 150px 150px; width: 200px;" id="item2"
            data-win-control="WinJS.UI.ItemContainer"
            data-win-options="{tapBehavior: 'none', selectionDisabled: 'true'}">
        <div style="margin: 10px; padding: 10px; background-color: gray;">
            <div class="win-type-x-large"
                    style="margin-bottom: 5px;">
                多云
            </div>
            <img src="/images/d01.gif">
            <div>多云</div>
        </div>
    </div>

这里我们并没有对css做调整,主要为了演示第一个元素是可以被选择的,而第二个元素则没有选中状态。
到这里我们就把 AppBarCommand、BackButton、Hub、ItemContainer 四种控件介绍完了,下一篇会介绍剩余三种控件,谢谢。