class="FocusMe"> 简介
单元测试关注的是验证一个模块或一段代码的执行效果是否和设计或预期一样。有些开发人员认为,编写测试用例浪费时间而宁愿去编写新的模块。然而,在处理大型应用程序时,单元测试实际上会节省时间;它能帮助您跟踪问题并安全地更新代码。
常用缩略语
DOM:文档对象模型
HTML:超文本标记语言
JSTD:JSTestDriver
YUI:Yahoo! User Interface
在过去,只对服务器端语言进行单元测试。但前端组件越来越复杂,使得编写 JavaScript 代码测试用例的需求日益提高。如果您不经常编写客户端脚本的测试,学习进度可能非常难。测试用户界面可能需要在思路上做一些调整。(有些程序开发人员一时半会还不能相信 JavaScript 是合适的编程语言。)
在本文中,您将学习如何使用 QUnit、YUI Test 和 JSTestDriver 对 JavaScript 进行单元测试。
下载 本文的源代码。
JavaScript 单元测试
为了演示 JavaScript 测试,这一节将分析 JavaScript 中一个基本函数测试用例。清单 1 显示了要测试的函数:将 3(作为一个数)添加到传递的变量中。
清单 1. 源代码 (example1/script.js)
1 2 3 4javascript spaces">
function addThreeToNumber(el){
return el + 3;
}
清单 2 在自执行的函数中包含了测试用例。
清单 2.测试用例 (example1/test.js)
1 2 3 4 5 6 7 8 9 10 11
(function testAddThreeToNumber (){
var a = 5,
valueExpected= 8;
if (addThreeToNumber (a) === valueExpected) {
console.log("Passed!");
} else {
console.log("Failed!");
}
}());
将 5 传递给测试的函数之后,测试检查返回值是 8。如果测试成功,就会在一个现有浏览器的控制台中打印出 Passed!;否则就会出现 Failed!。如果要运行测试,需要按照以下步骤进行操作:
1. 将两个脚本文件导入作为测试运行程序的 HTML 页面中,如清单 3 所示。
2. 在浏览器中打开页面。
清单 3. HTML 页面 (example1/runner.html)
1 2 3 4 5 6 7 8 9 10 11
<!DOCTYPE html>
<html>
<head>
<meta http-equiv="Content-type" content="text/html; charset=utf-8">
<title>Example 1</title>
<script type="text/javascript" src="js/script.js"></script>
<script type="text/javascript" src="js/test.js"></script>
</head>
<body></body>
</html>
您可以不使用浏览器控制台,而是将结果打印在页面或由 alert() 方法生成的弹出窗口中。
断言是测试用例中的核心元素,用来验证某一条件是否满足。例如,在 清单 2 中,addThreeToNumber (a) === valueExpected 就是一个断言。
如果您拥有很多用例并带有很多断言,那么使用框架就会方便很多。下面的内容将会重点介绍一些最流行的 JavaScript 单元测试框架:QUnit、YUI Test 和 JSTestDriver。
QUnit 入门
QUnit 是与 JUnit(Java 编程)类似的单元测试框架,jQuery 团队用它来对 jQuery 库进行单元测试。要使用 QUnit,需要按照以下方法:
1. 下载 qunit.css 文件和 qunit.js 文件(参阅 参考资料)。
2. 创建一个 HTML 页面,其中包含导入刚下载的 CSS 和 JavaScript 文件的特定标签。
清单 4 显示了适用于 QUnit 的标准的 HTML 运行程序。
清单 4. HTML 运行程序 (qunit/runner.html)
1 2 3 4 5 6 7 8 9 10 11 12 13 14 15 16 17 18
<!DOCTYPE html>
<html>
<head>
<meta charset="UTF-8" />
<title>QUnit Test Suite</title>
<link rel="stylesheet" href="css/qunit.css" type="text/css" media="screen">
<script type="text/javascript" src="js/lib/qunit.js"></script>
</head>
<body>
<h1 id="qunit-header">QUnit Test Suite</h1>
<h2 id="qunit-banner"></h2>
<div id="qunit-testrunner-toolbar"></div>
<h2 id="qunit-userAgent"></h2>
<ol id="qunit-tests"></ol>
<div id="qunit-fixture">test markup</div>
</body>
</html>
假设您拥有两个函数分别负责将温度从摄氏转换为华氏,并转换回来。清单 5 显示了执行此转换的脚本。
清单 5. 转换 (qunit/js/script.js)
1 2 3 4 5 6 7 8 9 10
function convertFromCelsiusToFahrenheit(c){
var f = c * (9/5) + 32;
return f;
}
function convertFromFahrenheitToCelsius(f){
var c = (f - 32) * (5/9);
return c;
}
清单 6 显示了各自的测试用例。
清单 6. 测试用例 (qunit/js/test.js)
1 2 3 4 5 6 7 8 9 10 11 12 13 14 15 16 17 18
module ("Temperature conversion")
test("conversion to F", function(){
var actual1 = convertFromCelsiusToFahrenheit(20);
equal(actual1, 68, ?Value not correct?);
var actual2 = convertFromCelsiusToFahrenheit(30);
equal(actual2, 86, ?Value not correct?);
})
test("conversion to C", function(){
var actual1 = convertFromFahrenheitToCelsius(68);
equal(actual1, 20, ?Value not correct?);
var actual2 = convertFromFahrenheitToCelsius(86);
equal(actual2, 30, ?Value not correct?);
})
QUnit 中的测试用例由 test() 方法定义。逻辑是包含在传入函数的第二个参数中。在清单 6 中,两个测试分别名为 conversion to F和 conversion to C。每个测试包含两个断言。该测试中的断言使用了 equal() 方法。equal() 函数可以将预期值与测试函数的实际值相比较。equal() 方法中的第三个参数是错误情况下显示的消息。
还可以通过 module() 函数将测试组织到模块中。在清单 6 中,Temperature conversion 模块含有这两个测试。
如果要运行测试:
1. 在 HTML 运行程序中包含源代码和测试文件,如清单 7 所示。
2. 在浏览器中打开页面。
清单 7. 在运行程序中包含 script.js 和 test.js
1 2 3 4
...<script type="text/javascript" src="js/script.js"></script>
<script type="text/javascript" src="js/test.js"></script>
...
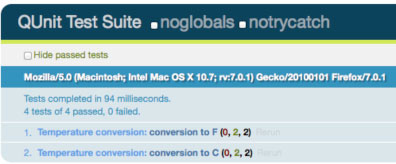
图 1 显示了 QUnit 如何在浏览器 (Firefox) 中显示结果。
图 1. QUnit 结果

清单 6 中的断言使用了 equal() 方法,但它不是 QUnit 提供的惟一断言。QUnit 提供的其他断言包括 ok() 或 strictEqual()。清单 8 显示了正在执行的方法。
清单 8. 更多的断言
1 2 3 4 5 6 7 8
module ("Other assertion");
test("assertions", function(){
ok(true);
ok(3);
strictEqual("c", "c");
equal (3, "3");
});
ok() 函数检查第一个参数为 true;strictEqual() 验证第一个参数严格等于第二个参数。在这些代码背后,strictEqual() 使用了=== 运算符,equal() 使用了 == 运算符。
如果测试失败,QUnit 还提供了有用的信息。将清单 8 中的代码改成清单 9 中的代码,让上一次断言执行失败。
清单 9. 上一次断言出现的错误
1 2 3 4 5 6 7 8
module ("Other assertion");
test("assertions", function(){
ok(true);
ok(3);
strictEqual("c", "c");
strictEqual (3, "3");
});
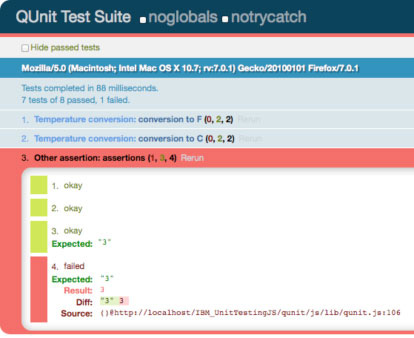
图 2 显示了 QUnit 执行清单 9 代码所返回的结果。
图 2. QUnit 结果:上次测试失败

结果非常详细,而且很容易查到上次断言的预期值与实际值有什么不同。
QUnit 另一项特性能让您在模块中的所有测试执行之前或之后执行命令。module() 函数接受 setup() 和 teardown() 回调作为第二个参数。使用 setup() 函数更新 清单 6 ,如清单 10 所示。
清单 10. setup() (qunit/js/test-setup.js)
1 2 3 4 5 6 7 8 9 10 11 12 13 14 15 16 17 18 19 20 21 22 23module ("Temperature conversion", {
setup : function() {
this.celsius1 = 20;
this.celsius2 = 30;
this.fahrenheit1 = 68;
this.fahrenheit2 = 86;
}
});
test("conversion to F", function(){
var actual1 = convertFromCelsiusToFahrenheit(this.celsius1);
equal(actual1, this.fahrenheit1);
var actual2 = convertFromCelsiusToFahrenheit(this.celsius2);
equal(actual2, this.fahrenheit2);
});
test("conversion to C", function(){
var actual1 = convertFromFahrenheitToCelsius(this.fahrenheit1);
equal(actual1, this.celsius1);
var actual2 = convertFromFahrenheitToCelsius(this.fahrenheit2);
equal(actual2, this.celsius2);
});
该示例移动了设置部分的断言所使用的值,以避免在测试的逻辑中使用这些值。
QUnit 还通过 asyncTest() 函数提供对异步测试的支持,如果您使用 Asynchronous JavaScript and XML (Ajax),这是非常有用的特性。在这样的环境中,expect() 函数可以让你轻松地验证测试中运行的断言数量。
YUI Test:独立的单元测试模块
YUI Test 是 YUI 库(Yahoo!)的一个组件,是一个可扩展而完整的单元测试框架。如果要使用 YUI Test,需要:
1. 将 YUI 导入 HTML 运行程序,如下所示。
1<script src="http://yui.yahooapis.com/3.4.1/build/yui/yui-min.js"></script>
如以上代码所示,此样例使用了 YUI Test 第 3 版本。
2. 在测试脚本文件中,实例化 YUI 函数。加载所需的模块,test 和 console,如清单 11 所示。
清单 11.下载 test 和 console YUI 模块
1 2 3YUI().use("test", "console", function (Y) {
// Test cases go here
});
test 模块显然是用于测试的。console 模块并不是强制性的,但本示例将用它来打印结果。测试用例将会进入回调中,并以全局的 Y实例作为参数。
YUI Test 使用 Y.Test.Case() 构造函数实例化新测试用例,使用 Y.Test.Suite() 构造函数来实例化测试套件。测试套件与 JUnit 类似,包含若干个测试用例。可以使用 add() 方法将测试用例添加到测试套件中。
我们使用 YUI test 重新测试 清单 5 中的源代码。清单 12 显示了如何创建测试用的套件和测试用例。
清单 12. 测试套件和用例
1 2 3 4 5 6 7 8 9YUI().use("test", "console", function (Y) {
var suite = new Y.Test.Suite("Temperature conversion suite");
//add a test case
suite.add(new Y.Test.Case({
name:"Temperature conversion?
));
});
清单 12 生成了一个名为 Temperature conversion suite 的套件和一个名为 Temperature conversion 的测试用例。现在,可以将测试方法写入对象文本中,作为参数传递给 Y.Test.Case 构造函数,如清单 13 所示。
清单 13. 测试用例与测试方法
1 2 3 4 5 6 7 8 9 10 11 12 13 14 15 16 17 18 19 20 21 22 23 24 25 26 27suite.add(new Y.Test.Case({
name:"Temperature conversion",
setUp : function () {
this.celsius1 = 20;
this.celsius2 = 30;
this.fahrenheit1 = 68;
this.fahrenheit2 = 86;
},
testConversionCtoF: function () {
Y.Assert.areEqual(this.fahrenheit1,
convertFromCelsiusToFahrenheit(this.celsius1));
Y.Assert.areEqual(this.fahrenheit2,
convertFromCelsiusToFahrenheit(this.celsius2));
},
testConversionFtoC: function () {
Y.Assert.areEqual(this.celsius1,
convertFromFahrenheitToCelsius(this.fahrenheit1));
Y.Assert.areEqual(this.celsius2,
convertFromFahrenheitToCelsius(this.fahrenheit2));
}
}));
您可能注意到,在清单 13 中:
1. 可使用 setUp() 方法。YUI Test 在测试用例和测试套件层提供了 setUp() 和 tearDown() 方法。
2. 测试方法名以 test 单词开头,它们包含断言。
3. 本示例使用 Y.Assert.areEqual() 断言类型,它与 QUnit 中的 equal() 函数类似。YUI Test 为断言提供了多种方法,如:
1). Y.Assert.areSame(),它类似于 QUnit 中的 strictEqual()。
2). 数据类型断言(Y.Assert.isArray()、Y.Assert.isBoolean()、Y.Assert.isNumber() 等等)。
3). 特殊值断言(Y.Assert.isFalse()、Y.Assert.isNaN()、Y.Assert.isNull() 等等)。
要启动 YUI 中的测试,需要使用 Y.Test.Runner 对象。还需要将套件或测试用例添加到对象中,然后调用 run() 方法来运行测试。清单 14 显示了如何运行 清单 13 中创建的测试。
清单 14. 运行 YUI test
1 2 3
Y.Test.Runner.add(suite);
Y.Test.Runner.run();
在默认情况下,结果会打印在浏览器的控制台中(如果浏览器支持控制台的话)。更好的方法是使用 Yahoo! Console 组件来打印结果。如果要使用 Yahoo! Console 组件,需要采用 Y.Console 构造函数将控制台绑定到 HTML 运行程序的 DOM 元素中,如清单 15 所示。
清单 15. Yahoo! Console
1 2 3 4 5 6 7 8
var console = new Y.Console({
verbose: true,
newestOnTop: false,
width:"600px"
});
console.render('#testLogger');
清单 15 显示了如何使用几个参数配置控制台。该控制台会在 DOM 元素内部呈现,其 id 为 testLogger。
需要更新 HTML 运行程序。添加该控制台所引用的 DOM 元素,如清单 16 所示。
1 2 3 4
<body>
<div id="testLogger"></div>
</body>
本例为 <body> 设置了一个类,名为 yui3-skin-sam。该类负责定义控制台的皮肤。
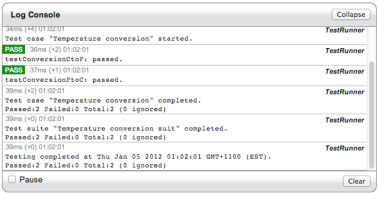
图 3 显示了运行测试之后的控制台。
图 3. YUI Test 结果

使用 JSTestDriver 轻松测试
通过使用功能强大的 JSTestDriver (JSTD) 工具,您能够在多个浏览器中从命令行运行 JavaScript。JSTD 带有一个 JAR 文件,它可以让您启动服务器、捕获一或多个浏览器并在这些浏览器中运行测试。因为拥有上述的两个框架,您不需要 HTML 运行程序,但您需要一个配置文件。图 17 显示了配置文件。
清单 17. 配置文件 (jsTestDriver.conf)
1 2 3 4 5 6
server: http://localhost:4224
load:
- js/src/*.js
test:
- js/test/*.js
该配置文件是用 YAML 编写的,这是一种很好的配置文件格式。它包含了要启动的服务器以及源代码和测试文件的位置信息。
要使用 JSTD 来执行测试:
1. 启动测试服务器。从命令行中,进入到保存 jsTestDriver.jar 的文件夹,并执行以下命令:
1java -jar JsTestDriver-1.3.3d.jar -port 4224
清单 17 中指定的端口应该与配置文件中指定的一样。在默认情况下,JSTD 会在 JAR 文件所在的同一个目录下查找 jsTestDriver.conf 文件。
2. 在测试中,通过将 URL http://localhost:4224/capture 复制粘贴到测试中的浏览器,在服务器上注册一个或多个浏览器。
测试之前示例中所使用的相同代码(清单 5),但这次使用 JSTD 语法。清单 18 显示了如何转换 清单 10 的 QUnit 和 清单14 的 YUI Test 中的代码。
清单 18. JSTD 测试
1 2 3 4 5 6 7 8 9 10 11 12 13 14 15 16 17 18 19 20
TestCase("Temperature conversion", {
setUp : function () {
this.celsius1 = 20;
this.celsius2 = 30;
this.fahrenheit1 = 68;
this.fahrenheit2 = 86;
},
testConversionCtoF: function () {
assertSame(this.fahrenheit1, convertFromCelsiusToFahrenheit(this.celsius1));
assertSame(this.fahrenheit2, convertFromCelsiusToFahrenheit(this.celsius2));
},
testConversionFtoC: function () {
assertSame(this.celsius1, convertFromFahrenheitToCelsius(this.fahrenheit1));
assertSame(this.celsius2, convertFromFahrenheitToCelsius(this.fahrenheit2));
}
});
清单 18 中的代码与 YUI 版本差别不大。JSTD 使用 TestCase() 函数来定义测试用例。您可以使用内联声明来定义测试方法,如清单 18 所示,或者可以扩展 TestCase 实例的原型。每个测试用例还可以使用 SetUp() 和 tearDown() 方法。
如果要运行测试,运行以下命令:
1java -jar JsTestDriver-1.3.3d.jar --tests all
图 4 显示了终端上的输出结果。
图 4. JSTD 测试的结果

测试会传入之前捕获到的所有浏览器(Chrome 15、Safari 5 和 Firefox 7)。
JSTD 还能与您偏好的连续集成系统很好地集成,成为连续版本的一部分。它还能与 IDE 集成,如 Eclipse(插件)或 TextMate(包)。
结束语
随着现在对 Web 应用程序客户端的关注,对 JavaScript 进行单元测试就显得尤为必要。有很多框架可以帮助您完成此任务,本文介绍了三个最流行的框架:QUnit、YUI Test 和 JSTestDriver。
QUnit 非常简单,很适合初学者的框架。
YUI Test 是个全面的工具,适合熟悉 YUI 库的用户。
JSTestDriver 可在多个浏览器中运行测试。