项目是生成好了,貌似自己还没写一句代码呢,rails把工作全给我做了,这就遇到个问题,他都给我配置了什么东西,我如果需要改一个地方的话,会不会对其他地方有影响从而发生错误呢,相信这是每一个新手都有的疑问,想到这就两眼一抹瞎,不知道怎么办了,怎么才能理清楚到底是怎么回事,我心想,那就看他代码去吧,看能不能把整个项目流程跟着代码走一遍,恩,说干咱就干。
?
1.new
首先我们通过url访问我们的项目,http://localhost:3000/students,这个请求到WEBrick服务器里它会怎么响应呢。不清楚啊,不过咱还是知道他最后是通过路由表找到相应的路径的,那咱就去路由表文件看看吧。Demo5/config/routes.rb
class="ruby">Demo5::Application.routes.draw do
  resources :students

  # The priority is based upon order of creation: first created -> highest priority.
  # See how all your routes lay out with "rake routes".

  # You can have the root of your site routed with "root"
  # root 'welcome#index'

  # Example of regular route:
  #   get 'products/:id' => 'catalog#view'

  # Example of named route that can be invoked with purchase_url(id: product.id)
  #   get 'products/:id/purchase' => 'catalog#purchase', as: :purchase

  # Example resource route (maps HTTP verbs to controller actions automatically):
  #   resources :products

  # Example resource route with options:
  #   resources :products do
  #     member do
  #       get 'short'
  #       post 'toggle'
  #     end
  #
  #     collection do
  #       get 'sold'
  #     end
  #   end

  # Example resource route with sub-resources:
  #   resources :products do
  #     resources :comments, :sales
  #     resource :seller
  #   end

  # Example resource route with more complex sub-resources:
  #   resources :products do
  #     resources :comments
  #     resources :sales do
  #       get 'recent', on: :collection
  #     end
  #   end

  # Example resource route with concerns:
  #   concern :toggleable do
  #     post 'toggle'
  #   end
  #   resources :posts, concerns: :toggleable
  #   resources :photos, concerns: :toggleable

  # Example resource route within a namespace:
  #   namespace :admin do
  #     # Directs /admin/products/* to Admin::ProductsController
  #     # (app/controllers/admin/products_controller.rb)
  #     resources :products
  #   end
end
貌似只给我加了一个resources :students,这个路由它会去找哪个controller,从而响应那个view呢,恩,这是个问题,去看源码去,找controllers目录下有个students_controller,很显然这个请求交给这个controller处理了,Demo5/app/controllers/students_controller.rb,恩,就是他,代码是这样的
class StudentsController < ApplicationController
  before_action :set_student, only: [:show, :edit, :update, :destroy]

  # GET /students
  # GET /students.json
  def index
    @students = Student.all
  end

  # GET /students/1
  # GET /students/1.json
  def show
  end

  # GET /students/new
  def new
    @student = Student.new
  end

  # GET /students/1/edit
  def edit
  end

  # POST /students
  # POST /students.json
  def create
    @student = Student.new(student_params)

    respond_to do |format|
      if @student.save
        format.html { redirect_to @student, notice: 'Student was successfully created.' }
        format.json { render action: 'show', status: :created, location: @student }
      else
        format.html { render action: 'new' }
        format.json { render json: @student.errors, status: :unprocessable_entity }
      end
    end
  end

  # PATCH/PUT /students/1
  # PATCH/PUT /students/1.json
  def update
    respond_to do |format|
      if @student.update(student_params)
        format.html { redirect_to @student, notice: 'Student was successfully updated.' }
        format.json { head :no_content }
      else
        format.html { render action: 'edit' }
        format.json { render json: @student.errors, status: :unprocessable_entity }
      end
    end
  end

  # DELETE /students/1
  # DELETE /students/1.json
  def destroy
    @student.destroy
    respond_to do |format|
      format.html { redirect_to students_url }
      format.json { head :no_content }
    end
  end

  private
    # Use callbacks to share common setup or constraints between actions.
    def set_student
      @student = Student.find(params[:id])
    end

    # Never trust parameters from the scary internet, only allow the white list through.
    def student_params
      params.require(:student).permit(:name, :sex, :age, :phone)
    end
end
?
看到这句
?
# GET /students
  # GET /students.json
  def index
    @students = Student.all
  end
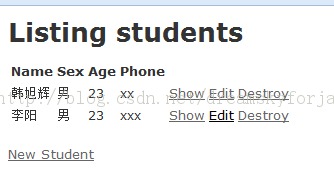
这不就是得到/students请求并作处理的一个action吗,恩,是的,这个action名字叫index,在这里定义一个变量students并初始化,我的理解Student.all是执行了一个查询的请求,把数据库students表中的数据组装成一个个的对象存在变量students里,这里students应该相当于java中的list或是map类型的吧(会是数组吗?)。总之呢,这个controller定义了一个action,用于页面跳转的,一个变量students用于存储数据的,恩,就是这样,好了,请求到这里,下面初始化好students,页面应该跳转到index页面了吧,去看看index里都有什么,Demo5/app/views/students/index.html.erb,这个文件是一个嵌入了ruby代码的html,看看去。
<h1>Listing students</h1>

<table>
  <thead>
    <tr>
      <th>Name</th>
      <th>Sex</th>
      <th>Age</th>
      <th>Phone</th>
      <th></th>
      <th></th>
      <th></th>
    </tr>
  </thead>

  <tbody>
    <% @students.each do |student| %>
      <tr>
        <td><%= student.name %></td>
        <td><%= student.sex %></td>
        <td><%= student.age %></td>
        <td><%= student.phone %></td>
        <td><%= link_to 'Show', student %></td>
        <td><%= link_to 'Edit', edit_student_path(student) %></td>
        <td><%= link_to 'Destroy', student, method: :delete, data: { confirm: 'Are you sure?' } %></td>
      </tr>
    <% end %>
  </tbody>
</table>

<br>

<%= link_to 'New Student', new_student_path %>
?
看这代码得配合着图片才有效果

相信很多人都能看懂代码啥意思了,其实细节地方我也不太懂,不过不影响咱理解他的大概意思。我们看到这个页面对数据有四种操作,增删改查,每个操作具体的交给那个action大家都明白吧,写的还是挺清楚的。下面咱就跟着链接走一遭吧,鼠标放到New Student上 ,我们看到浏览器左下角链接为localhost:3000/students/new,那就是要交给new这个action处理了,在students_controller里找到
 # GET /students/new
  def new
    @student = Student.new
  end
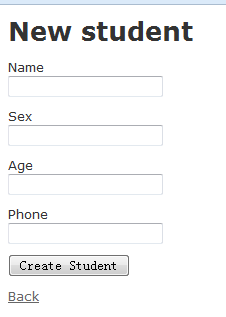
恩,就是你了。在这里我就要说一下了,每个action都有一个相对应的xxx.html.erb,就是这个action将要跳转的页面。这里就是定义一个new的action和定义一个student的变量(应该说是对象吗,不太懂)并初始化(相当于java中的Student student = new Studen()吧),接下来就跳转到new.html.erb页面了,咱也跟着走。

?
看看代码去Demo5/app/views/students/new.html.erb
?
<h1>New student</h1>

<%= render 'form' %>

<%= link_to 'Back', students_path %>
?
这么简单,from就能生成一个表单吗,这个表单在哪呢,恩?view目录下有个视图文件_form.html.erb,去看看
<%= form_for(@student) do |f| %>
  <% if @student.errors.any? %>
    <div id="error_explanation">
      <h2><%= pluralize(@student.errors.count, "error") %> prohibited this student from being saved:</h2>

      <ul>
      <% @student.errors.full_messages.each do |msg| %>
        <li><%= msg %></li>
      <% end %>
      </ul>
    </div>
  <% end %>

  <div class="field">
    <%= f.label :name %><br>
    <%= f.text_field :name %>
  </div>
  <div class="field">
    <%= f.label :sex %><br>
    <%= f.text_field :sex %>
  </div>
  <div class="field">
    <%= f.label :age %><br>
    <%= f.number_field :age %>
  </div>
  <div class="field">
    <%= f.label :phone %><br>
    <%= f.text_field :phone %>
  </div>
  <div class="actions">
    <%= f.submit %>
  </div>
<% end %>
?
这个是根据我们model的字段生成的一个form,上面是错误处理,下面就是各个字段的展示了,最后是一个action按钮,用于提交表单的,跟html挺像的是吧,我们就不研究他了,这个表单可以嵌入到别的视图代码中,不用重复写表单的代码了,这正是ruby的思想,不做重复的工作。继续我们的new student的研究,我们把new student的表单填好后,点击create student 按钮,表单被提交到create的action里了,我们去看看create这个action
 # POST /students
  # POST /students.json
  def create
    @student = Student.new(student_params)

    respond_to do |format|
      if @student.save
        format.html { redirect_to @student, notice: 'Student was successfully created.' }
        format.json { render action: 'show', status: :created, location: @student }
      else
        format.html { render action: 'new' }
        format.json { render json: @student.errors, status: :unprocessable_entity }
      end
    end
  end
?
拿到表单传过来的参数,初始化student,student_params是什么?传过来的参数?怎么接收的呢?看students_controller.rb
private
    # Use callbacks to share common setup or constraints between actions.
    def set_student
      @student = Student.find(params[:id])
    end

    # Never trust parameters from the scary internet, only allow the white list through.
    def student_params
      params.require(:student).permit(:name, :sex, :age, :phone)
    end
?
这个应该相当于java中的set,get方法吧(我是这么理解的,我想应该差不多),set_student是设置student对象的,应该是初始化,注意是通过参数中的id初始化的,从这里我们想到,当我们把鼠标放到链接地址上是,url通常是localhost:3000/students/1或者是localhost:3000/students/1/edit等等,这里的1、2、3。。。应该是student的id,这样才能知道是在操作哪个student,set_student通过id从数据库中找到相应的student数据把他组装成对象(是对象吧,暂时这么理解)赋值给@studnet,@是定义变量用的。注意在students_controller开头的地方有一句
before_action :set_student, only: [:show, :edit, :update, :destroy]
这句话就是说在执行show,edit,update,destroy这些action之前先给我把student对象初始化好,这就是set_studnet存在的意义。
至于student_params的作用就不多说了吧,就像我create student,提交过来的是一个表单信息,我肯定是通过studnet_params把表单里的数据和对象里的字段对应起来,这样才能组装成一个student对象存到数据库中。
我们看到create的action定义里有一个if-else语句,这个就是说create成功我就跳到show的action里,不成功返回到new的action并带回错误信息。
?
2.show
其实show这个请求还是比较简单的,就是通过url请求,到达show的action,我们看到show的action的url为localhost:3000/students/1 这样就把要show那个student定义好了,前面说过了,在show之前要先执行set_student,就是通过url传过来的id从数据库中取得相应的student数据初始化好对象student,这样就能把初始化好的studnet传到view页面进行渲染了。恩,就是这样。
?
3.edit
edit和show差不过,就是多了一步update操作,我们看下update的action定义
 # PATCH/PUT /students/1
  # PATCH/PUT /students/1.json
  def update
    respond_to do |format|
      if @student.update(student_params)
        format.html { redirect_to @student, notice: 'Student was successfully updated.' }
        format.json { head :no_content }
      else
        format.html { render action: 'edit' }
        format.json { render json: @student.errors, status: :unprocessable_entity }
      end
    end
  end
?
if语句是对update操作成功或是失败的处理。成功就重定向到show的页面,失败就跳到edit的action里,并带回错误信息。
?
4.destroy
<td><%= link_to 'Destroy', student, method: :delete, data: { confirm: 'Are you sure?' } %></td>
相信大家都懂得,没啥东西,看action
# DELETE /students/1
  # DELETE /students/1.json
  def destroy
    @student.destroy
    respond_to do |format|
      format.html { redirect_to students_url }
      format.json { head :no_content }
    end
  end
?
@student.destroy是调用destroy方法将数据库中对应的数据删除。成功后重定向到index的action里。
?
到这里,CRUD差不多解释完了,下面该干啥了,目标:
使用devise实现用户的注册、登录、找回密码以及修改密码。找回密码会涉及到mail配置以及发送
点击下载源码: Demo5源码