本文学习下自定义ViewController的切换,从无交互的到交互式切换。
(本文已同步到我的小站:icocoa,欢迎访问。)
UIViewControllerTransitioningDelegate:
用于支持自定义切换或切换交互,定义了一组供animator对象实现的协议,来自定义切换。
可以为动画的三个阶段单独提供animator对象:presenting,dismissing,interacting。
UIViewControllerAnimatedTransitioning:
主要用于定义切换时的动画。这个动画的运行时间是固定的,而且无法进行交互。
UIViewControllerInteractiveTransitioning:
负责交互动画的对象。
该对象是通过加快/减慢动画切换的过程,来响应触发事件或者随时间变化的程序输入。对象也可以提高切换的逆过程来响应变化。
比如iOS7上NavController响应手指滑动来切换viewController
如果要提供交互,那么也需要提供实现UIViewControllerAnimatedTransitioning的对象,这个对象可以就是之前实现UIViewControllerInteractiveTransitioning的对象,也可以不是。
如果不需要(动画按预先设置的进行),则可以自己实现。如果要提供交互,那么也需要实现UIViewControllerAnimatedTransitioning。
上述是API文档中的说明,我们按图索骥,根据说明一步一步来实现一个无交互的切换动画。
为了方便,我在一个viewController A里添加按钮,点击后以present modal的方式跳转到viewController B。B中也放置一个按钮,用来回到A。
为了支持自定义transition,iOS7中UIViewController多了transitioningDelegate的属性。这个delegate需要实现相关的protocol,可以是viewcontroller本身。不过,这样的话,很显然不利于自定义部分的重用。因此我们新建一个类:
@interface ZJTransitionDelegateObj : NSObject<UIViewControllerTransitioningDelegate>

@end
然后实现delegate,UIViewControllerTransitioningDelegate定义了4个protocol,后2个是用于交互时用的,这里我们只需实现前2个。
class="brush:csharp;gutter:true;">- (id <UIViewControllerAnimatedTransitioning>)animationControllerForPresentedController:(UIViewController *)presented presentingController:(UIViewController *)presenting sourceController:(UIViewController *)source;

- (id <UIViewControllerAnimatedTransitioning>)animationControllerForDismissedController:(UIViewController *)dismissed;

- (id <UIViewControllerInteractiveTransitioning>)interactionControllerForPresentation:(id <UIViewControllerAnimatedTransitioning>)animator;

- (id <UIViewControllerInteractiveTransitioning>)interactionControllerForDismissal:(id <UIViewControllerAnimatedTransitioning>)animator;
前2个返回的是实现 UIViewControllerAnimatedTransitioning 协议的对象,这里我们返回self,这样意味着我们的ZJTransitionDelegateObj类还需要实现相应的协议:
// This is used for percent driven interactive transitions, as well as for container controllers that have companion animations that might need to
// synchronize with the main animation.
- (NSTimeInterval)transitionDuration:(id <UIViewControllerContextTransitioning>)transitionContext;
// This method can only  be a nop if the transition is interactive and not a percentDriven interactive transition.
- (void)animateTransition:(id <UIViewControllerContextTransitioning>)transitionContext;


@optional

// This is a convenience and if implemented will be invoked by the system when the transition context's completeTransition: method is invoked.
- (void)animationEnded:(BOOL) transitionCompleted;
根据说明,我们可以看到主要是实现第2个协议。transitionContext是一个实现UIViewControllerContextTransitioning协议的对象,再进一步查看该协议,可以看到一系列方法,具体的就不详细展开,看一下代码:
- (void)animateTransition:(id <UIViewControllerContextTransitioning>)transitionContext;
{
    UIViewController *toViewController = [transitionContext viewControllerForKey:UITransitionContextToViewControllerKey];
    UIView *containView = [transitionContext containerView];
    [containView addSubview:toViewController.view];

    CGRect rect = toViewController.view.frame;
    rect.origin.x = -320;
    rect.origin.y = -rect.size.height;
    toViewController.view.frame = rect;
    [UIView animateKeyframesWithDuration:1.5 delay:0 options:UIViewKeyframeAnimationOptionLayoutSubviews animations:^{
        CGRect frame = rect;
        frame.origin.x = 0;
        frame.origin.y = 0;
        toViewController.view.frame = frame;
    } completion:^(BOOL finished) {


        [transitionContext completeTransition:YES];
    }];

}
内容很简单,这里需要注意的是 [transitionContext completeTransition:YES] 很重要。如果没有使用,系统会不知道当前的transition是否已经结束,这样造成的后果:使app进入某种未知状态,比如presentingViewController能看到新view但是无法和用户交互。关于这一点,Apple把它放置在头文件里说明了,所以我推荐大家遇到问题的时候,不妨先直接查看头文件中的注释说明(xCode中按住command后鼠标点击类名)。
接下来,看一下app,发现present的方式是以对角的方式出现了。如果你不小心点击了ViewCOntroller B的dismiss按钮,发现之前的view也以同样的方式出现了。这是因为我们尚未做present和dismiss的区分。接下来给ZJTransitionDelegateObj增加增加Bool属性
@interface ZJTransitionDelegateObj ()
@property (nonatomic) BOOL isPresent;
@end
并在协议中赋值:
- (id <UIViewControllerAnimatedTransitioning>)animationControllerForPresentedController:(UIViewController *)presented presentingController:(UIViewController *)presenting sourceController:(UIViewController *)source;
{
    self.isPresent = YES;
    return self;
}

- (id <UIViewControllerAnimatedTransitioning>)animationControllerForDismissedController:(UIViewController *)dismissed;
{
    self.isPresent = NO;
    return self;
}
然后修改动画:
- (void)animateTransition:(id <UIViewControllerContextTransitioning>)transitionContext;
{
    UIViewController *toViewController = [transitionContext viewControllerForKey:UITransitionContextToViewControllerKey];
    UIViewController *fromViewController = [transitionContext viewControllerForKey: UITransitionContextFromViewControllerKey];
    UIView *containView = [transitionContext containerView];
    CGRect rect = toViewController.view.frame;
    if (self.isPresent)
    {
        [containView addSubview:toViewController.view];


        rect.origin.x = - rect.size.width;
        rect.origin.y = - rect.size.height;
        toViewController.view.frame = rect;
        [UIView animateKeyframesWithDuration:1.5 delay:0 options:UIViewKeyframeAnimationOptionLayoutSubviews animations:^{
            CGRect frame = rect;

            frame.origin.x = 0;
            frame.origin.y = 0;
            toViewController.view.frame = frame;
        } completion:^(BOOL finished) {


            [transitionContext completeTransition:YES];
        }];

    }
    else
    {

        [containView insertSubview:toViewController.view atIndex:0];
        rect = fromViewController.view.frame;

        [UIView animateKeyframesWithDuration:1.5 delay:0 options:UIViewKeyframeAnimationOptionLayoutSubviews animations:^{
            CGRect frame = rect;

            frame.origin.x = - rect.size.width;
            frame.origin.y = - rect.size.height;
            fromViewController.view.frame = frame;
        } completion:^(BOOL finished)
        {
            [fromViewController.view removeFromSuperview];
            [transitionContext completeTransition:YES];
        }];

    }

}
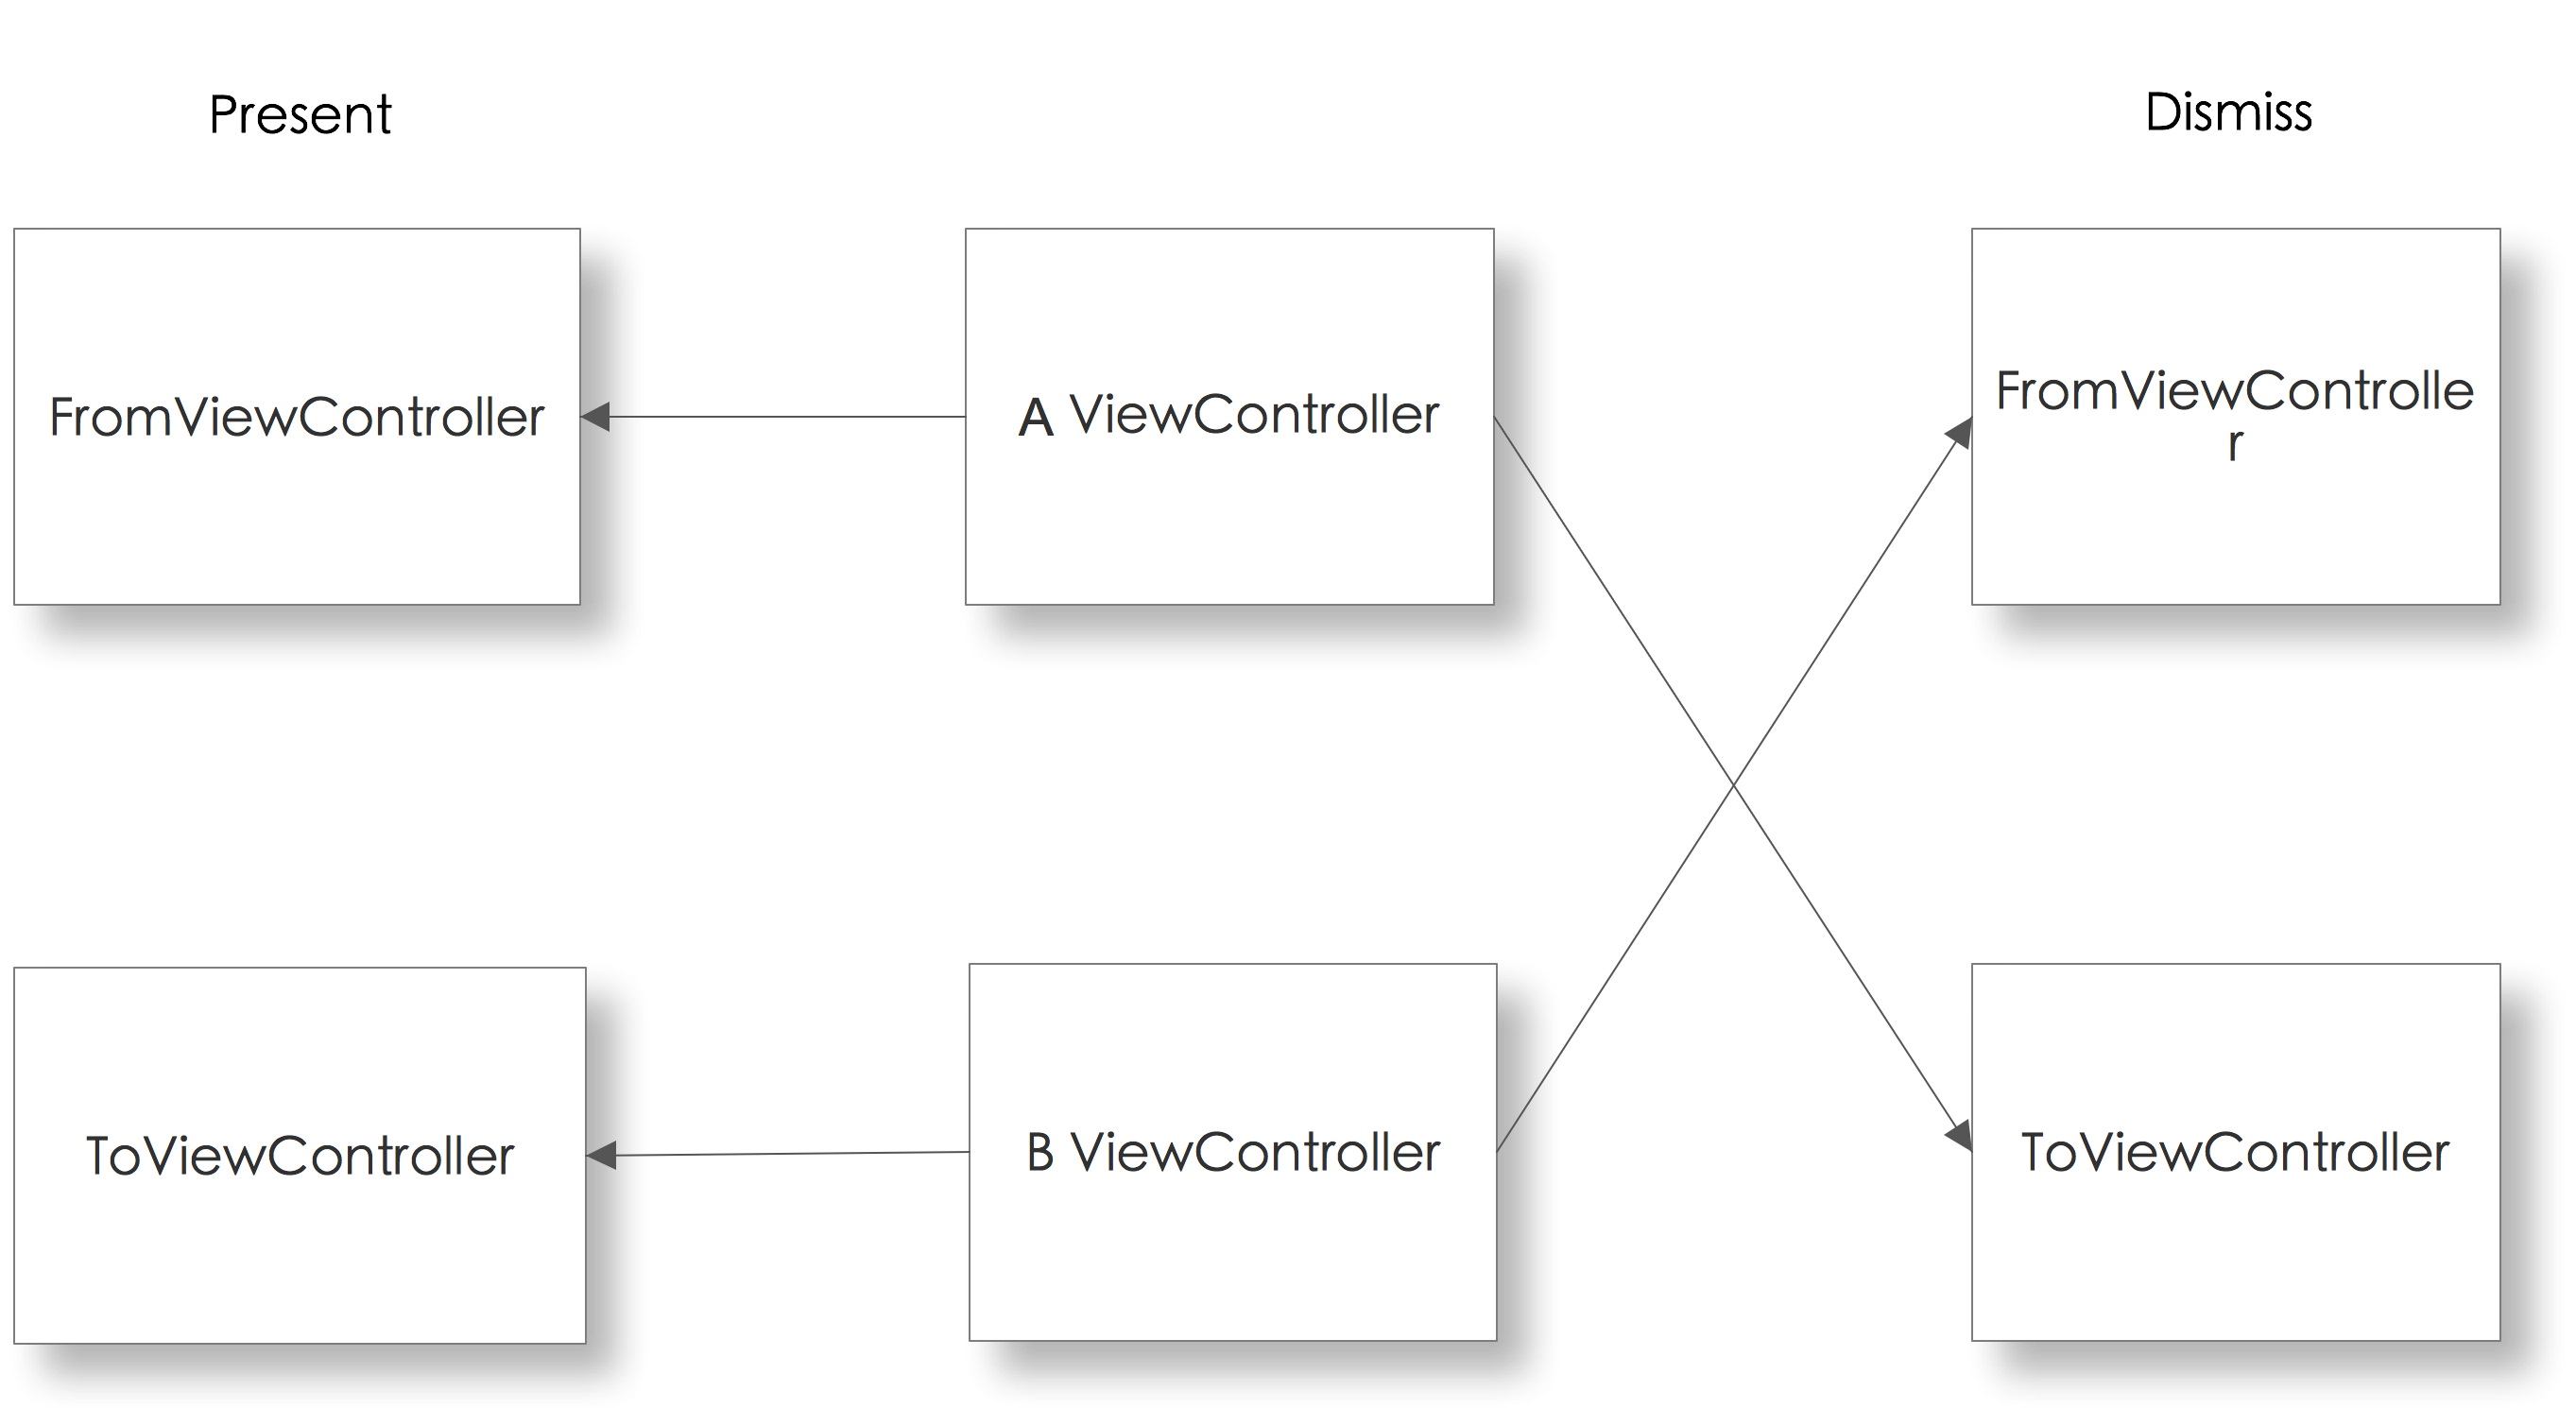
假设A present B,那么fromViewController和toViewController在present和dismiss是正好相反的,如图:

而且present时,container view中没有subview,需要自己添加B的view。而dismiss的时候,container view中已经添加了B的view,所以要先把A的view添加到最底层,然后对B的view做动画,最后还要把它移除。
这样,一个简单的custom transition 就已经完成了。
下面,我们趁热打铁,来实现一个交互式的custom transion。何谓交互式的custom transion呢?举个简单的例子,有个navController,push了viewController A,在A页面可以通过手指从左向右的滑动的方式pop到上一级ViewController。在滑动的过程中,你也可以取消当前的pop。这种交互的方式,是Apple在iOS7中推荐的。
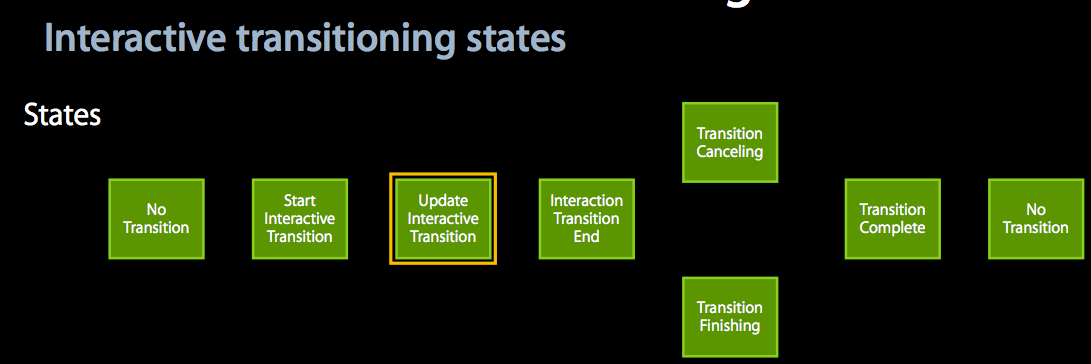
我们看一下WWDC中的讲义,来领会一下这样的一个过程:

上图就是交互式动画过程中的状态变化,其中更新,结束和取消的几个状态,是需要客户端调用来通知系统的。
根据WWDC的说明,最简单的实现交互式动画的方法就是通过继承 UIPercentDrivenInteractiveTransition。
下面我们尝试实现一个交互式动画,我选择的是对nav的pop添加交互式动画,通过两个手指向内滑动pop当前的viewcontroller。与此同时,点击返回键能正常的pop当前的viewcontroller。
首先根据WWDC的例子,添加一个新类:
#import <UIKit/UIKit.h>

@interface ZJSliderTransition : UIPercentDrivenInteractiveTransition
- (instancetype)initWithNavigationController:(UINavigationController *)nc;

@property(nonatomic,assign) UINavigationController *parent;
@property(nonatomic,assign,getter = isInteractive) BOOL interactive;

@end
注意源文件中需要添加一些变量,并且在初始化的时候添加gesture:
#import "ZJSliderTransition.h"

@interface ZJSliderTransition ()
{
    CGFloat _startScale;
}
@end


@implementation ZJSliderTransition
- (instancetype)initWithNavigationController:(UINavigationController *)nc;
{
    if (self = [super init])
    {
        self.parent = nc;

        UIPinchGestureRecognizer *pintchGesture = [[UIPinchGestureRecognizer alloc] initWithTarget:self action:@selector(handlePinch:)];
        [self.parent.topViewController.view addGestureRecognizer:pintchGesture];
    }
    return self;
}


- (void)handlePinch:(UIPinchGestureRecognizer *)gr {
    CGFloat scale = [gr scale];
    switch ([gr state]) {
        case UIGestureRecognizerStateBegan:
            self.interactive = YES; _startScale = scale;
       self.parent.delegate = self.parent.topViewController;

            [self.parent popViewControllerAnimated:YES];
            break;
        case UIGestureRecognizerStateChanged: {
            CGFloat percent = (1.0 - scale/_startScale);
            [self updateInteractiveTransition: (percent <= 0.0) ? 0.0 : percent];
            break;
        }
        case UIGestureRecognizerStateEnded:
        case UIGestureRecognizerStateCancelled:
            if([gr velocity] >= 0.0 || [gr state] == UIGestureRecognizerStateCancelled)
                [self cancelInteractiveTransition];
            else
                [self finishInteractiveTransition];
            self.interactive = NO;
        break;
        default:
            break;
    }
}
@end
由此可见,gesture的状态和交互式的状态,是一一对应的。因为我们希望添加的动画不影响正常的返回pop,我们在pinch操作开始的时候,再设置navController的delegate。当然,这样的设置有点怪。
接下来,就是添加我们的sliderTransition。为了和其他transition区分,我们给ZJToViewController添加一个BOOL属性:isPopInterActive。
当isPopInterActive为YES的时候,我们才去准备navController的delegate需要实现的相关对象。
ZJViewController类添加的部分:
- (void)viewDidAppear:(BOOL)animated
{
    [super viewDidAppear:animated];
    if (self.isPopInterActive)
    {
        _sliderTransition = [[ZJSliderTransition alloc] initWithNavigationController:self.navigationController];

    }
}
- (void)viewDidDisappear:(BOOL)animated
{
    [super viewDidDisappear:animated];
    if (self.isPopInterActive)
    {
        self.navigationController.delegate = nil;
    }
}


#pragma mark - UINavigationController
- (id<UIViewControllerAnimatedTransitioning>)navigationController:(UINavigationController *)navigationController animationControllerForOperation:(UINavigationControllerOperation)operation fromViewController:(UIViewController *)fromVC toViewController:(UIViewController *)toVC
{
    if (self.isPopInterActive)
    {
        return [[ZJSliderTransitionDelegateObj alloc] init];
    }

    else
    {
        return nil;
    }
}

- (id <UIViewControllerInteractiveTransitioning>)navigationController:(UINavigationController *)navigationController
                          interactionControllerForAnimationController:(id <UIViewControllerAnimatedTransitioning>) animationController
{
    if (self.isPopInterActive)
    {
        return self.sliderTransition;
    }
    return nil;

}
然后,在masterViewController部分,push一个新的ZJViewController即可。具体的效果请自行编译运行文后的源码。
从构建一个交互式的transition可以看到,交互式本身就被设计为一个单独的“模块”,方便开发的时候集成。这也再次体现出苹果对开发者的“体贴”。
最后附上本篇的代码下载地址。
由于最近转战C,iOS的内容拖了又拖,如果有疏漏的地方,欢迎大家指正,谢谢!