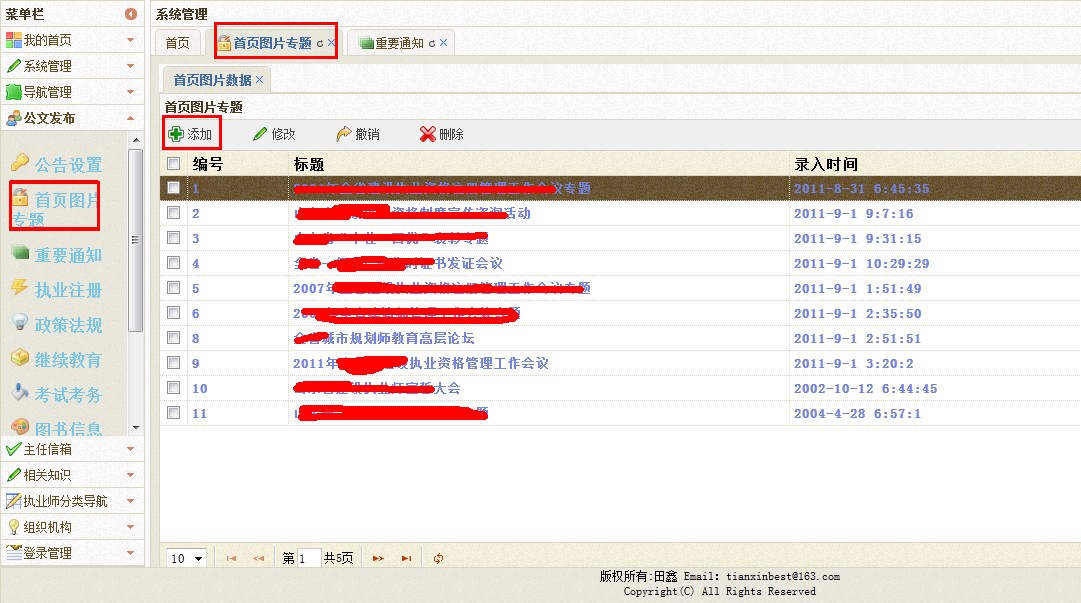
一、这篇文章主要是要实现:图片新闻的添加,无刷新图片的上传,以及添加新闻静态页的生成。


添加完之后前台显示滚动图片:如下图

添加完新闻之后生成的静态页:如下图

由于篇幅过长:添加完新闻之后生成的“分页”静态页:如下图:

二、实现上面“图片新闻添加”的功能:
方法上添加[ValidateInput(false)]该值指示是否启用验证。
HttpPostedFileBase[] photo,表示前台传入name为上传的文件。其中(ContentLength:获取上传文件的大小,ContentType:获取上传文件的 MIME 内容类型,FileName:上传的文件名,SaveAs:保存上载文件的内容)
public ActionResult AddImage() { return this.View(); } [HttpPost] [ValidateInput(false)] [AcceptVerbs(HttpVerbs.Post)] public ActionResult AddImage(FormCollection collection, string filepath, int? filesize, HttpPostedFileBase[] photo) { HomeImage hHomeImage = new HomeImage(); TryUpdateModel(hHomeImage, collection); hHomeImage.ImgUrl = filepath; if (hHomeImage.Name.IsNullOrEmpty()) { return View("AddImage", hHomeImage); } if (hHomeImage.Content.IsNullOrEmpty()) { return View("AddImage", hHomeImage); } if (filepath.IsNullOrEmpty() && hHomeImage.ImgUrl.IsNullOrEmpty()) { return View("AddImage", hHomeImage); } ViewData["PhotoUrl"] = hHomeImage.ImgUrl; if (filesize != null) hHomeImage.ImgSize = filesize / 1024; else hHomeImage.ImgSize = 0; hHomeImage.InputTime = DateTime.Now; hHomeImageRepository.Save(hHomeImage); if (photo!=null) { foreach (var item in photo) { if (item != null) { var extention = Path.GetExtension(item.FileName); if (extention == ".aspx" || extention == ".html" || extention == ".exe" || extention == ".asp" || extention == ".jsp" || extention == ".js" || extention == ".htm" || extention == ".php") { return Content("<script>alert('不能上传这类型文件')</script>"); } NewFile newFile = new NewFile(); string fileName = DateTime.Now.ToString("yyyyMMddhhmm") + "_img_" + Path.GetFileName(item.FileName); newFile.NewId = hHomeImage.ID; newFile.Name = fileName; newFile.FileSize = item.ContentLength; newFile.isImg = true; item.SaveAs(Server.MapPath("~/UpLoadFiles/" + fileName));//保存到物理路径 newFileBLL.Save(newFile);//保存新闻附件 } } } hHomeImage.HtmlUrl = "/ljzcHtml/" + DateTime.Now.ToString("yyyyMMddHHmm") + "hmIndex" + hHomeImage.ID + ".htm";//静态页地址 hHomeImageRepository.Update(hHomeImage);//修改图片表 this.isHtmlPage(hHomeImage);//分页 XElement xe = XElement.Load(Server.MapPath(path)); XElement element = new XElement(XName.Get("img")); element.SetElementValue("id", DateTime.Now.ToString("yyyyMMddhhmmssfff")); element.SetElementValue("title", hHomeImage.Name); element.SetElementValue("path", filepath); xe.Add(element); xe.Save(Server.MapPath(path)); return Content("<script>window.parent.afterImage();</script>"); }后台“Home/AddImage”方法
6、前台View中,进行uploadify的配置,以及Ckediter的使用。
7、同样这里涉及到文件的上传,所以Form的格式为“multipart/form-data”。
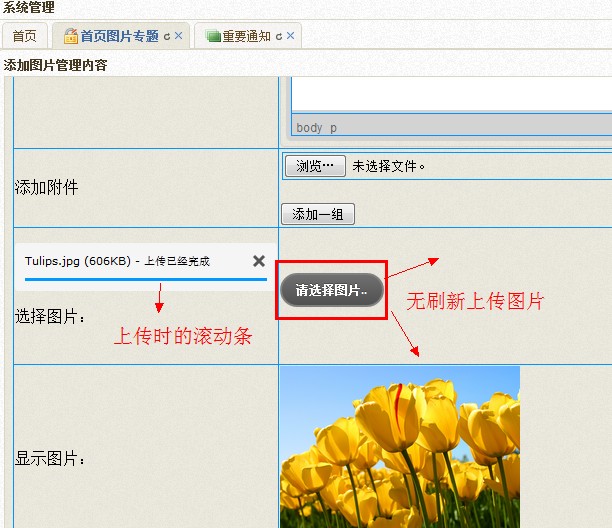
8、添加uploadify的JS和Css。其中还有一个uploadify.swf,上传文件时滚动条的动画效果。
            <script src="@Url.Content("~/Scripts/jquery.uploadify.js")" type="text/javascript"></script>
            <link href="@Url.Content("~/Content/uploadify.css")" rel="stylesheet" />
9、其中uploadify中有个方法是:onUploadSuccess,上传成功之后执行的方法,为了达到无刷新上传图片,使用
$("#PersonImage").attr("src", data).show(),进行显示图片。data为图片的路径地址。
10、上传图片上传到了哪里??uploadify有一个uploader属性:指定上传后指定的地方:(@Url.Content("~/Common/Upload"))。返回值为路径的字符串。

  [HttpPost]
        public ActionResult Upload(HttpPostedFileBase FileData, string folder)
        {
            string result = "";
            folder = "/Homeimages";
            if (FileData != null)
            {
                try
                {
                    string filename = Path.GetFileName(FileData.FileName);//获得文件名
                    string extname = Path.GetExtension(FileData.FileName);//获得文件扩展名
                    string saveName = Guid.NewGuid().ToString("N") + extname;//实际保存文件名
                    saveFile(FileData, folder, saveName);//保存文件
                    result = folder + "/" + saveName;
                }
                catch
                {
                    result = "";
                }
            }
            return Content(result);
        }

        [NonAction]
        private void saveFile(HttpPostedFileBase postedFile, string filepath, string saveName)
        {
            string phyPath = Request.MapPath(filepath + "/");
            if (!Directory.Exists(phyPath))
            {
                Directory.CreateDirectory(phyPath);
            }
            try
            {
                postedFile.SaveAs(phyPath + saveName);
            }
            catch (Exception e)
            {
                throw new ApplicationException(e.Message);

            }
        }
Upload方法
11、简单介绍uploadify其他属性: (官网介绍)
folder : 上传文件存放的目录 。
queueID : 文件队列的ID,该ID与存放文件队列的div的ID一致。
queueSizeLimit : 当允许多文件生成时,设置选择文件的个数,默认值:999 。
multi : 设置为true时可以上传多个文件。
auto : 设置为true当选择文件后就直接上传了,为false需要点击上传按钮才上传 。
fileDesc : 这个属性值必须设置fileExt属性后才有效,用来设置选择文件对话框中的提示文本。
fileExt : 设置可以选择的文件的类型,格式如:'*.doc;*.pdf;*.rar' 。
sizeLimit : 上传文件的大小限制 。
simUploadLimit : 允许同时上传的个数 默认值:1 。
buttonText : 浏览按钮的文本,默认值:BROWSE 。
buttonImg : 浏览按钮的图片的路径 。
hideButton : 设置为true则隐藏浏览按钮的图片 。
rollover : 值为true和false,设置为true时当鼠标移到浏览按钮上时有反转效果。
width : 设置浏览按钮的宽度 ,默认值:110。
height : 设置浏览按钮的高度 ,默认值:30。
12、前台View代码如下:

@using (Html.BeginForm("AddImage", "Home", FormMethod.Post, new { enctype = "multipart/form-data" }))
{
<script src="@Url.Content("~/Scripts/jquery.uploadify.js")" type="text/javascript"></script>
<link href="@Url.Content("~/Content/uploadify.css")" rel="stylesheet" />
<script type="text/javascript">
    $(function () {
        $("#custom_file_upload").uploadify({
            auto: true,
            buttonClass: "selectbtnClass",
            swf: '@Url.Content("~/Content/uploadify.swf")',
            buttonCursor: "arrow",
            buttonText: "请选择图片..",
            //debug: true,
            fileObjName: "fileData",
            fileSizeLimit: "20000kB",
            fileTypeDesc: "图片文件",
            fileTypeExts: "*.jpg;*.gif;*.png",
            queueID: "custom-queue",
            method: "post",
            uploader: '@Url.Content("~/Common/Upload")',
            //preventCaching: true,
            progressData: "percentage",
            queueSizeLimit: 10,
            removeComplete: true,
            removeTimeout: 1,
            requeueErrors: true,
            successTimeOut: 5,
            uploadLimit: 10,
            width: 100,
            height: 30,
            onUploadSuccess: function (file, data, response) {
                if (file != null) {
                    $("#PersonImage").attr("src", data).show();
                    var hideDiv = $("<div>").attr("id", "ImgID");
                    var filename = $("<input>").attr("name", "filename").attr("type", "hidden").attr("value", file.name);
                    var extname = $("<input>").attr("name", "extname").attr("type", "hidden").attr("value", file.type);
                    var filesize = $("<input>").attr("name", "filesize").attr("type", "hidden").attr("value", file.size);
                    var filepath = $("<input>").attr("name", "filepath").attr("type", "hidden").attr("value", data);
                    hideDiv.append(filename);
                    hideDiv.append(extname);
                    hideDiv.append(filesize);
                    hideDiv.append(filepath);
                    $("#custom-queue").append(hideDiv);
                } else {
                    alert("上传错误!");
                }

            },
            onCancel: function (file) {
                alert(file.name);
            }
        });
    });

   </script>
<table id="ListImage">
            <tr>
                <td> 图片标题</td>
                <td>@Html.TextBoxFor(p => p.Name)</td>
            </tr>
            <tr><td>图片内容</td>
                <td>@Html.TextAreaFor(p => p.Content, new { @class = "ckeditor", style = "width:60px;" })</td>
            </tr>
             <tr>
             <td>添加附件</td>
             <td>
             <table style="width: 552px; height: 30px" id="idMultiTable"></table>  <br />
             <input id="btnAddRow" onclick="addTableRow(-1);" value="添加一组" type="button"/>      </td>
             </tr>
             <tr>
             <td>
             <div>
                <p style="margin-top:5px;font-size:14px;font-weight:bold;"></p>
                <p style="margin-top:5px;font-size:14px;font-weight:bold;"><span id="result"></span></p>
                <div id="custom-queue"></div>
                <p>选择图片:</p><br />
            </div>
             </td>
             <td><input id="custom_file_upload" type="file" name="Filedata" /></td>
             </tr>
             <tr>
             <td>
            显示图片:
             </td>
             <td>
             <input type="image" id="PersonImage" name ="PersonImage" style="width:240px; display:none;"   src="@ViewData["PhotoUrl"]" />

            </td>
             </tr>
             <tr>
             <td colspan="2"><center><input type="submit" id="btnSave" name="button" class="button" value="保存" /></center></td>
             </tr>

        </table>

}
View中 Home/AddImage
三、至此“添加图片新闻”已经完成,接下来实现带分页的静态页(StreamWriter)。


#region 公共生成静态页 /// <summary> /// 判断是否分页 /// </summary> /// <param name="hHomeImage"></param> private void isHtmlPage(New nNew) { string pattern = @"<div\s+style="page-break-after:\s+always[;]?">\s+<span\s+style="display:\s+none[;]?">&nbsp;</span></div>";//[;]?在chrome和ff中插入的代码中是比较严谨的都是style=“page-break-after:always;”(注意这个分号,ie中是没有的) string[] contentarr = System.Text.RegularExpressions.Regex.Split(HttpUtility.HtmlEncode(nNew.Content), pattern);//为了html页面分页 if (contentarr.Length <= 1) { this.publicHtmlHomeImage(nNew, nNew.HtmlUrl, 1); } else { for (int i = 0; i <= contentarr.Length; i++) { string htmlUrl = nNew.HtmlUrl.Substring(0, 10) + "CurrentPage" + i + "a" + nNew.HtmlUrl.Substring(10); if (i == 0) htmlUrl = nNew.HtmlUrl; this.publicHtmlHomeImage(nNew, htmlUrl, i); } } } /// <summary> /// 公共生成静态页 /// </summary> /// <param name="hHomeImage">实体类</param> /// <param name="pathUrl">静态页面路径</param> /// <param name="index">页码</param> private void publicHtmlHomeImage(New nNew, string pathUrl, int index) { System.Text.Encoding code = System.Text.Encoding.GetEncoding("GB2312"); // 读取模板文件 string temp = System.Web.HttpContext.Current.Server.MapPath("~/qiantaiContent.htm"); string str = ""; using (StreamReader sr = new StreamReader(temp, code)) { str = sr.ReadToEnd(); // 读取文件 } List<string> list = htmlPageData.htmlPageList(nNew.Content, nNew.HtmlUrl, index); // 替换内容 这时,模板文件已经读入到名称为str的变量中了 str = str.Replace("$document", Enum.GetName(typeof(TianxinWeb.Webs.Models.Document), nNew.Document)); str = str.Replace("$Title", nNew.Title); //模板页中的标签 str = str.Replace("$Wenhao", nNew.Wenhao); str = str.Replace("$CreatDate", nNew.CreatDate.Value.ToString()); str = str.Replace("$htmlPage", list[0]);//分页 str = str.Replace("$Content", list[1]);//内容 var iNf = _NewFileBLL.IEnumrable_NewFile(nNew.ID, false); string fujian = ""; foreach (var item in iNf) { fujian += "<div style='height:22px; line-height:22px;'><a color=red href=../UpLoadFiles/" + item.Name + ">" + item.Name + "</a></div>"; } str = str.Replace("$htmlfujian", fujian);//附件 // 写文件 pathUrl = System.Web.HttpContext.Current.Server.MapPath(pathUrl); using (StreamWriter sw = new StreamWriter(pathUrl, false, code)) { sw.Write(str); sw.Flush(); } } #endregion带分页的静态页实现方法

/// <summary> /// html分页 前台页面分页和样式 /// </summary> /// <param name="Content">内容</param> /// <param name="htmlUrl"></param> /// <param name="currentPageIndex"></param> /// <returns></returns> public static List<string> htmlPageList(string Content, string htmlUrl, int?currentPageIndex) { if (currentPageIndex == null || currentPageIndex==0) currentPageIndex = 1; List<string> strList = new List<string>();//存页码和内容 string pattern = @"<div\s+style="page-break-after:\s+always[;]?">\s+<span\s+style="display:\s+none[;]?">&nbsp;</span></div>";//[;]?在chrome和ff中插入的代码中是比较严谨的都是style=“page-break-after:always;”(注意这个分号,ie中是没有的) string[] contentarr = System.Text.RegularExpressions.Regex.Split(HttpUtility.HtmlEncode(Content), pattern); int pageCount = contentarr.Length; //总页数 int CurrentPage = currentPageIndex.Value;//当前页 string outputContent = "";//要输出的内容 string pageStr = "";//分页字符串 if (pageCount <= 1)//只有一页 不分页 outputContent = Content; else { pageStr += "共 <span class='count'>" + pageCount + "</span> 页 "; if (CurrentPage != 1) pageStr += "<a class='prevA' href =" + htmlUrl.Substring(0, 10) + "CurrentPage" + (CurrentPage - 1) + "a" + htmlUrl.Substring(10) + ">上一页</a>"; for (int i = 1; i <= pageCount; i++) { if (i == CurrentPage) pageStr += ("<span class='activeA'>" + i + "</span>"); else pageStr += ("<a class='numA' href =" + htmlUrl.Substring(0, 10) + "CurrentPage" + i + "a" + htmlUrl.Substring(10) + ">" + i + "</a>"); } if (CurrentPage != pageCount) { pageStr += "<a class='nextA' href =" + htmlUrl.Substring(0, 10) + "CurrentPage" + (CurrentPage + 1) + "a" + htmlUrl.Substring(10) + ">下一页</a>"; } outputContent = contentarr[CurrentPage - 1].ToString().Replace(" ", " "); outputContent = HttpUtility.HtmlDecode(outputContent); } strList.Add(pageStr);//分页样式 strList.Add(outputContent); return strList; }判断分页,加入分页样式的方法 htmlPageList
四、今天情人节,借着这个机会,祝愿所有的程序员,情人节快乐,终成眷属。今天写的内容也挺多的,写博客确实费时和费神,希望朋友们也多多支持下,如果对您有一点点帮助的话,右下角“推荐”一下。