前一篇文章介绍了Excel中的菜单系统,在创建完菜单和工具栏之后,就要着手进行功能的开发了。不论您采用何种方式来开发Excel应用程序,了解Excel对象模型尤其重要,这些对象是您与Excel进行交互的基石。据不完全统计,Excel的对象模型中有270多个对象及超过5000多个属性和方法。通过这些对象及方法,您可以充分利用Excel来定制化您的插件。
Excel的所有对象,事件,方法和属性在这里不可能全部介绍完。本文简要介绍一下Excel的整体文档对象模型,以及一些比较重要的,平常开发中需要频繁接触到的对象,属性,事件及方法,如Application,Range对象等,使您对Excel的整个结构有一个简单的了解。后面在编程中遇到问题了,您可以快速定位知道需要设置或者调用哪个对象及其方法,然后根据关键字到Google或者MSDN上方便查找。本文大部分内容参照MSDN上的这篇文章Understanding the Excel Object Model from a .NET Developer's Perspective 如果您对英文没有问题,建议您直接去MSDN看原文。
在与Excel进行交互之前,了解Excel对象模型的整体结构非常重要,这使得我们对Excel有一种更整体全面的了解。下图是Excel的对象模型的整个层级结构。
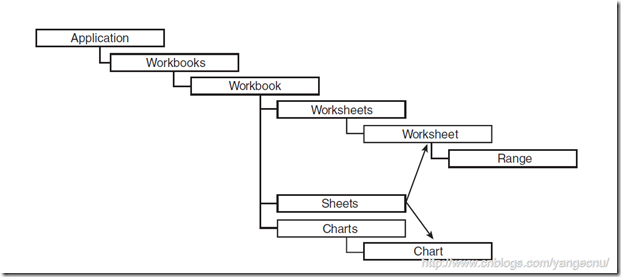
根据这个图,我们打开一个Excel,可以有一种非常直观形象的了解。
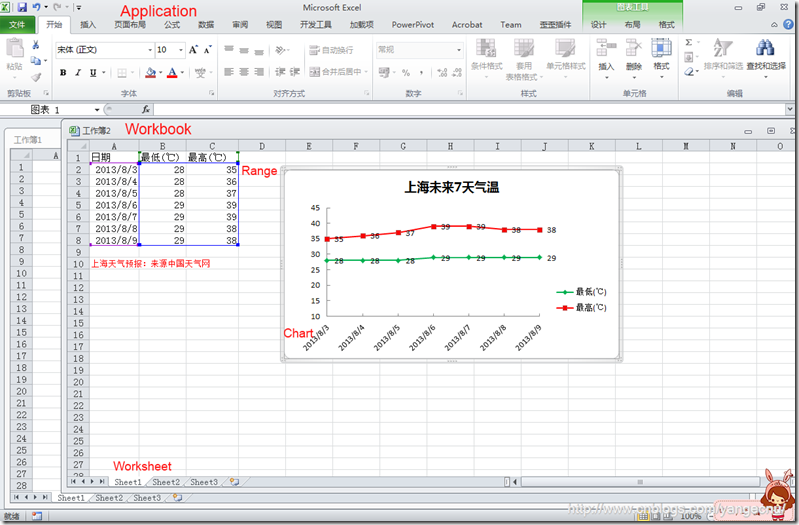
图中可以看到,Excel对象模型基本模拟了UI界面:
更详细地Excel的对象模型图,如下,图中灰色的部分存在于office.dll中所有Office应用程序中都存在的对象。
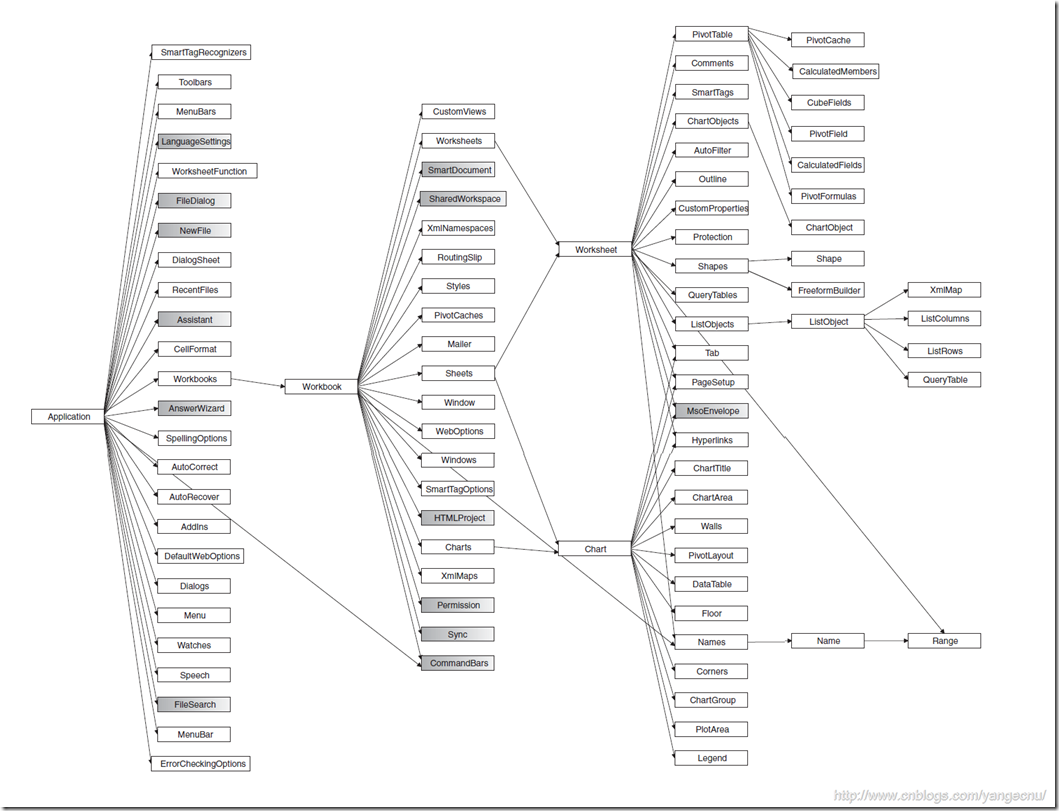
以上是Excel文档对象模型的大概全部的对象模型。其中最重要的几个对象为Application,Workbook,Worksheet 和Range对象。下面就简单介绍下这些对象中的一些属性,方法及事件。
Application是根对象,代表着Excel应用程序本身,一切Excel中的其他对象都有它直接或者间接创建。 您可以回想到前面我们在Shared Add-in项目中创建Excel菜单和工具条时接触到的对象。我们首先是在Connect方法中保存了 application对象,然后在该对象上创建了MenuBar和Toolbar。Application对象有一些熟悉,事件和方法,在我们编程中经常会用到,现在就稍微讲一下:
Application中控制Excel状态和显示的方法和属性有很多,表一中列出了常用的几个属性。有一个属性是需要重新启用后才可以生效的。
属性
类型
说明
Cursor
XlMousePointer 枚举
获取或者设置鼠标手势的形状
EditDirectlyInCell
Boolean
获取或者设置是否可以直接在单元格里面对数据进行编辑,如果为false,则只能在公示栏中对数据进行编辑
Interactive
Boolean
获取或者设置用户是否可以通过鼠标或者键盘与Excel进行交互
MoveAfterReturnDirection
xlDirection枚举
设置当用户敲回车时,在 MoveAfterReturn属性设置为true的情况下,下一个单元格移动的位置,默认为向下。
ScreenUpdating
Boolean
设置屏幕刷新属性,当设置为True时,每一个单元格的刷新时都会刷新整个屏幕,一般地在编程时,为了提升速度,在代码处理的过程中禁止屏幕刷新,待数据填充完成之后,再开启屏幕刷新.
StandardFont
String
StandardFontSize
Long
获取或者设置Excel默认显示的字体大小,重启后生效。
StartupPath (read-only
String
返回Excel外接插件启动项的加载目录.
TemplatesPath (read-only)
String
返回Excel模板加载的路径,通常为Windows的特殊目录.
DisplayAlerts
Boolean
如果设置为true,在某些情况下,比如我们的代码删除一个sheet页,Excel会弹出提示框提醒用户。如果设置为false,则不显示提示框,Excel默认选择默认项。
上面列出的属性中,最可能用到的是ScreenUpdating属性,正确使用该属性能够大幅提高应用程序的性能。默认的,该属性为true,即每一次修改就会刷新整个界面,这会使得应用程序变慢,尤其是在往单元格填充大量数据的时候。所以一般的做法是,在填充数据之前保存ScreenUpdating属性,然后将ScreenUpdating属性设置为false,禁止屏幕刷新,然后填充数据,最后将之前保存的ScreenUpdating属性赋值回来。下面的代码演示了这一做法:
class="code">Boolean oldScreenUpdate = this.Application.ScreenUpdating;
try
{
    this.Application.ScreenUpdating = false;
    //to fill in a large range that time comsuming

}
finally
{
    this.Application.ScreenUpdating = oldScreenUpdate;
}
从Application对象中可以获取很多有用的对象。如ActiveCell返回当前活动的单元格;ActiveChart,返回当前选中的活动的图表;ActiveSheet、ActiveWindows分别返回活动的Sheet页和窗口;Selection属性返回当前选中的对象,可能是Range,Worksheet或者是一个窗体;Workbooks,Sheets,Charts返回当前Excel中所有工作簿,工作表,图表的集合。
通常,我们接触最多的是Application对象的Workbooks属性,该对象是当前Excel打开的所有的工作簿文件。一个Workbook就是一个.xls或者.xlsx文件。下面简单讲解Workbooks对象。
// Create a new workbook object
Excel.Workbook wb = this.Application.Workbooks.Add(Type.Missing);
// Close all workbooks
this.Application.Workbooks.Close();
// Open an exist workbook
Excel.Workbook wbOpenExistFile = this.Application.Workbooks.Open(
    "C:\\YourPath\\Yourworkbook.xls",
    Type.Missing, Type.Missing, Type.Missing, Type.Missing,
    Type.Missing, Type.Missing, Type.Missing, Type.Missing,
    Type.Missing, Type.Missing, Type.Missing, Type.Missing,
    Type.Missing, Type.Missing);
这些操作可以通过OpenText,OpenDatabase,OpenXml方法来实现,方法参数可能需要您详细指定。
有时候我们可能需要从当前的工作簿文件中,找到指定的工作簿文件进行操作。一般的我们可以通过Workbooks属性通过索引器传入index来返回,或者通过工作簿名称来返回。需要注意的是,工作簿没有保存前,不需要后缀,保存后需要带上后缀来进行访问,代码如下:
//Get an exist workbook form current workbooks
Excel.Workbook wbFind =  this.Application.Workbooks[1];
// Before Book1 is saved:
wbFind =  this.Application.Workbooks["Book1"];
// After Book1 is saved:
wbFind =  this.Application.Workbooks["Book1.xls"];
Application对象提供了一些方法,包括单元格的重新计算,撤销操作等。
//  Cell calculate
this.Application.Calculate();
// Or...
this.Application.Calculate();
// Or...
this.Application.get_Range("A1", "B12").Calculate();
//using FileDialog to open an exist file
Office.FileDialog dlg = this.Application.get_FileDialog(
    Office.MsoFileDialogType.msoFileDialogOpen);
dlg.Filters.Clear();
dlg.Filters.Add("Excel Files", "*.xls;*.xlw", Type.Missing);
dlg.Filters.Add("All Files", "*.*", Type.Missing);
if (dlg.Show() != 0)
    dlg.Execute();
Application中还有一些其他有用的对象,如WorksheetFunction,该对象包括了一系列静态或者共享方法,这些方法都是对Excel内置函数的包装。
Excel.Worksheet ws = (Excel.Worksheet)this.Application.ActiveSheet;
Excel.Range rng = ws.get_Range("RandomNumbers", Type.Missing);
System.Random rnd = new System.Random();

for (int i = 1; i <= 20; i++)
    ws.Cells[i, 2] = rnd.Next(100);

rng.Sort(rng, Excel.XlSortOrder.xlAscending,
    Type.Missing, Type.Missing, Excel.XlSortOrder.xlAscending,
    Type.Missing, Excel.XlSortOrder.xlAscending,
    Excel.XlYesNoGuess.xlNo, Type.Missing, Type.Missing,
    Excel.XlSortOrientation.xlSortColumns,
    Excel.XlSortMethod.xlPinYin,
    Excel.XlSortDataOption.xlSortNormal,
    Excel.XlSortDataOption.xlSortNormal,
    Excel.XlSortDataOption.xlSortNormal);

Excel.WorksheetFunction wsf = this.Application.WorksheetFunction;
ws.get_Range("Min", Type.Missing).Value2 = wsf.Min(rng,
    Type.Missing, Type.Missing, Type.Missing, Type.Missing,
    Type.Missing, Type.Missing, Type.Missing, Type.Missing,
    Type.Missing, Type.Missing, Type.Missing, Type.Missing,
    Type.Missing, Type.Missing, Type.Missing, Type.Missing,
    Type.Missing, Type.Missing, Type.Missing, Type.Missing,
    Type.Missing, Type.Missing, Type.Missing, Type.Missing,
    Type.Missing, Type.Missing, Type.Missing, Type.Missing,
    Type.Missing);
// Arrange the windows
this.Application.Windows.Arrange(
  Excel.XlArrangeStyle.xlArrangeStyleTiled,
  Type.Missing, Type.Missing, Type.Missing);
//Add a name range
Excel.Name nm = this.Application.Names.Add(
"NewName", @"='Other Application Members'!$A$6",
Type.Missing, Type.Missing, Type.Missing,
Type.Missing, Type.Missing, Type.Missing,
Type.Missing, Type.Missing, Type.Missing);
后面使用该名称即可找到该名称代表的Range对象:
// Retrive a name Range
this.Application.get_Range("NewName", Type.Missing).Value2 = "Hello, World!";
Application对象除了上面讲解的一些有用的方法和属性之外,还有一些事件。这些事件大致分为Sheet行为相关的事件、Window行为相关事件Workbook管理相关的事件。下面简要介绍这些事件的作用。
Sheet相关事件:
以上application上的事件在Workbook类上也存在。application上的事件对所有的工作簿都有效,而Workbook上的这些事件仅对该Workbook有效。
Windows行为相关事件:
Workbook行为相关事件:
Workbook对象也有很多属性和方法,下面仅介绍一些比较常用的方法和属性。
Workbook属性
文档属性
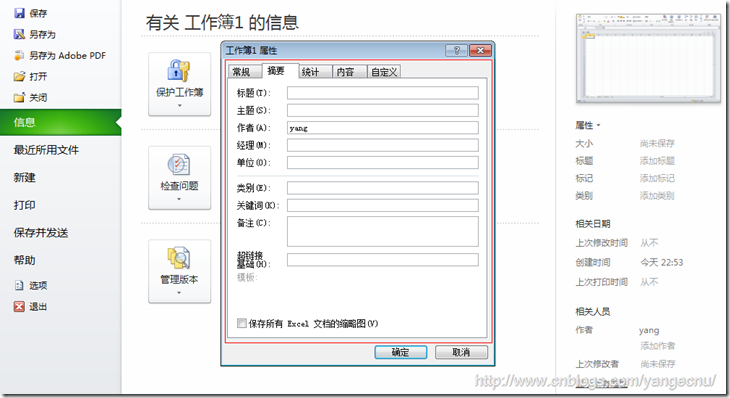
Excel文档允许用户将一些信息保存到文件属性中。Excel提供了一些列内置的属性,我们也可以添加自己的属性。
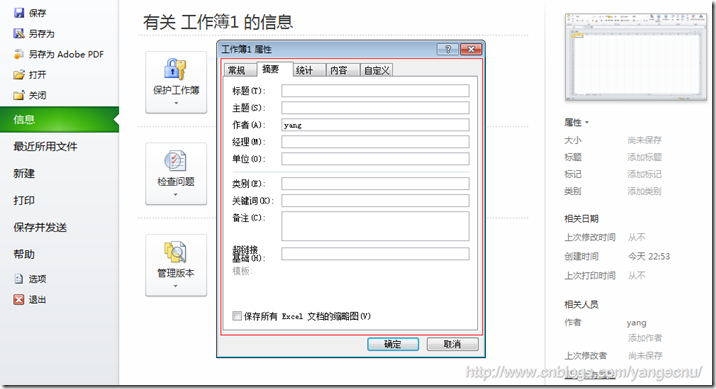
Workbook类的BuiltInDocumentProperties属性可以获取和设置那只的属性,CustomDocumentProperties可以获取和设置自定义属性。属性以键值对表示,我们可以使用属性的关键字或者Index来获取属性。下面的代码演示了获取所有的内置和自定义的属性,DumpPropertyCollection方法用来打印属性。
//Display the document property
private void DisplayDocumentProperties()
{
    Office.DocumentProperty prp = null;
    Office.DocumentProperties prps =
        (Office.DocumentProperties)
        this.Application.ActiveWorkbook.BuiltinDocumentProperties;

    Excel.Range rng = this.Application.
        get_Range("DocumentProperties", Type.Missing);
    int i = 0;

    try
    {
        this.Application.ScreenUpdating = false;

        try
        {
            // Set the Revision Number property:
            prp = prps["Revision Number"];
            prp.Value = Convert.ToInt32(prp.Value) + 1;

            // Dump contents of the collection:
            i = DumpPropertyCollection(prps, rng, i);
        }
        catch (Exception ex)
        {
            MessageBox.Show(ex.Message, this.Application.Name);
        }

        // Work with custom properties:
        try
        {
            prps = (Office.DocumentProperties)
                this.Application.ActiveWorkbook.CustomDocumentProperties;
            DumpPropertyCollection(prps, rng, i);
        }
        catch (Exception ex)
        {
            MessageBox.Show(ex.Message, this.Application.Name);
        }

        // Add a custom property:
        try
        {
            // Delete the property, if it exists.
            prp = prps["Project Name"];
            prp.Delete();
        }
        catch
        {
            // Do nothing if you get an exception.
        }
        try
        {
            // Add a new property.
            prp = prps.Add("Project Name", false,
                Office.MsoDocProperties.msoPropertyTypeString,
                "White Papers", Type.Missing);
        }
        catch (Exception ex)
        {
            MessageBox.Show(ex.Message, this.Application.Name);
        }
    }
    finally
    {
        this.Application.ScreenUpdating = true;
    }
}

private int DumpPropertyCollection(
    Office.DocumentProperties prps, Excel.Range rng, int i)
{
    foreach (Office.DocumentProperty prp in prps)
    {
        rng.get_Offset(i, 0).Value2 = prp.Name;
        try
        {
            if (prp.Value != null)
            {
                rng.get_Offset(i, 1).Value2 =
                    prp.Value.ToString();
            }
        }
        catch
        {
            // Do nothing at all.
        }
        i += 1;
    }
    return i;
}
一般地,我们可以将一些和文档相关的信息或者临时数据保存到自定义信息中。
文档样式
在Excel开发中,我们经常要对单元格进行格式化,这时,我们可能需要自定义一些样式,然后给其命名,然后下次直接按照名称赋给样式即可。
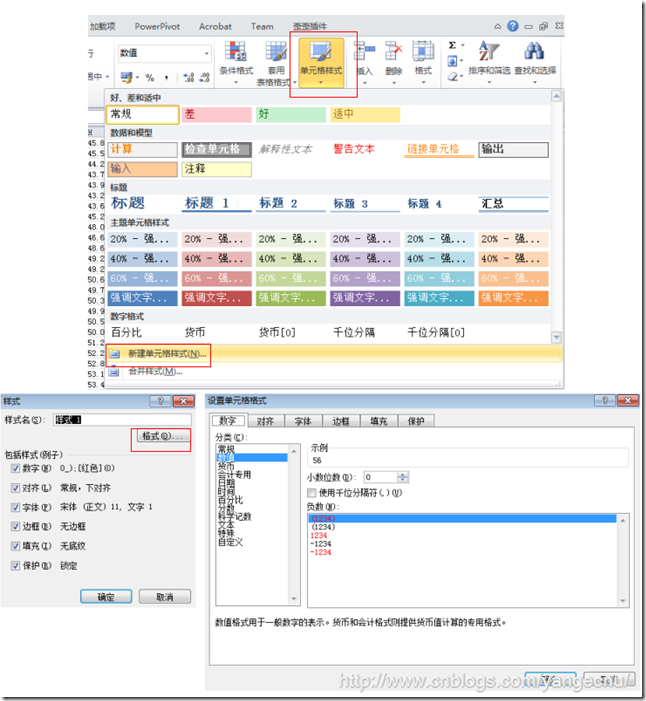
我们可以通过Workbook的Styles属性来对这些文档样式进行添加,修改和删除。下面代码演示了如何创建或者修改一个样式:
// Apply Style
private void ApplyStyle()
{
    const String STYLE_NAME = "PropertyBorder";
    // Get the range containing all the document properties.
    Excel.Range rng = GetDocPropRange();
    Excel.Style sty;
    try
    {
        sty = this.Application.ActiveWorkbook.Styles[STYLE_NAME];
    }
    catch
    {
        sty = this.Application.ActiveWorkbook.Styles.Add(STYLE_NAME, Type.Missing);
    }

    sty.Font.Name = "Verdana";
    sty.Font.Size = 12;
    sty.Font.Color = ColorTranslator.ToOle(Color.Blue);
    sty.Interior.Color = ColorTranslator.ToOle(Color.LightGray);
    sty.Interior.Pattern = Excel.XlPattern.xlPatternSolid;
    rng.Style = STYLE_NAME;
    rng.Columns.AutoFit();
}
工作表对象
Workbook的Sheets属性返回该工作簿包含的所有工作表对象。这些对象可以是工作表也可以是Chart对象,下面的代码列出了当前工作簿中的所有对象。
// Show all the workSheet name in the active workbook
private void ListSheets()
{
    int i = 0;

    Excel.Range rng =
        this.Application.get_Range("Sheets", Type.Missing);
    foreach (Excel.Worksheet sh in this.Application.ActiveWorkbook.Sheets)
    {
        rng.get_Offset(i, 0).Value2 = sh.Name;
        i = i + 1;
    }
}
WorkSheet有一些很有用的属性和方法:
// Hide Worksheet
private void HideTheSheet()
{
    ((Excel.Worksheet)this.Application.ActiveWorkbook.Sheets[1]).Visible =
        Excel.XlSheetVisibility.xlSheetVeryHidden;
}
Excel.Worksheet sh = this.Application.Sheets.Add(
    Type.Missing, Type.Missing, Type.Missing, Type.Missing);
//Copy Worksheet
((Excel.Worksheet) this.Application.ActiveWorkbook.Sheets[1]).
    Copy(Type.Missing, this.Application.ActiveWorkbook.Sheets[3]);
// Fill across sheet method
this.Application.ActiveWorkbook.Sheets.FillAcrossSheets(
    this.Application.get_Range("Data", Type.Missing),
    Excel.XlFillWith.xlFillWithAll);
// move Worksheet
Excel.Sheets shts = this.Application.ActiveWorkbook.Sheets;
((Excel.Worksheet)shts[1]).Move(Type.Missing, shts[shts.Count]);
// print out method
((Excel.Worksheet)this.Application.ActiveWorkbook.Sheets[1]).
    PrintOut(1, 1, 2, true, Type.Missing, Type.Missing,
    Type.Missing, Type.Missing);
Workbook类的方法
Workbook代表一个工作簿,他也提供了很多方法,其中一些方法用来处理一些非常特殊的场景。和前面介绍其他对象一样,这里仅介绍我们在开发中会经常使用到的属性和方法。
// Active a workbook
((Excel._Workbook)this.Application.Workbooks[1]).Activate();
// Close a workbook without save changes
this.Application.Workbooks[1].Close(false,Type.Missing, Type.Missing);
// Protect a workbook use password
this.Application.Workbooks[1].Protect("your password", Type.Missing, Type.Missing);
// Save all open workbooks.
foreach (Excel.Workbook wb in this.Application.Workbooks)
{
    wb.Save();
}
// Save as the active workbook
this.Application.ActiveWorkbook.SaveAs("C:\\MyWorkbook.xml",
    Excel.XlFileFormat.xlXMLSpreadsheet, Type.Missing,
  Type.Missing, Type.Missing, Type.Missing,
  Excel.XlSaveAsAccessMode.xlNoChange, Type.Missing,
    Type.Missing, Type.Missing, Type.Missing, Type.Missing);
// save a copy of the activeworkbooks
this.Application.ActiveWorkbook.SaveCopyAs("C:\\Test.xls");
虽然Worksheet类也提供了大量的属性方法和事件,但是大部分的属性和方法和Application和Workbook类现相似,这部分重点介绍Worksheet中之前的对象中没有讲到过的,且经常会用到的属性和方法。
没有Sheet类
虽然Workbook对象有一个Sheets集合类,但是并不存在一个所谓的Sheet类,Sheets集合中的类要不是Worksheet元素,要么是Chart对象。可以认为Worksheet和Chart对象是Sheet类对象的实例,虽然公共的对象中并没有看到有Sheet类。
文档保护
通常Excel会对工作簿或者工作表提供一些保护特性,以不允许用户修改工作表中的队形。一旦我们开启了对工作表进行保护,除非进行取消保护,否则用户不能编辑或者修改工作表。在用户界面上,您可以通过菜单审阅-> 保护工作表菜单开启,我们可以设置保护密码。默认情况下,会对所有的工作表中的单元格进行保护。如果您要对特定范围的单元格进行保护,可能需要使用 审阅->允许用户编辑区域实现。
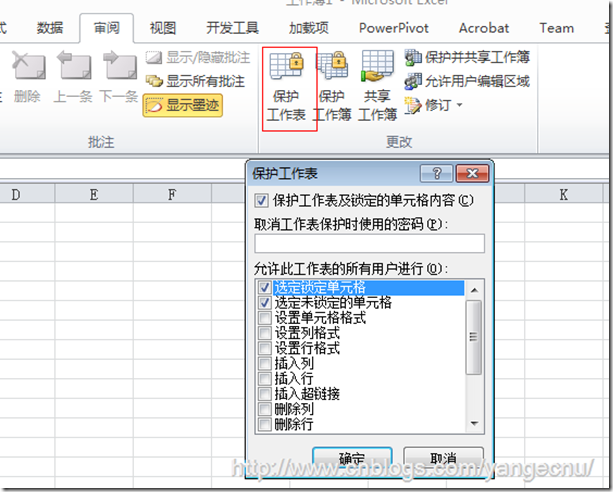
在代码中,我们可以通过调用Worksheet的Protect方法来实现,该方法有很多参数进行配置。其方法签名如下:
// Worksheet protect method signature
WorksheetObject.Protect(Password, DrawingObjects, Contents,
  Scenarios, UserInterfaceOnly, AllowFormattingCells,
  AllowFormattingColumns, AllowFormattingRows,
  AllowInsertingColumns, AllowInsertingRows,
  AllowInsertingHyperlinks, AllowDeletingColumns,
  AllowDeletingRows, AllowSorting, AllowFiltering,
  AllowUsingPivotTables);
下面是一个使用Protect方法对工作表进行保护的例子,该方法设置了保护密码,并仅允许对数据进行排序:
((Excel.Worksheet)this.Application.Sheets[1]).Protect(
"MyPassword", Type.Missing, Type.Missing, Type.Missing,
Type.Missing, Type.Missing, Type.Missing, Type.Missing,
Type.Missing, Type.Missing, Type.Missing, Type.Missing,
Type.Missing, true, Type.Missing, Type.Missing);
要取消保护,直接调用unprotect方法即可。
Object属性
Worksheet对象还有几个返回Object类型的属性。
下面的代码演示了如果注释存在,删除,然后添加注释。后面演示了如何通过代码演示和现实所有注释:
Excel.Range rng = this.Application.get_Range("Date", Type.Missing);
if (rng.Comment != null)
{
    rng.Comment.Delete();
}
rng.AddComment("Comment added " + DateTime.Now);

// Display all the comments:
ShowOrHideComments(true);
Worksheet类提供了Comments属性,该属性返回一个Comments对象,该对象是一个集合,您可以便利该集合中的对象,Comment类提供的属性很少,用的最多的是Visible属性,用来显示或者隐藏注释;在一个就是Delete属性,用来删除注释,最后Text属性可以用来添加或者修改现有的注释。
添加完成注释之后,我们可能希望在工作表中显示注释。下面就是在当前活动工作表中显示或者隐藏注释的代码。
private void ShowOrHideComments(bool show)
{
    // Show or hide all the comments:
    Excel.Worksheet ws =
        (Excel.Worksheet)this.Application.Sheets["Worksheet Class"];

    for (int i = 1; i <= ws.Comments.Count; i++)
    {
        ws.Comments[i].Visible = show;
    }
}
Range对象是在Excel开发中用的最多的队形,在我们对Excel进行操作之前,我们需要获取我们要进行操作的对象。几乎我们对工作表中的内容操作都会涉及到Range对象。Range对象是对工作表中内容的一种抽象,他可以表示一个单元格,一行数据,一列数据,一个选择的单元格区间,或者在不同工作表中的一系列对象。下图是Range的简要对象模型图:
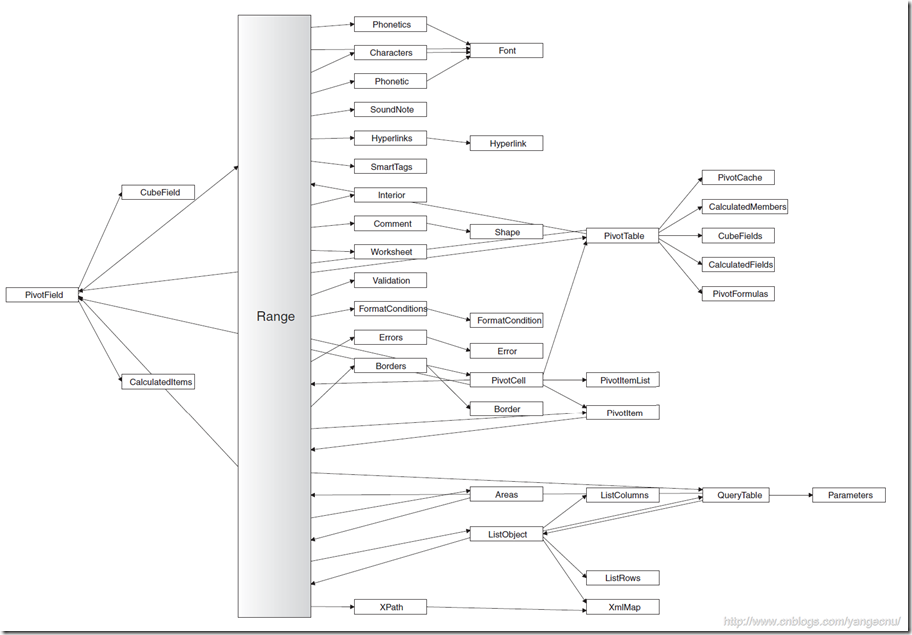
下面就从三个方面介绍Range对象
对选中对象进行操作
虽然可以对当前选中的对象进行各种属性和行为的修改,但是最好避免这样做。Excel中的选中对象代表用户的选择。如果我们再代码中进行修改的话,会导致用户对当前选中的对象失去控制。首要准则是,只有当你试图更改用户的选择区域时,才去调用Range对象的Select方法。作为一个开发者,我们不应该因为该方法比较简单就去使用它。如果我们只想对这些用户选中的范围进行操作的话,通常有其他更好的选择。避免调用Select方法不仅能够使得我们的代码运行的更快,而且也能让用户更高兴使用我们的产品。
下面的代码用来清除用户当前单元格中的内容。
// clear select content
this.Application.ActiveCell.CurrentRegion.Select();
((Excel.Range)this.Application.Selection).ClearContents();
上面的代码会使得用户当前的选择区域丢失。如果之前只有一个单元格被选中,那么在运行上面的代码之后,整个连续的单元格都回被选中了。除非我们的目的就是这样,要选择整个Range返回内的单元格,一个更好的方法可能是:
this.Application.ActiveCell.CurrentRegion.ClearContents();
之前的代码通常是使用宏录制获得的,一般情况下,宏录制其会录制好用户的选择,然后对用户的选择进行修改。当我们对单个单元格或者多个单元格进行操作的时候,一般应该使用Range对象来表示我们操作的对象,而不是通过修改选中的对象来进行操作。如果确实需要修改用户的选择对象,可以使用Range.Select 方法。
在代码中引用Range对象
在开发中,Range对象的使用范围非常广泛和灵活。有时候Range对象表示单个的对象,有时候也表示一个集合。即使一个Range对象只表示一个对象,它也有Item和Count属性,所以我们要注意在有些情况下该如何更好地使用Range对象。
Excel.Worksheet ws = (Excel.Worksheet)this.Application.Worksheets[1];
Excel.Range  rng1, rng2;
rng1 = this.Application.ActiveCell;
rng = ws.get_Range("A1", Type.Missing);
rng = ws.get_Range("A1:B12", Type.Missing);
rng = (Excel.Range)ws.Cells[1, 1];
rng = ws.get_Range("A1", "C5");
rng = ws.get_Range("A1", "C5").Cells;
rng = ws.get_Range("A1", "C5").Rows;
rng = ws.get_Range("A1", "C5").Columns;
rng = this.Application.get_Range("SomeRangeName", Type.Missing);
rng = (Excel.Range)ws.Rows[1, Type.Missing];
rng = (Excel.Range)ws.Rows["1:3", Type.Missing];
rng = (Excel.Range)ws.Columns[3, Type.Missing];
// C#
rng = this.Application.get_Range("A1:D4, F2:G5", Type.Missing);
// You can also use the Application object's Union
// method to retrieve the intersection of two ranges, but this
// is far more effort in C#:
rng1 = this.Application.get_Range("A1", "D4");
rng2 = this.Application.get_Range("F2", "G5");
// Note that the Union method requires you to supply thirty
// parameters:
rng = this.Application.Union(rng1, rng2,
    Type.Missing, Type.Missing, Type.Missing, Type.Missing,
    Type.Missing, Type.Missing, Type.Missing, Type.Missing,
    Type.Missing, Type.Missing, Type.Missing, Type.Missing,
    Type.Missing, Type.Missing, Type.Missing, Type.Missing,
    Type.Missing, Type.Missing, Type.Missing, Type.Missing,
    Type.Missing, Type.Missing, Type.Missing, Type.Missing,
    Type.Missing, Type.Missing, Type.Missing, Type.Missing);
rng = this.Application.get_Range("A1:D16 B2:F14", Type.Missing);
// You can also use the Application object's Intersect
// method to retrieve the intersection of two ranges. Note
// that the Intersect method requires you to pass 30 parameters:
rng1 = this.Application.get_Range("A1", "D16");
rng2 = this.Application.get_Range("B2", "F14");
rng = this.Application.Intersect(rng1, rng2,
    Type.Missing, Type.Missing, Type.Missing, Type.Missing,
    Type.Missing, Type.Missing, Type.Missing, Type.Missing,
    Type.Missing, Type.Missing, Type.Missing, Type.Missing,
    Type.Missing, Type.Missing, Type.Missing, Type.Missing,
    Type.Missing, Type.Missing, Type.Missing, Type.Missing,
    Type.Missing, Type.Missing, Type.Missing, Type.Missing,
    Type.Missing, Type.Missing, Type.Missing, Type.Missing);
rng = (Excel.Range)ws.Cells[1, 1];
for (int i = 1; i <= 5; i++)
{
    rng.get_Offset(i, 0).Value2 = i.ToString();
}
Excel.Range rngLeft, rngRight, rngUp, rngDown;
rng = (Excel.Range)this.Application.Selection;
// Note that the Range.End property is parameterized, so
// C# developers cannot retrieve it. You must call the
// get_End method, instead:
// E3
rngRight = rng.get_End(Excel.XlDirection.xlToRight);
// A3
rngLeft = rng.get_End(Excel.XlDirection.xlToLeft);
// C1
rngUp = rng.get_End(Excel.XlDirection.xlUp);
// C5
rngDown = rng.get_End(Excel.XlDirection.xlDown);
操作Range对象
获得了Range对象之后,我们就可以对Range对象进行各种操作了。
private void AutoFill()
{
    Excel.Range rng = this.Application.get_Range("B1", Type.Missing);
    rng.AutoFill(this.Application.get_Range("B1:B5", Type.Missing),
        Excel.XlAutoFillType.xlFillDays);

    rng = this.Application.get_Range("C1", Type.Missing);
    rng.AutoFill(this.Application.get_Range("C1:C5", Type.Missing),
        Excel.XlAutoFillType.xlFillMonths);

    rng = this.Application.get_Range("D1", Type.Missing);
    rng.AutoFill(this.Application.get_Range("D1:D5", Type.Missing),
        Excel.XlAutoFillType.xlFillYears);

    rng = this.Application.get_Range("E1:E2", Type.Missing);
    rng.AutoFill(this.Application.get_Range("E1:E5", Type.Missing),
        Excel.XlAutoFillType.xlFillSeries);
}
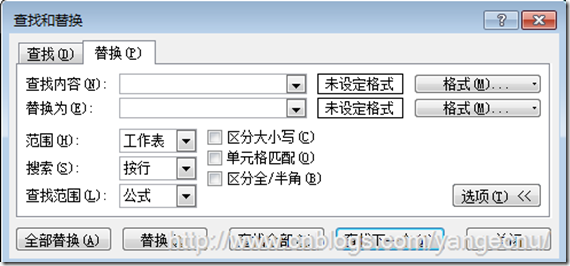
Find方法有很多个参数,下面的代码演示了如何使用Find方法:
private void DemoFind()
{
    Excel.Range rng = this.Application.
        get_Range("Fruits", Type.Missing);
    Excel.Range rngFound;

    // Keep track of the first range you find.
    Excel.Range rngFoundFirst = null;

    // You should specify all these parameters
    // every time you call this method, since they
    // can be overriden in the user interface.
    rngFound = rng.Find("apples", Type.Missing,
        Excel.XlFindLookIn.xlValues, Excel.XlLookAt.xlPart,
        Excel.XlSearchOrder.xlByRows, Excel.XlSearchDirection.xlNext,
        false, Type.Missing, Type.Missing);
    while (rngFound != null)
    {
        if (rngFoundFirst == null)
        {
            rngFoundFirst = rngFound;
        }
        else if (GetAddress(rngFound) == GetAddress(rngFoundFirst))
        {
            break;
        }
        rngFound.Font.Color = ColorTranslator.ToOle(Color.Red);
        rngFound.Font.Bold = true;
        rngFound = rng.FindNext(rngFound);
    }
}
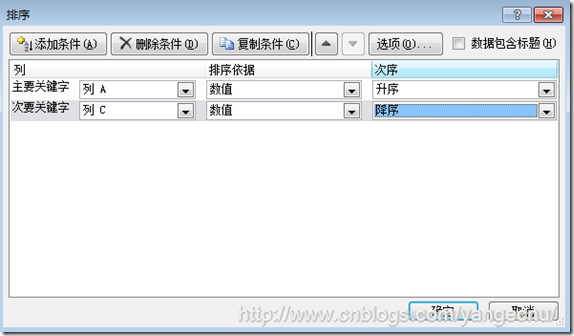
下面的代码演示了自定义排序:
private void DemoSort()
{
    Excel.Range rng = this.Application.
        get_Range("Fruits", Type.Missing);

    rng.Sort(rng.Columns[1, Type.Missing],
        Excel.XlSortOrder.xlAscending,
        rng.Columns[2, Type.Missing], Type.Missing,
        Excel.XlSortOrder.xlAscending,
        Type.Missing, Excel.XlSortOrder.xlAscending,
        Excel.XlYesNoGuess.xlNo, Type.Missing, Type.Missing,
        Excel.XlSortOrientation.xlSortColumns,
        Excel.XlSortMethod.xlPinYin,
        Excel.XlSortDataOption.xlSortNormal,
        Excel.XlSortDataOption.xlSortNormal,
        Excel.XlSortDataOption.xlSortNormal);
}
要进行Excel开发,绕不开对Excel中对象模型的理解, 本文简要介绍了Excel中的对象模型,介绍了这些对象中比较重要的几个对象,Application,Workbook,Worksheet,Range对象,这些对象不论在何种Excel开发方式中,只要需要对Excel进行交互,都会使用的到,本文介绍了这四个对象中的一些常用的属性,方法及事件。他们之间有很多对象都有相同的属性方法或者事件,这篇文章主要是想让大家对Excel对象模型有一个简单的认识,具体全部的对象模型,大家可以直接到MSDN或者Google上面去查找,下一篇文章将会介绍Excel中比较核心的功能:自定义函数。
希望本文对大家理解Excel对象模型有所帮助。