这篇说一下如何构造魔方,主要包括魔方几何体的构造及纹理贴图。以下论述皆以三阶魔方为例,三阶魔方共有3 x 3 x 3 = 27个小立方体。
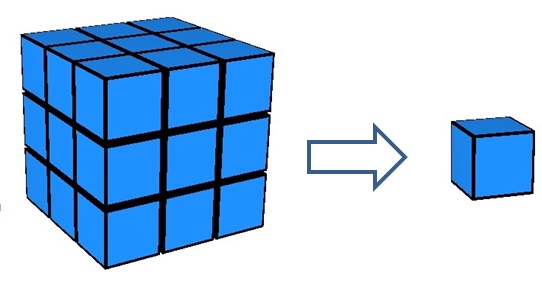
在第一篇里面说过,最初模型用的是微软的.x文件格式,由于魔方要实现按层旋转,所以不能将整个模型做成一个.x文件,只能分成若干个小立方体,每个立方体对应一个.x文件。这导致在发布程序的时候也要发布这些模型文件,而且.x文件已经逐渐为微软遗弃,所以就干脆不用了,自己画吧。魔方由27个小立方体构成,所以只要绘制一个小立方体,并复制27分,再将这个27个小立方体按一定顺序堆叠在一起,最后贴上纹理,就可以构成一个完整的魔方了。
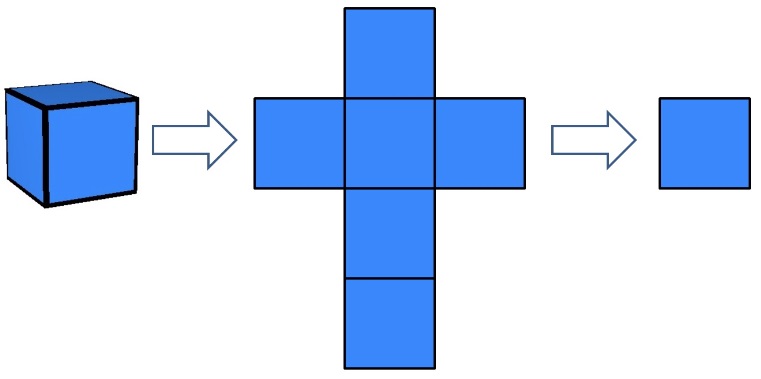
一个小立方体包含六个面,由于每个面的纹理可能不同,所以需要逐个面绘制,这样可以方便的为每个面单独设置纹理。
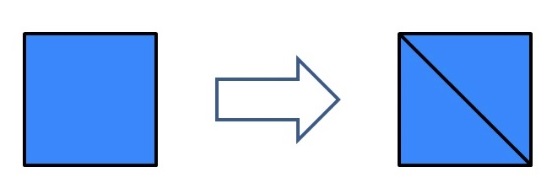
一个面由两个三角形构成,这里采用TriangleStrip的方式进行绘制,只需要指定四个顶点即可,如果是TriangleList,则需要六个顶点。
下面来分析一下顶点的数据结构,首先要有一个位置坐标(位置是一个顶点必须要包含的信息),其次,为了添加光照效果,还需要一个法向量。最后,为了实现纹理贴图,需要有纹理坐标。所以一个完整的顶点有以下三部分构成:
用一个结构体来表示顶点,如下:
struct Vertex
{
    float  x,  y,  z; // position
    float nx, ny, nz; // normal
    float  u,  v;     // texture
};
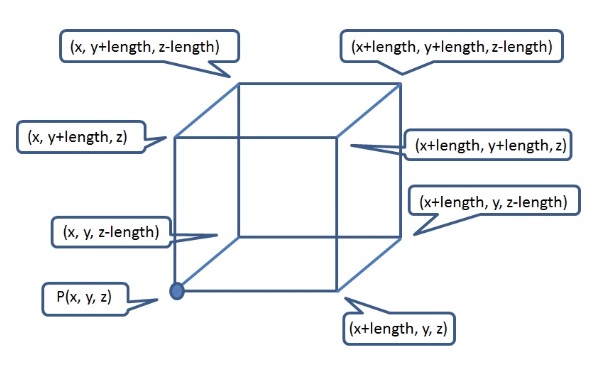
对于任意一个立方体,它的边长是固定的,所以只要给定立方体8个顶点中任意一个,就可以推算出其他的顶点坐标,这里使用立方体的左下角顶点来计算其他顶点。假设左下角顶点坐标为P(x,y,z),正方形边长为length,那么有如下关系成立。
顶点数组按面定义,顺序如下:
在定义任意一个面的四个顶点时,从左下角点开始按顺时针方向至右下角点结束,如下:
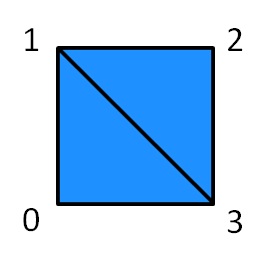
代码如下,解释一下第一行,其他行类似。
// Vertex buffer data
Vertex vertices[] =
{
    // Front face
    {          x,           y,           z,  0.0f,  0.0f, -1.0f, 0.0f, 0.0f}, // 0
    {          x, y + length_,           z,  0.0f,  0.0f, -1.0f, 1.0f, 0.0f}, // 1
    {x + length_, y + length_,           z,  0.0f,  0.0f, -1.0f, 1.0f, 1.0f}, // 2
    {x + length_,           y,           z,  0.0f,  0.0f, -1.0f, 0.0f, 1.0f}, // 3

    // Back face
    {x + length_,           y, z + length_,  0.0f,  0.0f,  1.0f, 0.0f, 0.0f}, // 4
    {x + length_, y + length_, z + length_,  0.0f,  0.0f,  1.0f, 1.0f, 0.0f}, // 5
    {          x, y + length_, z + length_,  0.0f,  0.0f,  1.0f, 1.0f, 1.0f}, // 6
    {          x,           y, z + length_,  0.0f,  0.0f,  1.0f, 0.0f, 1.0f}, // 7

    // Left face
    {          x,           y, z + length_, -1.0f,  0.0f,  0.0f, 0.0f, 0.0f}, // 8
    {          x, y + length_, z + length_, -1.0f,  0.0f,  0.0f, 1.0f, 0.0f}, // 9
    {          x, y + length_,           z, -1.0f,  0.0f,  0.0f, 1.0f, 1.0f}, // 10
    {          x,           y,           z, -1.0f,  0.0f,  0.0f, 0.0f, 1.0f}, // 11

    // Right face
    {x + length_,           y,           z,  1.0f,  0.0f,  0.0f, 0.0f, 0.0f}, // 12
    {x + length_, y + length_,           z,  1.0f,  0.0f,  0.0f, 1.0f, 0.0f}, // 13
    {x + length_, y + length_, z + length_,  1.0f,  0.0f,  0.0f, 1.0f, 1.0f}, // 14
    {x + length_,           y, z + length_,  1.0f,  0.0f,  0.0f, 0.0f, 1.0f}, // 15

    // Top face
    {          x, y + length_,           z,  0.0f,  1.0f,  0.0f, 0.0f, 0.0f}, // 16
    {          x, y + length_, z + length_,  0.0f,  1.0f,  0.0f, 1.0f, 0.0f}, // 17
    {x + length_, y + length_, z + length_,  0.0f,  1.0f,  0.0f, 1.0f, 1.0f}, // 18
    {x + length_, y + length_,           z,  0.0f,  1.0f,  0.0f, 0.0f, 1.0f}, // 19

    // Bottom face
    {x + length_,           y,           z,  0.0f, -1.0f,  0.0f, 0.0f, 0.0f}, // 20
    {x + length_,           y, z + length_,  0.0f, -1.0f,  0.0f, 1.0f, 0.0f}, // 21
    {          x,           y, z + length_,  0.0f, -1.0f,  0.0f, 1.0f, 1.0f}, // 22
    {          x,           y,           z,  0.0f, -1.0f,  0.0f, 0.0f, 1.0f}, // 23
};
层的编号主要用来确定旋转那一层,层的编号依如下顺序进行。
实际上编号都是由各个坐标轴的负方向到正方向依次递增,因为DirectX使用左手系,所以Z轴垂直屏幕向内为正,这与OpenGL正好相反,如果是OpenGL的话,需要将678层颠倒一下。

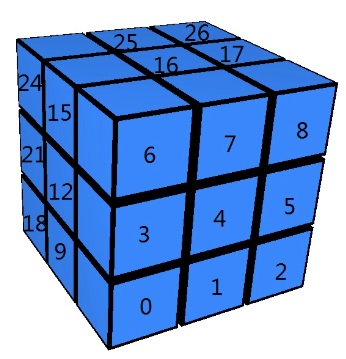
小立方体编号是初始化小立方体数组时的顺序,在本程序中不以立方体编号来确定哪些立方体要旋转,因为这样比较麻烦,在旋转之后需要更新编号,而且扩展性不好。小立方体编号按上图中6,7,8号层依次进行。顺序从左到右,从下到上,如下图所示(注意,这里只标出了能看见的立方体,看不见的可以按顺序计算出来)
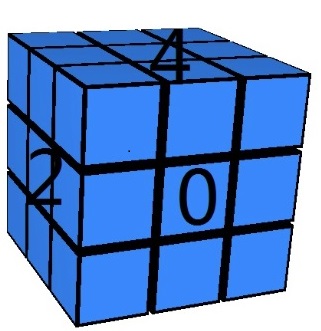
给面编号的原因是,当鼠标点击魔方时,需要确定当前拾取的是哪个面,确定了面以后,再根据鼠标的位置来确定旋转那一层,后续的篇章有详细介绍。面的编号按如下规则。下图中只有三个面可见,看不见的面可以推算出来。
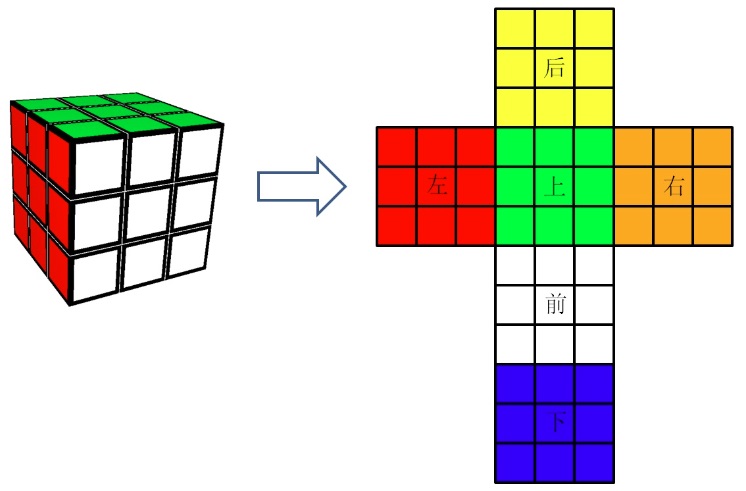
纹理布局如下:前白,后黄,左红,右橙,上绿,下蓝。
最初纹理是从图片生成的,后来发现魔方的颜色都是简单颜色,可以省去加载图片的步骤,直接在内存中创建纹理即可。函数CreateTexture有三个参数,分别是纹理宽度,高度及颜色,该函数内部调用D3DXCreateTexture来创建纹理。纹理创建好以后,调用Lock函数锁定之,然后使用memcpy进行颜色填充。
LPDIRECT3DTEXTURE9 D3D9::CreateTexture(int texWidth, int texHeight, D3DCOLOR color)
{
    LPDIRECT3DTEXTURE9 pTexture;

    HRESULT hr = D3DXCreateTexture(d3ddevice_,
        texWidth,
        texHeight,
        0,
        0,
        D3DFMT_A8R8G8B8,  // 4 bytes for a pixel
        D3DPOOL_MANAGED,
        &pTexture);

    if (FAILED(hr))
    {
        MessageBox(NULL, L"Create texture failed", L"Error", 0);
    }

    // Lock the texture and fill in color
    D3DLOCKED_RECT lockedRect;
    hr = pTexture->LockRect(0, &lockedRect, NULL, 0);
    if (FAILED(hr))
    {
        MessageBox(NULL, L"Lock texture failed!", L"Error", 0);
    }

    DWORD sideColor = 0xff000000; // the side line color

    int side_width = 10;

    // Calculate number of rows in the locked Rect
    int rowCount = (texWidth * texHeight * 4 ) / lockedRect.Pitch;

    for (int i = 0; i < texWidth; ++i)
    {
        for (int j = 0; j < texHeight; ++j)
        {
            int index = i * rowCount + j;

            int* pData = (int*)lockedRect.pBits;

            if (i <= side_width || i >= texWidth - side_width
                || j <= side_width || j >= texHeight - side_width)
            {
                memcpy(&pData[index], &sideColor, 4);
            }
            else
            {
                memcpy(&pData[index], &color, 4);
            }
        }
    }

    pTexture->UnlockRect(0);

    return pTexture;
}
调用上面的函数依次创建6个面的颜色纹理及魔方内部的纹理(旋转时可见,白色)。
void RubikCube::InitTextures()
{
    DWORD colors[] =
    {
        0xffffffff, // White,   front face
        0xffffff00, // Yellow,    back face
        0xffff0000, // Red,        left face
        0xffffa500,    // Orange,    right face
        0xff00ff00, // Green,    top face
        0xff0000ff, // Blue,    bottom face
    };

    // Create face textures
    for(int i = 0; i < kNumFaces; ++i)
    {
        face_textures_[i] = d3d9->CreateTexture(texture_width_, texture_height_, colors[i]);
    }

    // Create inner texture
    inner_textures_ = d3d9->CreateInnerTexture(texture_width_, texture_height_, 0xffffffff);

    Cube::SetFaceTexture(face_textures_, kNumFaces);
    Cube::SetInnerTexture(inner_textures_);
}
在RubikCube类里面依次初始化所有的小立方体。
void RubikCube::InitCubes()
{// Get unit cube length and gaps between layers
    float length = cubes[0].GetLength();
    float cube_length = cubes[0].GetLength();
    float gap = gap_between_layers_;

    // Calculate half face length
    float half_face_length = face_length_ / 2;

    for (int i = 0; i < kNumLayers; ++i)
    {
        for (int j = 0; j < kNumLayers; ++j)
        {
            for (int k = 0; k < kNumLayers; ++k)
            {
                // calculate the front-bottom-left corner coodinates for current cube
                // The Rubik Cube's center was the coordinate center, but the calculation assume the front-bottom-left corner
                // of the Rubik Cube was in the coodinates center, so move half_face_length for each coordinates component.
                float x = i * (cube_length + gap) - half_face_length;
                float y = j * (cube_length + gap) - half_face_length;
                float z = k * (cube_length + gap) - half_face_length;

                // calculate the unit cube index in inti_pos
                int n = i + (j * kNumLayers) + (k * kNumLayers * kNumLayers);

                // Initiliaze cube n
                cubes[n].Init(D3DXVECTOR3(x, y, z));
            }
        }
    }
}
绘制一个小立方体,pIB是一个index buffer数组,共有六个元素,每个元素代表一个面的index buffer。常量kNumFaces_=6。在绘制每个面的时候要先设置这个面的纹理。
void Cube::Draw()
{
    // Setup world matrix for current cube
    d3d_device_->SetTransform(D3DTS_WORLD, &world_matrix_) ;

    // Draw cube by draw every face of the cube
    for(int i = 0; i < kNumFaces_; ++i)
    {
        if(textureId[i] >= 0)
        {
            d3d_device_->SetTexture(0, pTextures[textureId[i]]);
        }
        else
        {
            d3d_device_->SetTexture(0, inner_texture_);
        }

        d3d_device_->SetStreamSource(0, vertex_buffer_, 0, sizeof(Vertex));
        d3d_device_->SetIndices(pIB[i]) ;
        d3d_device_->SetFVF(VERTEX_FVF);

        d3d_device_->DrawIndexedPrimitive(D3DPT_TRIANGLESTRIP, 0, 0, 24, 0, 2);
    }
}
绘制整个魔方,kNumCubes是一个魔方中小立方体的总数,对于三阶魔方来说是3 x 3 x 3 = 27。
//draw all unit cubes to build the Rubik cube
for(int i = 0; i < kNumCubes; i++)
{
    cubes[i].Draw();
}
RubikCube
上次发布的时候有一个严重的bug,在旋转的时候会出现丢失某一层的情况,现已修复,欢迎各位继续捉虫。
Haypp coding!