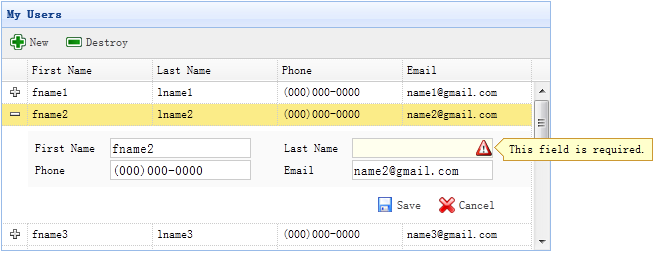
在easyui中,DataGrid可以通过detailview实现行的展开和收缩,利用这个特性可以实现基本的CRUD操作。
?
?
展开行时,动态加载表单并装载数据,保存或取消表单操作时再收缩行。
首先建立表格基本框架:
<table id="dg" title="My Users" style="width:550px;height:250px" url="get_users.php" toolbar="#toolbar" fitcolumns="true" singleselect="true">
    <thead>
        <tr>
            <th field="firstname" width="50">First Name</th>
            <th field="lastname" width="50">Last Name</th>
            <th field="phone" width="50">Phone</th>
            <th field="email" width="50">Email</th>
        </tr>
    </thead>
</table>
<div id="toolbar">
    <a href="#" class="easyui-linkbutton" iconcls="icon-add" plain="true" onclick="newItem()">New</a>
    <a href="#" class="easyui-linkbutton" iconcls="icon-remove" plain="true" onclick="destroyItem()">Destroy</a>
</div>
上面这段代码把DataGrid和工具栏都建好了,不用再编写JS代码。
?
接着,应用detailview并加载表单数据:
$('#dg').datagrid({
    view: detailview,
    detailFormatter:function(index,row){
        return '<div class="ddv"></div>';
    },
    onExpandRow: function(index,row){
        var ddv = $(this).datagrid('getRowDetail',index).find('div.ddv');
        ddv.panel({
            border:false,
            cache:true,
            href:'show_form.php?index='+index,
            onLoad:function(){
                $('#dg').datagrid('fixDetailRowHeight',index);
                $('#dg').datagrid('selectRow',index);
                $('#dg').datagrid('getRowDetail',index).find('form').form('load',row);
            }
        });
        $('#dg').datagrid('fixDetailRowHeight',index);
    }
});
表单的定义如下:
    <form method="post">
        <table class="dv-table" style="width:100%;background:#fafafa;padding:5px;margin-top:5px;">
            <tbody><tr>
                <td>First Name</td>
                <td><input name="firstname" class="easyui-validatebox" required="true"></td>
                <td>Last Name</td>
                <td><input name="lastname" class="easyui-validatebox" required="true"></td>
            </tr>
            <tr>
                <td>Phone</td>
                <td><input name="phone"></td>
                <td>Email</td>
                <td><input name="email" class="easyui-validatebox" validtype="email"></td>
            </tr>
        </tbody></table>
        <div style="padding:5px 0;text-align:right;padding-right:30px">
            <a href="#" class="easyui-linkbutton" iconcls="icon-save" plain="true" onclick="saveItem(<?php echo $_REQUEST['index'];?>)">Save</a>
            <a href="#" class="easyui-linkbutton" iconcls="icon-cancel" plain="true" onclick="cancelItem(<?php echo $_REQUEST['index'];?>)">Cancel</a>
        </div>
    </form>
保存表单的代码如下:
    function saveItem(index){
        var row = $('#dg').datagrid('getRows')[index];
        var url = row.isNewRecord ? 'save_user.php' : 'update_user.php?id='+row.id;
        $('#dg').datagrid('getRowDetail',index).find('form').form('submit',{
            url: url,
            onSubmit: function(){
                return $(this).form('validate');
            },
            success: function(data){
                data = eval('('+data+')');
                data.isNewRecord = false;
                $('#dg').datagrid('collapseRow',index);
                $('#dg').datagrid('updateRow',{
                    index: index,
                    row: data
                });
            }
        });
    }
?
详细的说明及演示可以参考:http://www.jeasyui.com/tutorial/app/crud3.php