在开始之前,我们需要创建一个DrawRectView
其初始代码为
//
//  DrawRectView.h
//  CGContextSetShouldAntialias
//
//  Created by YouXianMing on 2017/8/30.
//  Copyright ? 2017年 TechCode. All rights reserved.
//

#import <UIKit/UIKit.h>

@interface DrawRectView : UIView

@end
//
//  DrawRectView.m
//  CGContextSetShouldAntialias
//
//  Created by YouXianMing on 2017/8/30.
//  Copyright ? 2017年 TechCode. All rights reserved.
//

#import "DrawRectView.h"

@implementation DrawRectView

- (instancetype)initWithFrame:(CGRect)frame {

    if (self = [super initWithFrame:frame]) {

        self.backgroundColor   = [UIColor clearColor];
        self.layer.borderWidth = 0.5f;
        self.layer.borderColor = [UIColor redColor].CGColor;
    }

    return self;
}

@end
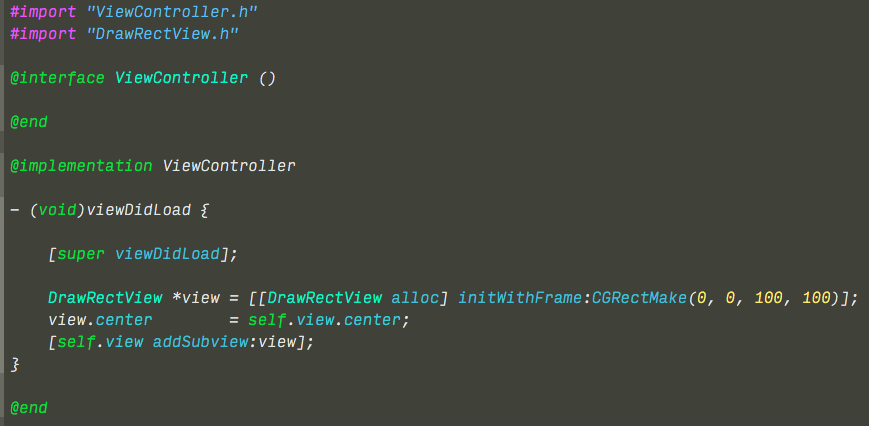
在ViewController中使用(尺寸为100x100并居中)
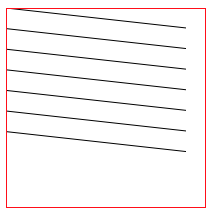
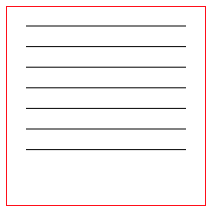
显示效果如下(用红色边框显示边界)

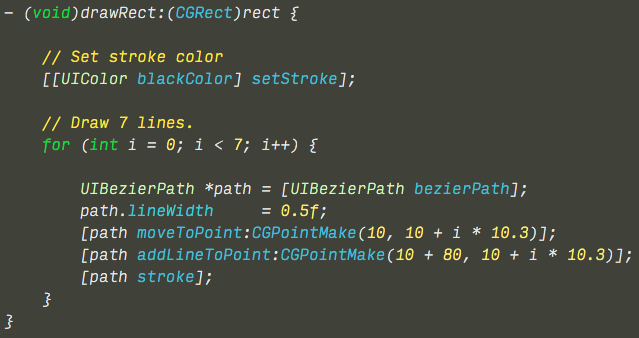
修改DrawRectView.m代码如下
//
//  DrawRectView.m
//  CGContextSetShouldAntialias
//
//  Created by YouXianMing on 2017/8/30.
//  Copyright ? 2017年 TechCode. All rights reserved.
//

#import "DrawRectView.h"

@implementation DrawRectView

- (instancetype)initWithFrame:(CGRect)frame {

    if (self = [super initWithFrame:frame]) {

        self.backgroundColor   = [UIColor clearColor];
        self.layer.borderWidth = 0.5f;
        self.layer.borderColor = [UIColor redColor].CGColor;
    }

    return self;
}

- (void)drawRect:(CGRect)rect {

    // Set stroke color
    [[UIColor blackColor] setStroke];

    // Draw 7 lines.
    for (int i = 0; i < 7; i++) {

        UIBezierPath *path = [UIBezierPath bezierPath];
        path.lineWidth     = 0.5f;
        [path moveToPoint:CGPointMake(10, 10 + i * 10.3)];
        [path addLineToPoint:CGPointMake(10 + 80, 10 + i * 10.3)];
        [path stroke];
    }
}

@end
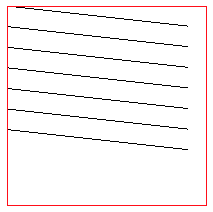
其实就添加了下面的绘图代码而已,绘制7条线条,每条线条的宽度为0.5
效果如下
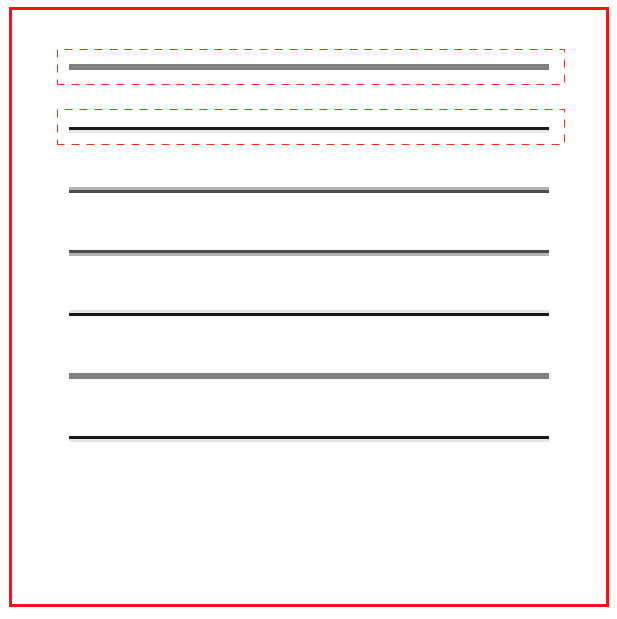
将图片放大后会发现,线条的宽度并不一致,有的颜色深,有的颜色浅,这就是开了抗锯齿之后的效果
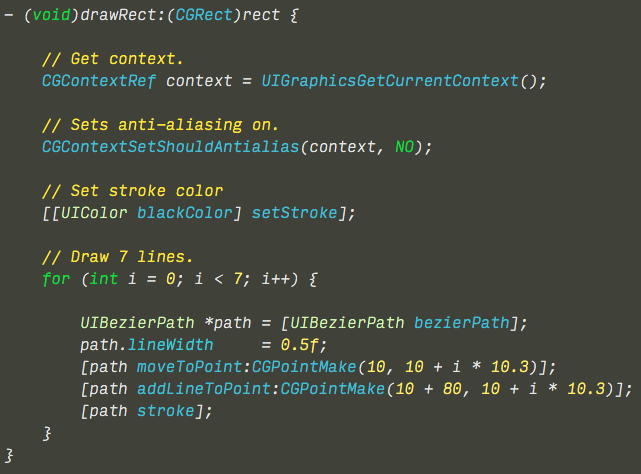
修改代码关闭抗锯齿
//
//  DrawRectView.m
//  CGContextSetShouldAntialias
//
//  Created by YouXianMing on 2017/8/30.
//  Copyright ? 2017年 TechCode. All rights reserved.
//

#import "DrawRectView.h"

@implementation DrawRectView

- (instancetype)initWithFrame:(CGRect)frame {

    if (self = [super initWithFrame:frame]) {

        self.backgroundColor   = [UIColor clearColor];
        self.layer.borderWidth = 0.5f;
        self.layer.borderColor = [UIColor redColor].CGColor;
    }

    return self;
}

- (void)drawRect:(CGRect)rect {

    // Get context.
    CGContextRef context = UIGraphicsGetCurrentContext();

    // Sets anti-aliasing on.
    CGContextSetShouldAntialias(context, NO);

    // Set stroke color
    [[UIColor blackColor] setStroke];

    // Draw 7 lines.
    for (int i = 0; i < 7; i++) {

        UIBezierPath *path = [UIBezierPath bezierPath];
        path.lineWidth     = 0.5f;
        [path moveToPoint:CGPointMake(10, 10 + i * 10.3)];
        [path addLineToPoint:CGPointMake(10 + 80, 10 + i * 10.3)];
        [path stroke];
    }
}

@end
显示效果
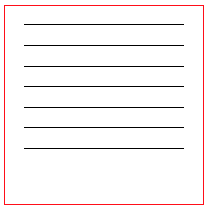
图片放大后,线条宽度一致

结论
开了抗锯齿后,系统会对绘制的线条进行一定的模糊处理,来达到不容易看到狗牙的目的,什么是狗牙?你可以运行以下代码来看看两者之间的区别
//
//  DrawRectView.m
//  CGContextSetShouldAntialias
//
//  Created by YouXianMing on 2017/8/30.
//  Copyright ? 2017年 TechCode. All rights reserved.
//

#import "DrawRectView.h"

@implementation DrawRectView

- (instancetype)initWithFrame:(CGRect)frame {

    if (self = [super initWithFrame:frame]) {

        self.backgroundColor   = [UIColor clearColor];
        self.layer.borderWidth = 0.5f;
        self.layer.borderColor = [UIColor redColor].CGColor;
    }

    return self;
}

- (void)drawRect:(CGRect)rect {

    // Get context.
    CGContextRef context = UIGraphicsGetCurrentContext();

    // Sets anti-aliasing off.
    CGContextSetShouldAntialias(context, NO);

    // Set stroke color
    [[UIColor blackColor] setStroke];

    // Draw 7 lines.
    for (int i = 0; i < 7; i++) {

        UIBezierPath *path = [UIBezierPath bezierPath];
        path.lineWidth     = 0.5f;
        [path moveToPoint:CGPointMake(0, 0 + i * 10.3)];
        [path addLineToPoint:CGPointMake(10 + 80, 10 + i * 10.3)];
        [path stroke];
    }
}

@end
关闭抗锯齿后不会出现模糊现象,都会出现锯齿,俗称狗牙

打开抗锯齿功能之后线条会模糊,锯齿得到了一些缓解,称作抗锯齿